Out of Gamut: (Almost) Everything You Wanted to Know about Sharpening in Photoshop but Were Afraid to Ask

It’s a sad but undeniable fact of life: Whether you scan, shoot, or capture, the process of digitizing images introduces softness, and to get great-looking results, you’ll need to sharpen the great majority of digital images. This column is usually about color management, but for every screed that’s been written on tone and color correction or color management, there’s precious little about sharpening. This time around, I’ll outline some of my favorite sharpening techniques for Photoshop 5, 5.5, and 6.
The softness introduced during digitizing results from the very nature of the digitizing process. To represent images digitally, we must transform them from continuous gradations of tone and color to points on a regular sampling grid. Detail that’s finer than the sampling frequency gets “averaged” into the pixels, softening the overall appearance. For some types of output, particularly press halftones and inkjet or color laser dither patterns, further softness is introduced when the image pixels are converted to dots of ink or toner. As a result, just about every digital image requires sharpening, no matter what its source, to counteract the softness introduced both in the capture and output processes.
The good news is that the digital approach also provides a nice range of remedies for its slightly fuzzy thinking. My Photoshop favorites fall into three broad categories:
- Using the Unsharp Mask filter globally
- Sharpening on an adjustment layer
- Using the Unsharp Mask filter on a selection
Unsharp Mask
The oft-maligned Unsharp Mask filter is capable of producing excellent results, but to get them, you need to understand how it works, and a great many people don’t. The Unsharp Mask filter works by evaluating the contrast between adjacent pixels, and increasing that contrast when it’s relatively high. The idea is that a large contrast difference between adjacent pixels usually represents an edge. But the filter doesn’t really recognize edges, just pixel differences, so successful sharpening requires finding the settings that accentuate the edges in the image in a natural-looking way.
One important implication of this is that optimal settings for Unsharp Mask depend primarily on the image content, and secondarily on the resolution and the output process at which the image is aimed. Close subjects with soft detail need a very different treatment from distant subjects with lots of fine detail. Perceived sharpness is a function of local contrast.
Another key point is that judging sharpening from an image’s on-screen appearance is quite tricky. Here are some general guidelines that should help:
- Always evaluate sharpness by looking at the Actual Pixels (100%) view (known in older versions of Photoshop as 1:1). You can sometimes draw reasonable conclusions about sharpness from the 50% view, but all of Photoshop’s other zoomed-out views are heavily antialiased, so they don’t offer a particularly accurate impression of sharpness.
- For images destined for on-screen use, or for printing to true continuous-tone printers (dye-sublimation, LightJet 5000, Durst Lambda, film recorders), sharpen the image until it looks good on screen. For images destined for halftone (press) or dithered (inkjet) output, sharpen until the image looks slightly oversharpened on screen.
- Always sharpen the image at the final output resolution. If you resample the image (up or down) after sharpening, you’ll probably sample the sharpening halos out of existence, and you’ll need to sharpen the image again.
The key parameter in obtaining good results from Unsharp Mask is the Radius setting. The Radius needs to match the image content. It controls the width of the sharpening halo in a somewhat indirect way: Entering a Radius of 1 doesn’t produce a one-pixel halo; it just tells Photoshop to “look” one pixel outward as it evaluates each pixel for sharpening. That said, a large Radius setting produces a larger halo than a small Radius setting.
Next, set the Amount. Amount is the “volume control” for unsharp mask. It dictates the strength of the sharpening. A small Radius setting will need a higher Amount than a large Radius to produce the same degree of visual sharpness.
Last, set the Threshold. The Threshold control is basically a noise-reduction setting. It tells Photoshop to ignore a certain amount of difference between pixels when sharpening, and allows you to avoid oversharpening lightly textured areas such as skin tones.
How can you best balance the three settings? The procedure I recommend is to start with an Amount setting in the 200-to-300-percent range and a Threshold of zero, and work the Radius setting until it matches the image content. Then adjust the Amount setting until the desired degree of sharpening is obtained. Finally, if necessary, increase the Threshold to smooth out oversharpened areas of texture.
For Example
The best way to get a feel for the sharpening is to consider some examples.
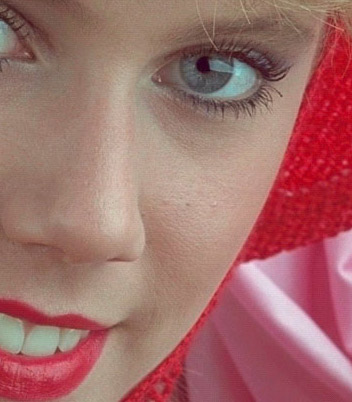
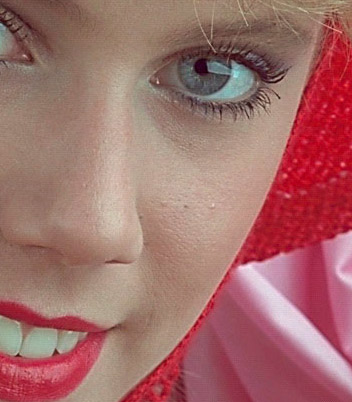
Figure 1a shows an unsharpened image, Figure 1b shows reasonable sharpening settings, and Figure 1c shows the resulting sharpened image. In this case, the subject is close, with soft detail. We want to avoid oversharpening the skin texture, so a fairly low Amount and large Radius are called for, with some thresholding to smooth out the skin tones.

Figure 1a: Unsharpened

Figure 1b: Reasonable sharpening settings for the image in Figure 1a

Figure 1c: Sharpened
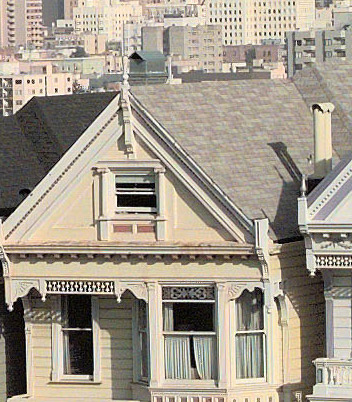
Compare this with the image shown in Figure 2a. Unlike Figure 1, it’s a “high-frequency” image with lots of fine detail, and it requires quite different sharpening. Figure 2b shows a reasonable set of sharpening settings that produce the result shown in Figure 2c. It requires a much smaller Radius, and hence a higher Amount. No thresholding was needed.

Figure 2a: Unsharpened

Figure 2b: Workable sharpening settings

Figure 2c: Sharpened
This article was last modified on January 3, 2023
This article was first published on January 25, 2001
Commenting is easier and faster when you're logged in!
Recommended for you

Top 5 Lightroom 5 Resources
It has been a week since Adobe announced the availability of the Lightroom 5 bet...

Aperture Bites the Dust
Apple recently stopped development of Aperture, the company’s professional...

Photoshop How-To: Aging Metal Textures
If, like me, you like the patina of aged, rusty metal, then this Photoshop trick...


