
Optimizing Your Workspace
Learn how to make the most of your screen real estate by building the best custom workspaces for your InDesign projects.

This article appears in Issue 136 of InDesign Magazine.
A workspace is the arrangement of your panels, such as Properties, Paragraph Styles, and Character Styles, that you can save and switch between using the Workspace Switcher at the top-right corner of the screen.
For example, you can switch from the default Essentials workspace (which does not contain the Control panel) to Essentials Classic (which does), or choose other workspaces such as Advanced, Book, and Digital Publishing. But the best part is that you can create and customize your own workspaces that reflect how you work, and which panels you need most often.
After all, panels that may seem obscure to one person could be mission critical to others who use them daily. For example, someone working with magazines for print production may not need panels for animations, buttons, and form fields that someone creating interactive documents might use throughout the day. So, which ones do you need? Many people prefer to arrange their most used panels in priority order, like a Top 10 list.
In this article, we’ll explore how to improve your productivity by building custom workspaces, as well as investigate some important user interface details you should understand if you want to be an InDesign power user.
Custom Workspaces
Creating a custom workspace is easy. Just close any panels you don’t want, open the panels you do want, and arrange those to your liking. Then choose Window > Workspace > New Workspace.
You could create a general- purpose workspace, but you’ll probably want workspaces for different document types, such as animations, forms, long documents with tables, cross- references, footnotes, an index, and so on. You might start with the default Digital Publishing workspace and adjust the Properties panel or Control panel as well as other appropriate panels.
class=”p2″>Later on if things start to get messy, you can clean up and restore the workspace you’re using back to its default settings by choosing Window > Workspace > Reset [Name of Workspace].
Workspaces are not tied to document preferences. Although the idea of opening a document and having InDesign automatically choose the right workspace for the content might sound cool, such a feature doesn’t exist. And it probably wouldn’t be practical when moving documents between users with different monitor sizes.
The Control Panel vs. the Properties Panel
If you are a longtime InDesign user like me, you probably use the Control panel more often than any other panel. I remember panicking back in 2018 when Adobe decided that the default Essentials workspace should not contain the Control panel and that the Properties panel was an appropriate replacement. (If you don’t see the Control panel, you can always find it by choosing Window > Control.)
Removing the Control panel was like removing the rearview mirror from my car or remodeling the kitchen and getting rid of the gas stove. The Properties panel is like a new multi-purpose appliance, but it doesn’t deliver everything expected as a replacement. I still prefer cooking with gas, even if the kitchen might look outdated to some folks. The Control panel may feel overwhelming to a new user, but it’s not a wall of shame that should be hidden. Mastering it should be a badge of honor!
If you compare what is available in the Control panel with the Properties panel, you will quickly realize there is quite a bit of redundancy (Adobe apparently has a Dept. of Redundancy Dept.) somewhat similar to seeing the same things in your rearview and side mirrors (Figure 1). In other words, if driving InDesign was like driving a car, the artwork area would be your windshield, the Control panel at the top of your screen would be your rearview mirror, the Tools panel on the left would be your driver’s side mirror (presuming you are driving in the U.S.) and the Properties panel on the right would be your passenger-side mirror. Just like you would not drive a new car without adjusting your mirrors first, you should carefully consider customizing your workspace panels. Figure 1 will take you on a deep dive into the key differences in what you can access in these panels.

Figure 1. The Control Panel vs. Properties Panel. The Properties panel offers options way beyond what you can access in the Control panel, but it’s missing some things you may use on a regular basis, and it can’t be customized like the Control panel. The screenshots below illustrate the specific differences between the two panels. Anything not highlighted is readily available in both the Control panel and the Properties panel. Highlighted areas are not always available in the Properties panel (you may need to click a More Options ellipsis button and scroll to see them). Red rectangles indicate features not available anywhere in the Properties panel. Green rectangles indicate features accessible with the More Options buttons. Option/Alt-clicking certain Control panel areas indicated by blue rectangles, allows access to additional options (see this article for details).
Eliminating the Control panel from the default Essentials workspace in 2018 sparked a big debate among InDesign users. Can the Control panel really be replaced by the Properties panel? In other words, what would you not be able to access with a single click? Some said the Control panel was too confusing and argued the Properties panel was best for beginners, but others said the Properties panel was too big!
You can hover over the icons in the Control panel with your pointer to see tooltips indicating their purpose. The Properties panel provides access to many more features of InDesign than the Control panel, but neither one can access everything. Of course, you don’t have to choose one or the other; you can have both the Control and Properties panel open at the same time.
Document and Screen Considerations
Depending on your document designs, you might choose to optimize your workspace for portrait (vertical) versus landscape (horizontal) designs. For example, if you are creating a really wide six-panel fold-out brochure, you would want more space available on the sides of the screen, so switching to the Essentials Classic workspace (without Properties) and using the Control panel might be better.
On the other hand, if you were designing a tall portrait poster, you would want more space available at the top of the screen, so you might consider closing the Control panel and putting the Properties panel on the side of the screen instead.
Of course, another important factor to consider is how much screen real estate do you have? Do you have more than one screen or perhaps a touch screen like a Microsoft Surface? Are you trying to cram everything into tiny 13-inch laptop screen, or are you stretching out across multiple big-screen monitors? In other words, form follows function (Figure 2). Consider where you have more available space and tailor your workspace accordingly with the Control panel paired with landscape designs and the Properties panel with portrait-oriented projects.
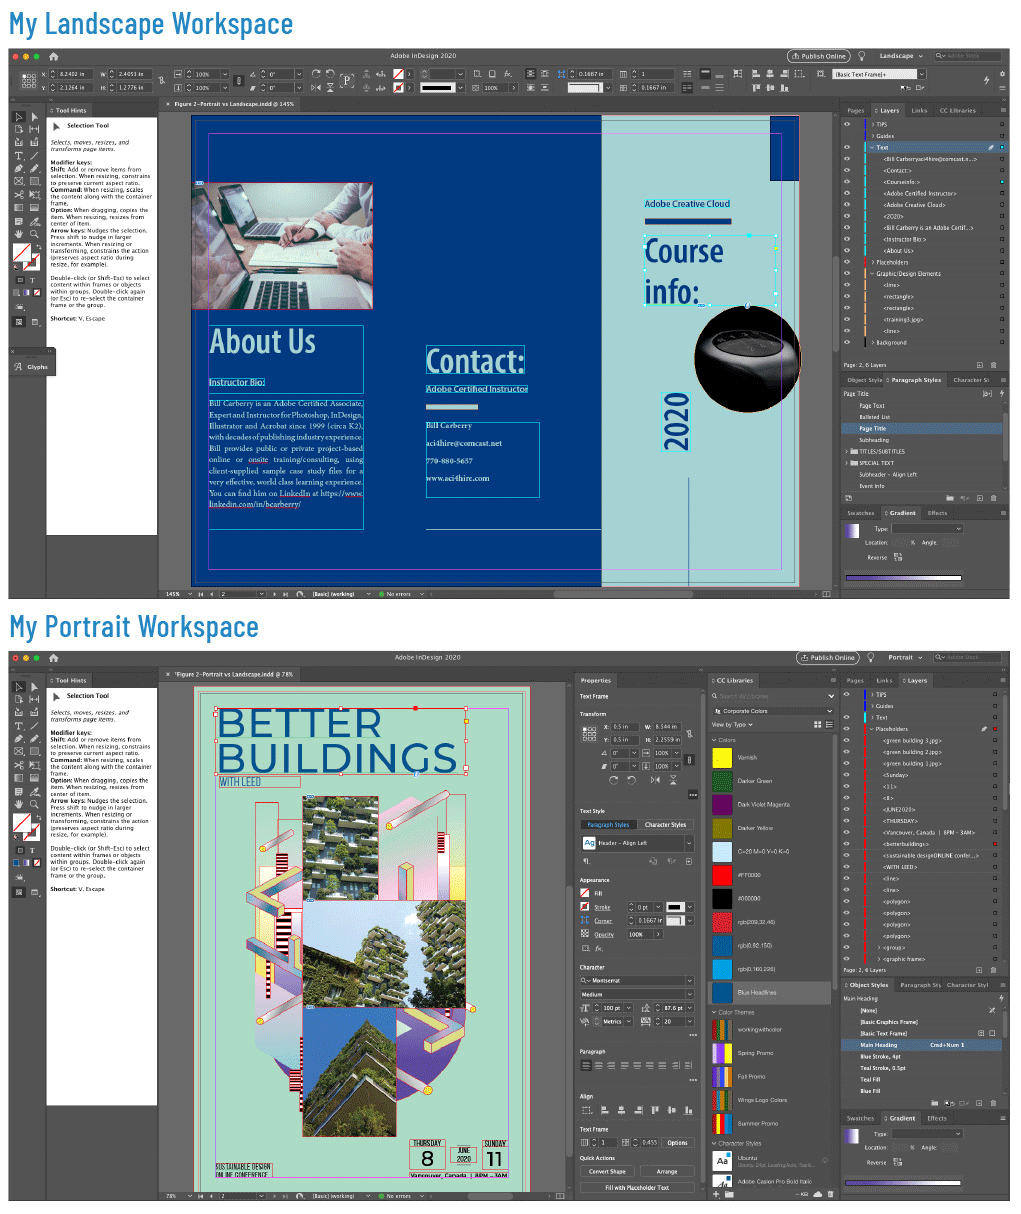
Figure 2. Form follows function: Consider using the Properties panel for portrait designs and the Control panel for landscape designs.
Another key consideration is to choose between the three possible panel views: icon only, icon with label, or full view, which I call “File Cabinet view,” because it resembles a file cabinet containing drawers with file folders. For example, in the top drawer, I typically put four file folders for the Pages, Layers, Links, and Libraries panels. In the separate drawer, I put the Paragraph Styles, Character Styles, and Object Styles panels. In the bottom drawer, I put my top three other panels for the project (Figure 3).

Figure 3. The three possible panel previews: icons only, icons with label, and the full “file cabinet” view (my favorite)
I find the two icon views cumbersome because I must click to show and hide the panels, which cover up the artwork area and other panels. Experience has taught me that covering the artwork area can be downright dangerous, because doing so blocks your view when editing styles or doing a find/change. On the other hand, the full view can be cumbersome on small screens or a distraction when you’re designing and brainstorming.
Workspace Tips
- I prefer to put the Tools panel in two-column mode to find tools twice as fast! Click the tiny arrows at the top to toggle.
- The Tool Hints panel (select Window > Utilities > Tool Hints) provides helpful guidance for using all tools, plus all the keyboard modifiers and shortcuts!
- I also put panels such as Glyphs below as buttons for easy access.
- I prefer the full “File Cabinet” view since everything I need to access is a single click away.
- You can probably fit two panels (drawers) across with three or four panels (file folders) in each cabinet for a Landscape design.
- You can probably fit four panels across, perhaps each in its own file cabinet, for a Portrait design on a big screen.
- It’s helpful to have the Properties and CC Libraries panels in their own file cabinet drawers to reduce scrolling to find things.
- While eliminating the Control panel gains precious real estate, you lose handy buttons like Quick Apply, but you can press Command/Ctrl+Return to conjure it up!
- Hiding the Rulers (Command/Ctrl+R) also gains some precious space.
- You can tap the Tab key to hide/show all panels or Shift+Tab to keep just the Control panel.
Additional Approaches and Survival Strategies
Here are some of my survival strategies and additional approaches to managing workspaces.
Tweak your menus. Consider using Edit > Menus for highlighting or hiding commands and panel menu options you know you will never need. You can then capture your customized menus by saving your workspace (Window > Workspace > New Workspace). Note that Dark or Light view modes are not captured in custom workspaces.
Browse for tips. Move your pointer over the icons in the Control panel and elsewhere, to see useful tooltips to discover their purpose.
Try Quick Apply. One of my most valuable and favorite features for InDesign, it’s kind of like having Google search within InDesign. Look for the button that looks like Harry Potter’s lightning bolt scar in the top-right corner of the Control panel (or press Command+Return/Ctrl+Enter). See this informative and amusing article by Mike Rankin on getting the most out of Quick Apply.
Collapse groups of panels in full “File Cabinet view” by double-clicking their names. You may need to double-click the names of some panels more than once to completely close up the “file cabinet drawer.”
Collapse individual panels. You can collapse and expand many panels by clicking the tiny up/down arrows next to their names, or double-clicking on the panel’s name. You may need to double-click more than once to fully expand some panels such as Stroke and Text Wrap, which work like three-way light switches. For example, the Strokes panel can appear as fully minimized, partially minimized (showing only the Stroke weight, which is pretty useless), or fully unfurled (showing all the features.
Try the Touch workspace. You can switch to the Touch workspace if you have a touchscreen device such as a Microsoft Surface Pro. See this article and this one along with the comments for further details.
Rotate for easier viewing. Although this doesn’t affect your workspace, you can rotate a spread view, so you can see sideways or upside-down text and graphics easier. Note that this feature is saved with your file, and your only clue it’s in effect is a rotated arrows icon that appears in the Pages panel alongside the page thumbnail (looks like a little recycle logo). See this article for further details.
Update as your needs change. There isn’t a Save Workspace command because InDesign is constantly keeping track of your panel arrangements, but you can update a workspace by creating a new one with the same name to overwrite the old one.
Make custom buttons. Some software and hardware gadgets, such as a Microsoft Surface Dial or a Wacom Tablet, can transcend navigating the workspace, enabling you to set up separate buttons to bring up whatever you want. For example, you could assign buttons to switch workspaces, show/hide any panels, or even run a script. In other words, it could become your custom InDesign remote control! (Editor’s note: See this month’s InDesigner for an example of how one user automates most of his workflow with scripts that he runs with the push of a button.)
Don’t ignore the panel menus. Panel menus (located in the top-right corner of most panels) contain many useful and cool commands, beyond the buttons at the bottom of the panels. If you fail to find them all, you’re missing about a third of the software, so keep checking!
Right-click. Of course, panels don’t contain everything you can do in InDesign, but many of the menu commands are just a right-click away. Adobe anticipates what many people are looking for, as long as you have the appropriate tool and/or selection. Remember this tip: When in doubt, right-click. Even if you don’t see what you want, you may discover something that will become really useful later on.
Top UI Tips & Tricks
Here are my top tips and tricks to get the most out of an InDesign workspace.
- Many panels, such as Styles, Swatches, and Pages, have Panel Options available from the panel menus (top-right corner of panels) that can reduce the size of thumbnails and rows to regain some precious screen space.
- Some panels, such as CC Libraries, Glyphs, Links, plus Buttons and Forms, tend to be too big and unruly; consider putting them on a separate screen if you have one. Buying a big-screen HDTV or Ultra HD 4k monitor might be your best investment, especially since sale prices have dropped down to the $200 range recently.
- Consider auto-hiding your macOS Dock or Windows Taskbar to gain horizontal height for big projects, especially on smaller screens.
- The tip of the pointer is the point of impact when dragging panels, not the sides of the panel(s). You will see a blue line appear to indicate how a panel (or group of panels) will be docked horizontally or vertically.
- Avoid covering panels with other panels! If you lose a panel, choose it from the Window menu to toggle it on and off until you notice it appear somewhere, which could be on a separate screen. The Book and Library (classic) panels are actually files that behave differently. Alternatively, you can reset the workspace to make everything visible again.
- For maximum efficiency, assign keyboard shortcuts to your favorite workspaces so you can switch between them with the flick of a finger. To do this, choose Edit > Keyboard Shortcuts. In the dialog box, choose the Product Area: Window menu and scroll down until you see your workspaces. Then select one, type in the shortcut you want to use, and click OK.
- InDesign keeps your custom workspaces in little XML files, so you can copy your workspaces from one machine to another, simply by putting copies of these files in the appropriate folders. On Windows, that’s C:Users[User Name]AppDataRoamingAdobeInDesignVersion [#]. On macOS, it’s /Users/[User Name]/Library/Preferences/Adobe InDesign/Version #. You can also keep copies of these files as backups of your custom workspaces and restore them in the appropriate folders if need be.
- The Links panel is extremely customizable, and it’s a great idea to tweak it to fit your needs. But you’ll lose any customization if you reset your workspace. To make your modifications a bit more “permanent” save them in a workspace. See this article for more details.
Dreaming of the Ultimate Workspace
Several years ago, Adobe asked the creative professional community, “What would a future version of Creative Cloud look like?” I responded by suggesting a feature to switch automatically from InDesign, Illustrator, Photoshop, and Acrobat, depending on the type of object selected. For example, when you select text, you would see all the tools and appropriate panels from the InDesign workspace. Selecting a photo would switch to the Photoshop workspace, and selecting an Illustration would switch to Illustrator. As of today, that’s still just a dream. But with the tips and tricks in this article, you can definitely find ways to make your time working in InDesign a more productive and fun experience.
Commenting is easier and faster when you're logged in!

Recommended for you

InDesign Magazine Issue 78: Tables and Charts
We’re happy to announce that InDesign Magazine Issue 78 (October, 2015) is now a...
Variable Fonts in InDesign
A concise Q&A guide to navigating InDesign 2020’s newest tool for type.

InDesign and Acrobat: PDF Partners
This article appeared in Issue 134 of InDesign Magazine. While the app...