
Indesign Basics: Numbering Pages
InDesign can number your pages, but a little bit of setup goes a long way, as Erica Gamet explains.


This article appears in Issue 106 of InDesign Magazine.
Page numbering is a basic navigation tool in most publications—so basic that we rarely even think about it. It’s practically hidden in plain sight! The process of working with page numbers in InDesign is mostly automated, which is as it should be. But when working with page numbers, you should allow for some planning and execution, to ensure you get all the right numbers in all the right locations, in every (possibly tricky) situation.
This article will help you make the right choices when you’re planning and executing. Along the way, as you work with page numbering, you might make use of sections, prefixes, layers, and text variables, ending up with something very elegant. But regardless of how you create it, or what it looks like, in the end, every page number has the same simple purpose: to smoothly guide the reader throughout the finished document.
Flexible Numbering
The beauty of automatic page numbering is that page numbers will update, even as you rearrange the pages. And since InDesign, unlike most other applications, doesn’t constrain your numbering to a simple header or footer area, we have the freedom to place our page numbers anywhere on the page. But manually drawing a text frame for each page number on each document page isn’t very practical. Instead, the best place to put page numbers so they work automatically is on a master page.
If you have several masters in your document, you’ll probably want to create a parent master page and put your page numbers on that page. All other (“child”) masters can be based on that parent page—which means any changes you make to the parent will be reflected in the child pages. (See Mike Rankin’s article on “10 Essential Long Document Techniques” in
href=”https://creativepro.com/issues/issue-65-long-documents”>issue # 65 for tips on master page strategies.)
Once you have a text frame on your master page, you’ll need to create a “stand-in” number. We make these by placing the text cursor in the text frame and then entering actual numbers—but we’re just using the numbers as a proxy in order to get our styling right. Apply any styling options, position them where you need them, and make sure that the text frame is big enough to avoid any overset text.
Once the styling is complete, we need to make the numbering happen automatically. Use the Type tool to select the text you’ve just styled, then head up to the Type menu, and work your way back down to the Insert Special Character submenu. Choose the Markers submenu, and then choose Current Page Number. This will replace your sample text with a special character. For instance, if your master page is named B-Master, then the page number text frame will display “B” (Figure 1).

Figure 1. Text frame with automatic page number
However, when you switch from the master page back to a document page, it’ll display the actual document page number.
Fun fact: If you move a text frame with a “current page number” character onto the pasteboard, it’ll display “PB” as its page number. It’s always keeping track.
ALWAYS SHOW PAGE NUMBERS
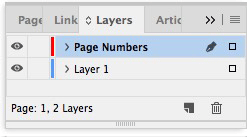
Sometimes your document page items will cover up your page numbers. This happens because master page items sit at the bottom of a document’s stacking order by default. But you can easily fix this by using layers. First, create a new layer (Layers panel menu > New Layer). In the Layers panel, move the new layer to the top of the layer stack.
Then move the text frame(s) containing your page numbers to sit on that top layer. No matter how cluttered your page gets, the page numbers will always be visible.
You can even put additional text in the page number text frames. For instance, if you want the page numbers to read, “Page 1,” “Page 2,” and so on, you would simply add “Page ” before the special “current page number” character.
What if you have a master with page numbers applied, but you’d rather not have numbers on that particular page? You could create a new master based on the current one, and then remove the page number from the child master. Or you could manually remove a page number from a document page. Either way, you’ll need to override the page number text frame; press Command/Ctrl+Shift, click the frame, and then delete it.
Page What of What?
There are times when you may want to add some content to page numbers; for example, to tell readers they’re currently on “Page X of Y.” To achieve that end, you can use the automatic page numbering along with a text variable. Using the methods above, set up your text frame to read, “Page A of ” to start with (where “A” is the Current Page Number special character and there is a space after “of”). (Figure 2) Now place your cursor where the final page count needs to be, and then, from the Type menu, choose Text Variables > Insert Variable > Last Page Number.
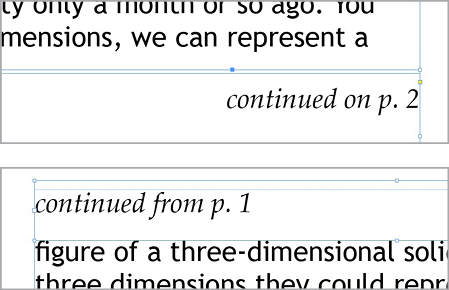
Figure 2. Text frame with automatic page number and text variable
Note that the last page number refers to the number of pages in the current document. If you’re using the book feature to create a publication from multiple InDesign documents, you can reference the last page of the whole book with a clever workaround, written up here.
Breaking a Story Across Pages
If you need to continue a story on another page, you can use automation to keep track of those pages. Start by creating a new text frame that will sit near the bottom of the first linked text frame of your story. In that new frame, put something like “Continued on Page ,” leaving a space at the end for the automatic page number. Insert the jump page information by choosing Type > Insert Special Character > Markers > Next Page Number. Important: Make sure that the new frame is touching the story’s text frame, so it knows which story it’s referring to.
If you need to add some breathing room between the text in each frame, you can adjust the baseline shift on the “continued” text, or increase the minimum value for the First Baseline Offset in the Text Frame Options dialog box.
On the top of the next frame in the text thread, do the reverse. Create a text frame above the threaded text, add “Continued from Page ,” and this time choose Type > Insert Special Character > Markers > Previous Page Number. Once again, make sure the two text frames are touching (Figure 3).
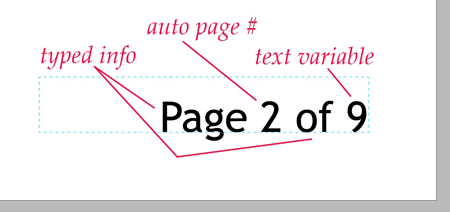
Figure 3. Top: Use a Next Page Number marker to indicate a story is continued. Bottom: Use Previous Page Number to
indicate where a story is continued from.
Creating and Numbering Sections
By default, InDesign assumes that document pages will be numbered consecutively from 1 onward. However, you can change the starting page number when you create a new document. In the New Document dialog box, enter a starting page number in the Start # field. Note that if you are working in a document with facing pages, an even-numbered start page will force your document to start on the left-hand side. You can force an even-numbered page to a right-hand page, and vice versa, by deselecting Allow Document Pages to Shuffle from the Pages panel menu and pulling the page’s icon to the opposite side of the spread layout (Figure 4).

Figure 4. Drag a facing page across the spine.
The Page Numbering and section options in the New Section dialog box control how automatic numbering kicks in and how that numbering is displayed. This is also the place to indicate where the numbering should start, as well as the place to add sections which can each have their own numbering sequence. You’ll need to make sure you are on the document page where you’d like to start a new section, and then enter the dialog box by choosing it from the Pages panel menu, the Layout menu, or by right-clicking the page’s thumbnail (Figure 5).

Figure 5. Options in the New Section dialog box
The Start Section option is turned on automatically, so your first task is to choose whether to have the numbering continue from the previous section or have the numbering start at a specific page. For instance, you might want each section’s numbering to restart from page 1. Next, indicate if your section should have a prefix (such as “Sec. 1:”). Below, you can choose whether or not to include that prefix along with the page numbering on the page. If you’re going to restart each section’s numbering, having a prefix makes it easier to visually identify pages in the Pages panel (even if you choose not to show the prefix).
The Style drop-down menu gives you the option of using Roman or Arabic numerals, letters, or digits with leading zeros. Along with numbering options, you can also indicate a section marker or name. In Figure 5, you might indicate the section marker as “Section 1.” You could then place a section marker on a master or document page (Type > Insert Special Character > Markers > Section Marker) to have that marker display on every page in that section.
Document Chapter Numbering applies when you’re using InDesign’s Book feature, which allows you to combine multiple documents and work with them as a unit. You can then have page numbers continue across multiple documents. See Issue #65 for more information on working with the Book panel.
Viewing and Printing
By default, pages in the Pages panel are displayed with section numbering, so each page number is displayed with the value and numbering style you’ve chosen. And while it makes the most sense to view each page number in this manner, there may be times when you want to view them as a continuous sequence numbered from “1” onward. This is known as absolute numbering, and you can switch to that setting at any time. In the General pane of the Preferences dialog box, choose Absolute Numbering from the View drop-down menu. This only affects how page numbers look to you within InDesign; nothing changes with the automatic page numbering you’ve set up.
When it comes time for printing or exporting a range of pages from your document, InDesign expects you to indicate page numbers exactly as they appear in the Pages panel. So if you’ve used Roman numerals, you must indicate the range in Roman numerals. And if you’ve included a prefix for your page numbers, you’ll need to include it with any page range you want to print. That could get cumbersome—think about having to type “Sec. 2:5-Sec. 4:3” in the Print dialog box’s page range field multiple times for those last-minute proofs.
There are two ways to get around this problem. First, you could use absolute numbering by inserting a plus sign (+) before each absolute page number. This way, the previous example might be indicated as “+8-+12” (meaning the 8th page through the 12th page). Or, you could select the range of pages you wish to print or export in the Pages panel, and then right-click on them and choose Print Spreads (yes, even for documents that don’t have facing pages). The Print dialog box will open, and the proper numbers will automatically be inserted in the Range field (Figure 6).
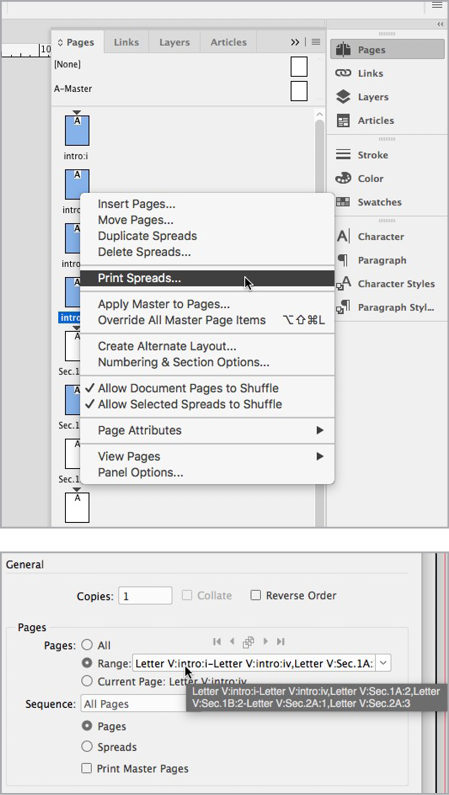
Figure 6. The easy way to print a complex range of pages: Select the range in the Pages panel, then right-click and choose Print Spreads. The Range field in the Print dialog box will be filled in for you.
Page Number Tips
Here are some more tips and tricks for getting just the effect you want with your page numbering:
Use Numbered Lists Instead of Auto Page Numbering
How to Skip Page Numbering for Pages That Shouldn’t be Numbered
Go Forth and Number!
While setting up the initial numbering for pages can be a chore, it soon becomes second nature. Using the “based on” feature with master pages gives you a way to move and re-style your numbers quickly. Numbering and section options gives you even greater control and better page management. I find that switching back and forth between absolute and section numbering depending on my current task means I’m able to navigate around my document quickly.
In the end, the most important thing is that you end up with a document that’s easy for readers to navigate, without their ever being made too aware of the page numbers themselves.
Commenting is easier and faster when you're logged in!

Recommended for you

Page Numbering Perfection
Learn all the ins and outs of page numbering, prefixes, and section markers in I...

Going Deep with Footnotes
Whether you're explaining, referencing, or elaborating, footnotes and endnotes a...
