
The A, B, Cs of Numbered Lists
Tips and techniques for making great-looking lists with the least amount of hassle.

This article appears in Issue 89 of InDesign Magazine.
I find myself making lists all the time—not just the kind on scraps of paper, but the kinds that have to be precisely typeset in InDesign! You might think just typing the list numbers—1., 2., 3., etc.—is the easiest way to create a list, and actually, when I have just a few items, that’s what I do. But for long lists, multi-level lists, and lists that are in a state of flux (where items may be added, removed, or reordered, requiring subsequent items to renumber), you should be using InDesign’s Numbered List feature.
The Basics of Creating Numbered Lists
A quick way to create a numbered list is to place your text cursor inside a paragraph (or select more than one paragraph) and choose Type > Bulleted & Numbered Lists > Apply Numbers. This will start a new, automatically numbered list, or convert paragraphs of text to a numbered list. You can also apply bullets from this menu, but for this article, I’m going to focus on numbered lists. This command simply applies numbers to the selected paragraphs without any customization. Once numbers have been applied, the numbers InDesign adds to numbered lists are not selectable text. You can edit their formatting (font, style, color, indent, separator, etc.), but you cannot select them.
A quicker way to create a numbered list is to simply click the Numbered List button in the Control panel (Figure 1) which, like the menu command, toggles paragraph numbering on and off.

Figure 1: The Bulleted List and Numbered List buttons in the Control panel.
However, if you want more control over your numbered list, Alt-click or Option-click
this button to access the Bullets and Numbering dialog box (you can also access this dialog box by choosing Bullets and Numbering from the Control panel menu). This is where you set the many options for defining numbered lists (Figure 2).

Figure 2: The Bullets and Numbering dialog box.
Formatting Lists
Once you’ve opened the Bullets and Numbering dialog box, that’s when the fun begins. To create a numbered list, select Numbers for the List Type (as opposed to Bullets, of course). After that, there are over 10 different adjustments you can make. Let’s cover each of them here.
List First, the List pop-up menu lets you define different lists used throughout your project. For instance, you could use one list to number captions and another to number tables that are used in the same document, or even across different documents in an InDesign book. For simple lists in a story, you can probably ignore this feature. However, you must create and choose a list in this menu if you want your numbered list to span across unthreaded text frames.
You can also choose a level for the list if you are creating a multi-level list. I’ll cover the Level feature in the next section.
Numbering Style Use this section to change the look of your list. You can choose from eight formats that include variations of roman (i, ii, iii; I, II, III), arabic (1, 2, 3; 01, 02, 03), and lettered (a, b, c; A, B, C) lists.
Number In this field, you define your numbering expression using a combination of text and metacharacters. For example, the default value of ^#.^t means “type the number, followed by a dot, followed by a tab.” If instead you wanted it to appear like “Table 1.”, you would enter the word “Table” and a space before the numbering meta-character (^#), followed by a period, like this: Table ^#.
As you create new combinations for your expressions, they are saved and can be reselected in the pop-up list. The tri-angle to the right of this field allows you to select the various metacharacters that can be used in this field, such as a tab (^t) or an em space (^m).
Character Style This field allows you to apply a character style to your numbering expression and includes one of my favorite InDesign features: the ability to create a new character style on the fly, for those of us who aren’t constantly thinking two steps ahead. As I said earlier, the numbering expression is not selectable in your document, so if you decide you want the word “Table” to appear green instead of black, you need to apply a character style in this dialog box to make that change.
Another reason to use a character style is that, by default, number expressions inherit some of their text formatting from the first character in the paragraph to which they’re attached. If the first character in the paragraph is different from the first characters in other paragraphs, the numbering expression may appear inconsistent with the other list items. For instance, a bold first word in step 2 of your list would cause a bold “2.” as well (Figure 3).

Figure 3: Numbering expressions inherit formatting from the first character in the paragraph. Use a character style in the Bullets and Numbering dialog box to ensure consistent formatting.
Mode This pop-up menu gives you the choice to Continue From Previous Number (thus numbering lists sequentially) or you can specify a Start At point—starting the numbering at a value you enter into the field. Numbered lists can start at 0, but cannot exceed 90,000 and even if you are using letters, you have to enter a numeric value into this field (for example, “8” if you wanted to start at “H”).
Restart Numbers at This Level After This checkbox and field pertain to multi-level lists, described below.
The final section of the Bullets and Numbering dialog box is called Bullet or Number Position, and (not surprisingly) it lets you specify the position of the number… with some important constraints. The Alignment pop-up menu left-aligns, centers, or right-aligns the numbers within the allotted horizontal space, and pertains only to the numbering expression you created above. However, if you choose Center or Right, you’ll probably notice that—weirdly!—nothing changes. The reason is: the Left Indent feature!
Left Indent This specifies how far the lines after the first line are indented. First Line Indent controls where the number is positioned. Increase the First Line Indent value if you want the punctuation in long lists to be aligned to either Center or Right. For example, if you want “9.” and “10.” to be aligned on the period, set Alignment to Right, and gradually increase the first line indent until the numbers align (make sure the Preview checkbox is turned on to see the effect of your changes) (Figure 4).
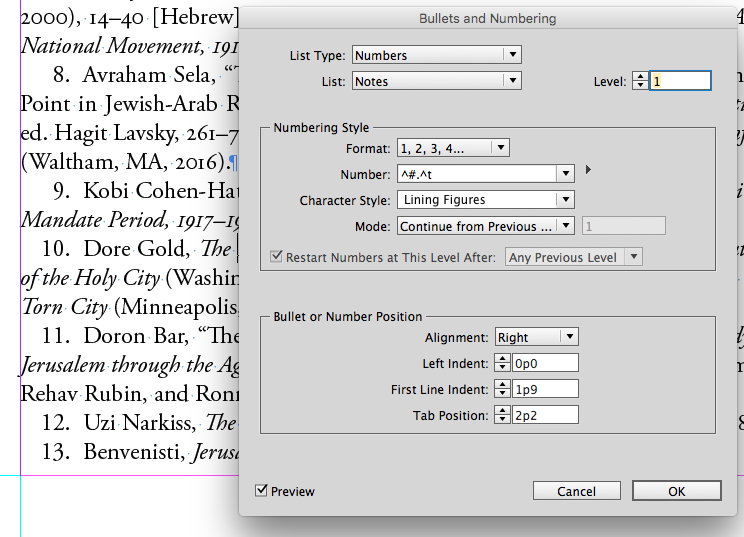
Figure 4: Set alignment to Right, with a First Line Indent large enough to indent double (or even triple) number values, with a tab position that’s larger.
Alternatively, to create a hanging indent effect, specify a positive Left Indent value and a negative value for First Line Indent—but note that the total value cannot be less than zero; that is, InDesign cannot move the number outside the left edge of the text frame (Figure 5).

Figure 5: A hanging indent effect created by using a positive left indent and a negative first line indent. Note that even though the text is selected, the numbering expressions are not. To change their look, use a character style.
Enter a value in the Tab Position field to create space between the number and the start of the list item.
One thing to keep in mind is that the Left Indent, First Line Indent, and Tab Position settings in the Bullets and Numbering dialog box are paragraph attributes, and so changing these settings in the Paragraph panel (or the Control panel) also changes bulleted and numbered list formats. If you are having trouble visualizing how the indents will align with your numbering expression and text, you can use the Tabs panel to make your settings. The bottom half-arrow sets the Left indent, the top half-arrow sets the First Line indent, and tabs are set by clicking in the ruler. As you click and drag the Left Indent half-arrow, the First Line Indent half-arrow moves as well, but can be dragged independently of the First Line Indent by holding the Shift key as you drag (Figure 6).

Figure 6: You can use the Tabs panel to help you visualize the indent settings of the Bullets and Numbering position.
When you get your indents to your liking, redefine your paragraph style to save the values you’ve set.
Multi-level lists
You can use InDesign to create lists of up to nine levels. Like an outline, the list’s numbering scheme (as well as indentations) shows rank as well as how items are subordinate to one another. When creating multi-level lists, it’s important to use paragraph styles to apply the lists, and to assign list levels in the Bullets and Numbering dialog box to each. For example, a four-level list would use four paragraph styles, and each would use a Defined List Level.
In general, you probably want each level’s numbers to start over at 1 (or A, or whatever) after each previous level. For example, after 1a and 1b, you generally want to reset to 2a again, right? To make that happen, turn on the Restart Numbers At This Level After checkbox. Or, deselect this option to number paragraphs at this level consecutively throughout the list without regard for where the paragraphs appear in the list hierarchy. When that’s deselected, the list would appear like 1a, 1b, 2c, 2d, 3e, and so on.
To restart numbers after a specific level or range of levels, type the level number or range (such as 2–4) in the Restart Numbers At This Level After field (Figure 7).
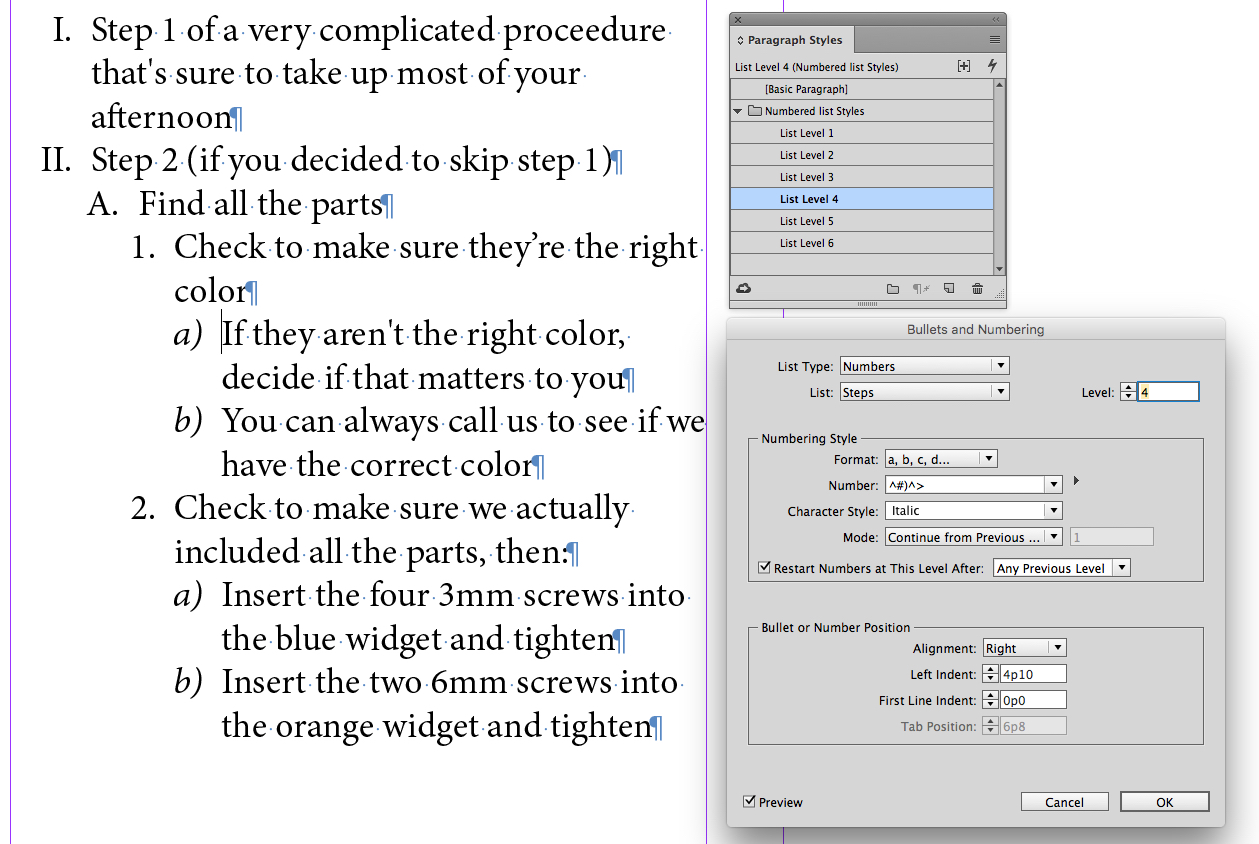
Figure 7: A multi-level list. If I had wanted the “a” and “b” of step 2 to have been labeled “c” and “d” instead, I would need to uncheck Restart Numbers at This Level After.
Import/Export and Other Tidbits
InDesign is smart enough to recognize Word’s Numbered List feature, so if you plan to place text from a Microsoft Word document that includes a numbered list, be sure to use Word’s Numbered List feature to apply the numbers (rather than typing numbers manually). If you don’t, when you apply the Numbered List feature in InDesign, the text will have two sets of numbers—those that InDesign applies, and those that were entered by hand.
Believe it or not, Word is actually a little bit smarter than InDesign in this regard. If you manually number a bunch of paragraphs (a Notes section for a research paper, for example), select them, and then click the Numbered List button, Word will swap out the manual numbers for its own built-in system. InDesign, on the other hand, will just add the numbers to your numbered paragraphs, leaving you with a double-numbered list.
Also, note that any time you place a Word document containing a numbered list, a Word Imported List item is added to your Defined Lists set in InDesign.
Here are a few more tips to keep in mind when working with lists:
To export a numbered list out of InDesign to RTF, first select the text in the list, and then choose Type > Bulleted & Numbered Lists > Convert Numbering to Text. That way, the automatic numbers are changed into selectable, “real” numbers (as though they were typed). That’s the only way to preserve the numbering of your list; otherwise it’ll be stripped out of the exported document.
Within the Type > Bulleted & Numbered Lists menu is a handy Restart Numbering command that you can use to restart your numbering effect at any time.
Remember that all defined lists give you the option to Continue Numbers across Stories or Continue Numbers from Previous Documents in Book, so you can continue your lists in various ways.
And finally, because lists that appear within text are often required to have extra space above and below them, it’s a good habit to use a set of at least three different paragraph styles, such as a List-Start style that starts the list and sets a Space Above, a List-End style that sets a Space Below, and your normal List style for all the items in between.
Type Tip: Avoid Old Style Figures With Lists
Even if you are using old style figures in your text, good typography dictates that numbered lists use lining figures. In the example below, note how the inconsistent character sizes—and numbers like 3, 4, 5, 7, and 9 extending below the baseline—make for an odd-looking list.

No More Boring Lists
Now that you know the ins and outs of bullets and numbering, there’s a lot you can do to make great-looking lists in combination with InDesign’s other styling options. The three examples at the end of this article (Figures 8–10) all use a combination of numbered lists, paragraph rules, and paragraph shading (along with an anchored object for “What to bring to campus”) to accomplish their look. These list items can be added to, removed, or reordered, all while keeping their styling.
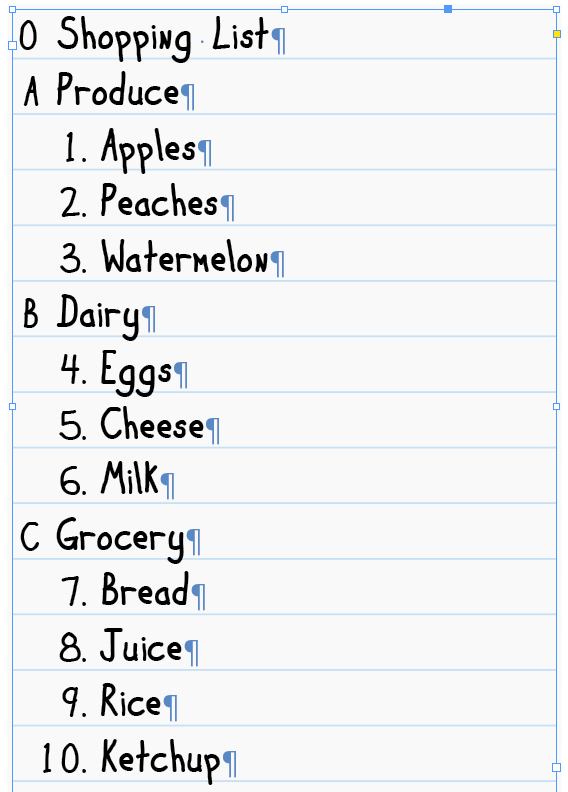
Figure 8: Shopping List: A simple list that uses paragraph shading and a paragraph rule to mimic lined paper. Note that lists can start at zero, even if they’re lettered lists.

Figure 9: Dessert: This multi-level list relies heavily on paragraph shading and paragraph rules to obtain its look.
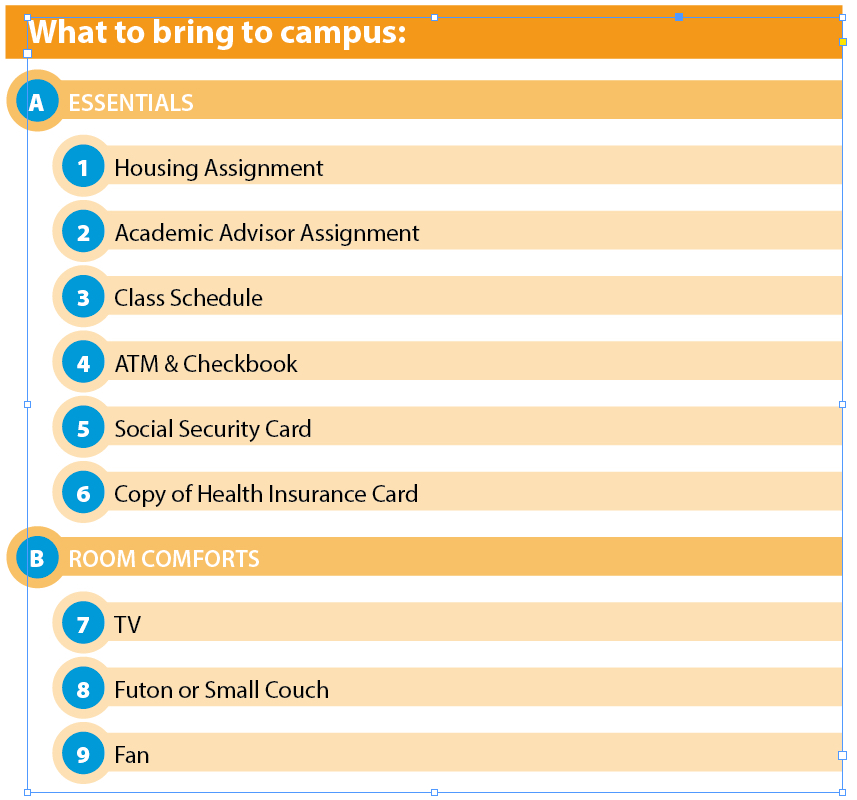
Figure 10: What To Bring To Campus: This list uses paragraph shading and an anchored object (the blue circle with orange outline) to offset the numbers. Anchored objects sit above the numbering effect, so apply an overlay, such as Color, from the Effects panel to allow the numbering to appear through.
Download the Lists
Click here to download snippet files of the lists shown on this page. Feel free to adapt them to your own projects!
Like many areas of InDesign, creating good-looking and easy-to-use numbered lists involves some initial setup and forethought, but you’ll find that it pays off in the end. With these instructions as a guide, even the most complicated list will become as easy as 1, 2, 3!
Commenting is easier and faster when you're logged in!

Recommended for you

InReview: MindSuite Pro
Master collection of linguistic products includes grammar checking, a thesaurus,...
Improving Scripts
Scripts can give you nearly magical powers in InDesign, but that doesn’t mean yo...