

If you’ve done even a little editing of digital images, then you know that sharpening is one of the most important steps in your image-editing workflow. Unfortunately, it’s also one of the hardest steps to get right. With its Nik Sharpener Pro Photoshop-compatible plug-in, Nik Multimedia, Inc. has come up with an excellent alternative to your image editor’s built-in sharpening controls.
The usual sharpening tool of choice is an Unsharp Mask filter, which works by identifying lines of high contrast in your image, and then darkening the dark side of the line and lightening the light side. This process serves to create a “halo” around the edges of objects in your image, rendering the overall image sharper.
Unfortunately, finding the right settings for an Unsharp Mask filter can be difficult. Though a sharpening filter can take a somewhat soft image or scan and render it sharper and “punchier,” it can just as easily take a somewhat soft image and render it over-contrasty, flat, and harsh. And, such filters uniformly sharpen all areas of your image, even though some areas may not respond as well to your chosen sharpening settings.
Nik Sharpener Pro addresses these issues, as well as others, using an interface that is simple to use and easy to understand. Though the program does not provide a guaranteed, one-stop solution to your sharpening woes, it does offer easier, better results than the tools built-in to most image editors.
Real Resolution
As you may have already discovered, different-sized images need different amounts of sharpening and, if you want to get really picky, images viewed from different distances need different sharpening, too. Sharpener Pro understands this and bases all sharpening calculations on your intended output device. Therefore, if you’re outputting to a desktop inkjet printer, Sharpener Pro will do things differently than if you’re outputting to a high-quality imagesetter, or saving a screen-resolution Web image.
To provide for different output options, Sharpener Pro includes separate filters for Color Laser, Inkjet, Internet, and Offset Press. Each includes its own set of assumptions about your sharpening needs. Two versions of each filter are provided — a regular version and an Autoscan version, which analyzes your image to determine it’s “real resolution.”
Real Resolution is Sharpener Pro’s assessment of the size and resolution settings that will yield the best reproduction of detail. For example, if the image was scanned with an inexpensive scanner, it may only have enough “real” resolution to support a 2-by-3-inch print. Any larger would result in loss of detail. Sharpener Pro performs this analysis and provides a simple read-out of its findings in the bottom of the Sharpener Pro dialog. This read-out details the program’s estimation of ideal print size and resolution.
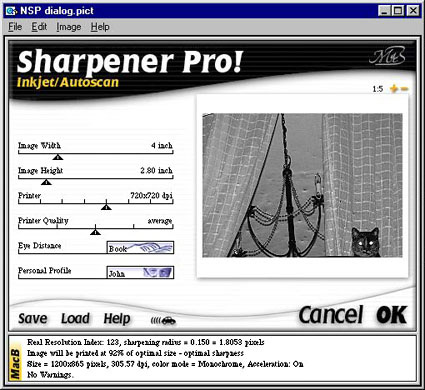
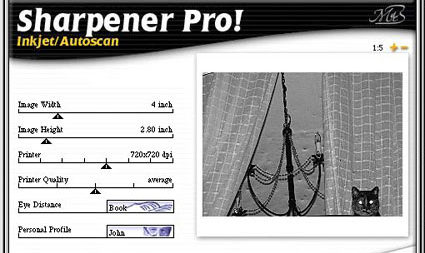
Figure 1: Nik Sharpener Pro’s Autoscan feature determines the optimum size and resolution settings for a given image and output device.
Sharpening
If you feel confident in your own assessment of an image’s quality and size (or if you need to print at a given size no matter what Sharpener Pro may think), simply choose the non-autoscan version of the appropriate filter. Either way, you will be presented with essentially the same Sharpener Pro dialog shown in Figure 1 — a simple affair with a preview window and a few slider controls.
You’ll need to provide at least some information using these sliders whether or not you use the Autoscan filters. Sharpener Pro’s Image Width and Height sliders let you specify the size of your final image, and the sliders are linked so that the aspect ratio of the image is retained. If you are using a non-autoscan filter, then you’ll need to specify the image source using a slider that offers options ranging from APS film to high-end scans to professional digital cameras. You’ll also need to specify the quality of your original — as bad, below average, average, above average, or good. Obviously, these are rather subjective terms, and it may take you a while to determine what “average” really means. To avoid these concerns, it’s best to simply use one of the Autoscan filters.

Figure 2: With Autoscan off, the user is presented with two additional sliders: Image Source and Image Quality, allowing for a broad level of adjustment.
Finally, whether you’re using non-autoscan or autoscan, you’ll need to select printer quality, viewing distance for your final output, and a “personal profile.” Sharpener Pro includes profiles of three different users: Anna, John, and Zap. Anna likes her images a bit soft, John likes his fairly conventional, and Zap likes his aggressively sharpened. Why they didn’t simply call these settings Soft, Conventional, and Aggressive is a mystery, but the chosen approach works.
Sharpener Pro provides good performance, certainly comparable to the sharpening plug-ins included in Photoshop, and you can even select a special accelerate mode that provides faster sharpening by ignoring more image detail. In our tests, we could discern little image quality difference between regular and accelerated performance.

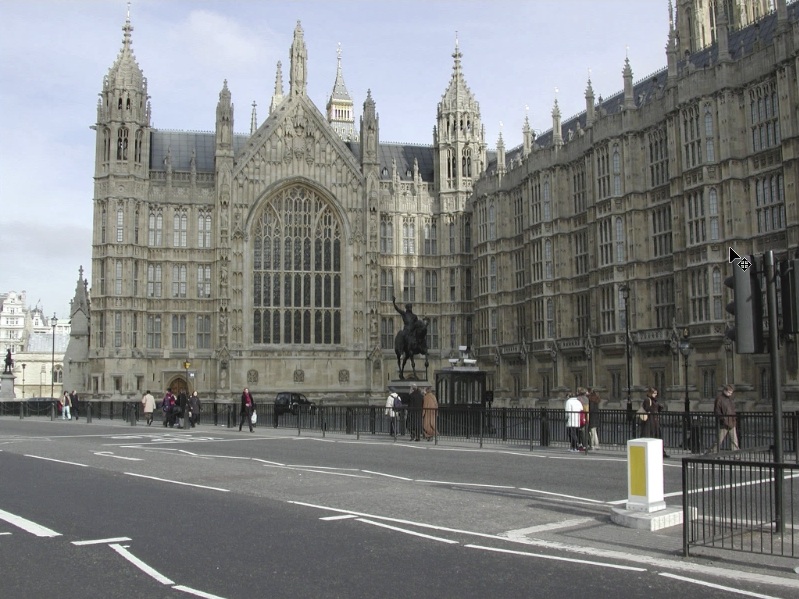
Before…

…and after Nik Sharpener Pro’s mid-range setting (otherwise known as John) for Web output.
Sharpening Quality
Keep in mind that assessing Sharpener Pro’s results on screen will be difficult, unless you’re using the Internet sharpening option. To meaningfully judge Sharpener Pro’s results, you need to print your image using your intended output device. Sharpener Pro is available for free trial download here.
Sharpening is very much a matter of personal taste, of course, and everyone has different ideas of what makes for good sharpening. In general, though, it’s safe to say that Sharpener Pro does an excellent job and does, in fact, produce better results than the typical Unsharp Task operation.
In addition to its ability to intelligently configure sharpening parameters, Sharpener Pro includes a few other features that give it a leg up on the competition. First, it attempts to intelligently analyze your image and apply different sharpening levels to areas of varying detail. Nik Multimedia calls this “Fence and Foliage” protection and it does seem to work. Dense foliage — something that usually needs far less sharpening than smoother subjects — receives less sharpening than other parts of the image. Similarly, high-contrast repeating patterns, such as a white picket fence, receive lower sharpening, to prevent moiré patterns. This feature also helps protect skin tones against excessive sharpening.
Sharpener Pro also includes special hue-protection algorithms that attempt to prevent colors from becoming oversaturated during the sharpening process. And in general we found that Sharpener Pro often preserved color detail better than other sharpening techniques.
Batch Processing
Our only complaint with Sharpener Pro is that its softest setting (Anna, to her friends) still usually performed more sharpening than we would have liked. We’d like to see an even softer, less aggressive setting in future versions. Note that it is possible to lessen Sharpener Pro’s effects by simply using Photoshop’s Fade command to back off on the filtered effect after filtering.
One particularly appealing feature of Sharpener Pro is its facility for unattended sharpening. Once you’ve defined your image-size and output-quality settings, Sharpener Pro is really doing all of the work, so it’s ideal for batch processing images, something you usually can’t do with an Unsharp Mask filter as you might have to pick different settings for each image. The excellent Sharpener Pro manual even provides step-by-step instructions on how to create a batch processing Photoshop Action.
The Price of Easy
At $330, Nik Sharpener Pro might seem a tad expensive for a mere plug-in. However, unlike most plug-ins, this little helper handles a chore that many of us need to do all the time. It also generally does its job admirably well. Additionally, Nik Multimedia offers a downloadable version of Sharpener Pro (scroll to the bottom) containing only the inkjet and Internet filter options for $199.95. This product will be available in boxed form soon.
This article was last modified on December 14, 2022
This article was first published on March 20, 2001
Commenting is easier and faster when you're logged in!

Recommended for you
How to Create Trees in Photoshop, Part 1
One of the more surprising features in the latest update to Photoshop CC is its...
Scanning Around With Gene: Stuff I Miss About Photography
For my thirteenth birthday, my father gave me a “junior darkroom” kit and taught...
