
Markdown to InDesign, Simplified
The path from Word or Google Docs to InDesign is often fraught. Markdown offers writers and InDesigners a smoother path.


This article appears in Issue 10 of CreativePro Magazine.
If a Microsoft Word user employs styles, and does so reliably and consistently, placing the Word document into an InDesign publication can go smoothly. I congratulate the handful of people who are able to live this workflow.
The rest of us wrangle text documents that are formatted erratically—if at all. To be honest, it’s not fair to ask content developers (aka, writers) to interrupt their train of thought to find formatting toolbars and apply styling. Their eyes are on the words, fingers forming les mots justes. Markdown is a way for a writer to easily add a few characters here and there so that we, doing layout, can recognize a header from a subheader from a block quote and format appropriately.
The writer should leave it to us to prettify their finely formed words.
Markdown Is Markup
In the days of those machines known as “typewriters” (you can find them in museums, and there’s even a fine documentary about the people who still love and use them), a writer would create a plain text manuscript that someone later would mark up by hand. A typesetter would consult a style guide to know how each marked-up element should be formatted (Figure 1).
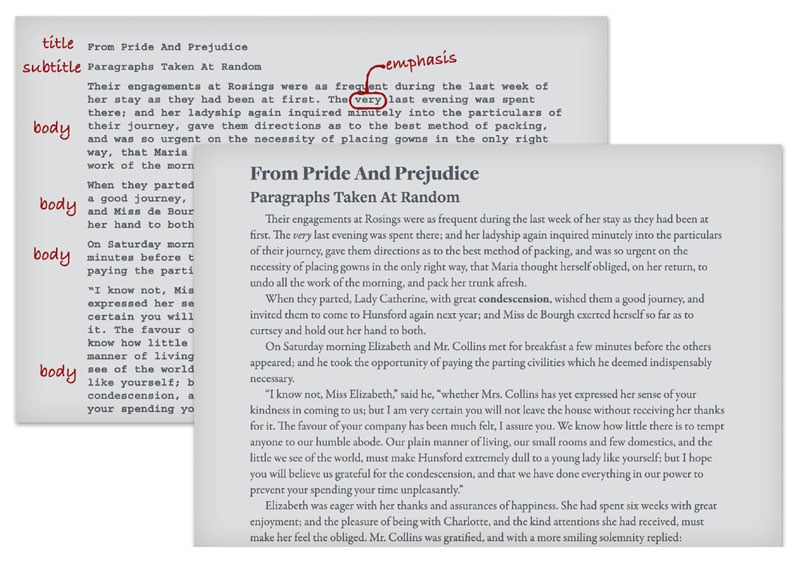
Figure 1. A fanciful example of markup and the resulting set type. In reality, markup is usually far more cryptic.
In other words, markup is a way of indicating what a given chunk of text is, whether a header, a regular paragraph, or some phrase that should be emphasized.
In modern times, we have other markup. HTML documents of which websites are made are plain text documents that support no formatting. HTML, Hypertext MarkUp Language, is a markup code that a browser application can interpret and format appropriately. But HTML is a bit hard to type. Consider the title of that manuscript. In HTML, you’d write:
<h1>From Pride and Prejudice</h1>
Try typing that quickly! Some of the tags on either side of an element can be verbose, like the <strong> tag, which usually yields bold type.
Almost two decades ago, John Gruber and Aaron Swartz invented Markdown, an easier-to-type markup that could be converted to HTML if desired. Using Markdown, the header above becomes:
# From Pride and Prejudice
Instead of surrounding a phrase in a <strong> tag, you use two underscores or asterisks (e.g., **this becomes bold later** and so does __this phrase__).
Not only is this wrist-saving, but its ease makes it simple to learn and more likely to be used by content developers. That’s why it’s become a very popular tool. All that’s been missing is an easy way to convert this code to actual formatting in InDesign.
The basic syntax of Markdown can be found here. Note that much of it assumes you’re converting content to HTML, but you can ignore that for use in InDesign.
Using Markdown Content in InDesign
There are many paths for converting Markdown to HTML, because that is what it was originally developed to do. For other formats, you could use a computer’s command line (Terminal in macOS, for example) to use a utility known as PANDOC, which can convert a huge number of formats to almost any other, including Word and InCopy documents. But the conversion to InCopy sadly misses some common Markdown elements, and the conversion to Word requires a lot of prep in Word. You can read all about it in Jeremy Howard’s article in Issue #146 of InDesign Magazine.
Also, many of my students lose interest as soon as I mention using the command line! They (and I) want something more direct, less code-laden, and less dangerous to the computer. Why not use InDesign itself?
Getting Markdown content into InDesign
The process of bringing Markdown content into InDesign is pretty much the same as with any plain text content. That’s because Markdown can be written in any text editor: Notepad, TextEdit, Scrivener, Ulysses, BBEdit, Word, Pages, and many more. Some apps even preview with provisional formatting. But the file that’s delivered to you, the InDesign user, can really be just a plain text file (TXT).
When you receive a Word document with Markdown, place it into InDesign, and select the option to Show Import Options. In the Import Options dialog box, turn on the Remove Styles and Formatting from Text and Tables to remove any formatting that may have randomly been applied (Figure 2).
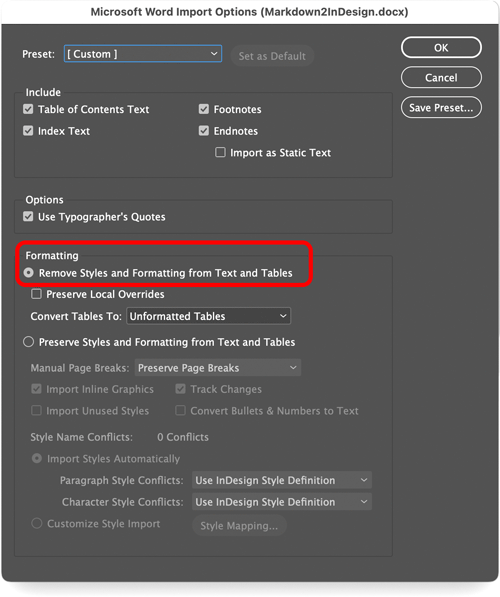
Figure 2. To strip away any residue from Word, I use Import Options when placing a DOCX and choose Remove Styles and Formatting from Text and Tables. Now, it’s as if I’m placing a plain text file.
Whatever style is the InDesign document’s default will be applied to this text initially.
Using Find/Change to style the text
In my classes and in my day-to-day layout work, I regularly use InDesign’s powerful Find/Change to apply styles. If there’s some hook in the text that I can hang the style on, I’m delighted. For example, in a novel I laid out, every chapter began with Chapter Eighteen or similar. No other paragraphs began with the word Chapter, so the query was simple (Figure 3).
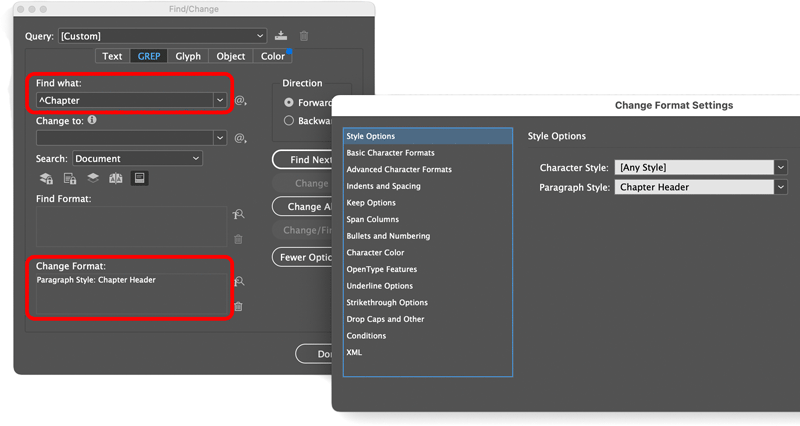
Figure 3. Clicking the rectangle under Find Format opens a dialog box from which you can choose a character or paragraph style to apply to the found text. Here I use a GREP query starting with a caret ^ to specify that the word Chapter is at the very beginning of a paragraph.
In an abundance of caution, I used a GREP query to ensure that only paragraphs that began with the word Chapter would get styled. It turns out that was unnecessary, as no other paragraph even had that word.
A query that looks for Markdown is often even easier (Figure 4).
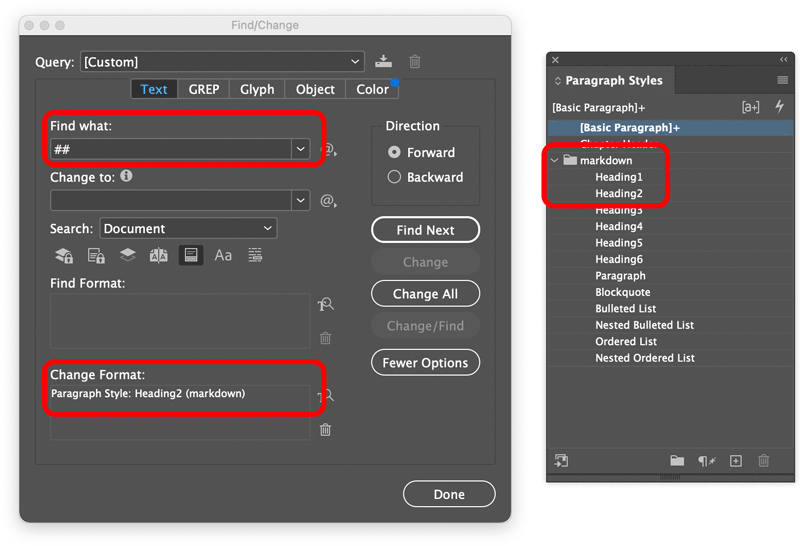
Figure 4. Note that the Find What query ends in a space (admittedly hard to see). In Markdown, “## ” begins a second-level header, for which I made a style called Heading2.
It’s a little more tricky to find an unknown number of characters surrounded by one or two underscores or asterisks. In Markdown, a single underscore or asterisk is put on either side of text that should be emphasized (to be italicized, usually). Double underscores or asterisks are for strong emphasis (usually made bold).
GREP is ideal for this task. The GREP code for “one or more characters” is .+ (a period means any character; the plus sign means “one or more of those”). So, to style the following Markdown text, it may seem pretty straightforward:
This paragraph contains a couple phrases that _should be italicized_ at some point. You just read one, and _here’s the other one_ for your amusement.
To find the two phrases bookended with underscores, you might try the query:
_.+_
But there’s a saying: GREP is greedy. It will actually find:
_should be italicized_ at some point. You just read one, and _here’s the other one_
That’s one result! Truthfully, it makes sense because it is, after all, matching one or more characters with underscores on either end. It reminds me of someone who says, “maybe that’s what you meant, but you actually said…” Annoying!
You want the shortest match that fits the pattern. In GREP, it’s an easy fix:
_.+?_
The plus and question mark combo means “one or more, but shortest match.”
Have you noted that a period, plus sign, and question mark all have special meaning in GREP? Asterisks do, too. To find a character with GREP that usually has special meaning, put a backslash in front of it. So, if the writer uses asterisks instead of underscores (which is legal in Markdown), your GREP query would be:
\*.+?\*
The Find/Change window would look like Figure 5.
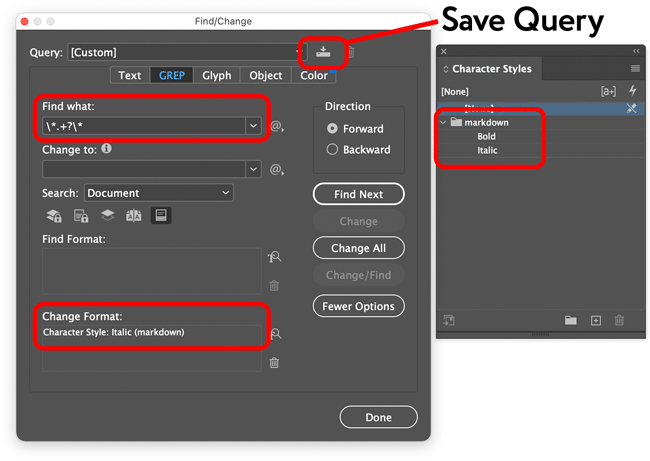
Figure 5. GREP queries can look a bit strange, but they’re wonderfully powerful. Luckily, you don’t have to reinvent them every time: You can save queries you use often by clicking the odd button towards the upper-right. Give the query a name you’ll recognize, and you can choose it from the Query menu any time!
Accelerating the process with FindChangeByList
Doing a few frequently accessed queries one at a time, especially if they’re saved, could be fine. But for the number of queries you’ll need for most of Markdown’s markup, there’s a much better way.
For many years, InDesign has shipped with a script called FindChangeByList (Figure 6).
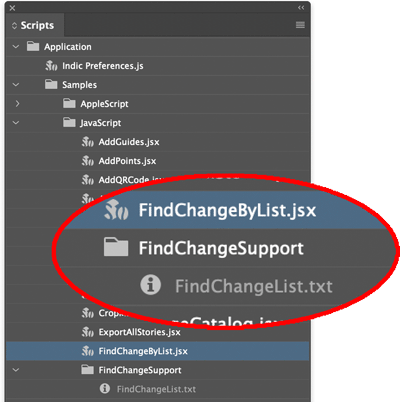
Figure 6. FindChangeByList.jsx uses an editable text file to run many Find/Change queries very quickly. Those supplied are for cleaning up common issues like multiple returns or spaces, trailing white space, and so on. You can edit the list by right-clicking the text file and choosing Show in Finder (macOS) or Show in Explorer (Windows).
It uses a list (surprise!) that’s in an accompanying text file called FindChangeList.txt. You can edit this tab-delimited list of queries to perform many Find/Change queries very quickly. The text file even has some instructions on how to configure each line so the query runs correctly.
Note that the script and its support folder are both in a specific folder in the Scripts panel: Application:Samples:Javascript. Depending on your operating system, this folder may disallow editing! My advice is to make a copy of both the script and support folder and put them in the User scripts folder. Here’s how:
- Right-click the script’s name. Choose Show in Finder (macOS) or Show in Explorer (Windows). Now you’re in the Javascript folder.
- Copy both the script and the FindChangeSupport folder.
- Go back to InDesign’s Scripts panel, and right-click the User folder. Choose Show in Finder/Explorer. Now you’re in a folder called Scripts Panel (weirdly, not User, but okay).
- Paste the items you copied. In the Scripts panel, these show up immediately!
To run a script, double-click it. Without any editing, the script does some text cleanup. Nice, but not why you’re here today.
Here are the steps to use this script to apply styles to text with Markdown syntax:
- Build styles for those Markdown items (headers, blockquotes, emphasis, etc.)
- Add the necessary queries to the file FindChangeList.txt. If, like me, you put the Markdown styles in a folder (Style Group), the syntax in that text file becomes unexpectedly difficult.
- Create a method of mapping the Markdown styles to ones you may already have in a document.
Or you can use the text file, styles, and the method I’ve built for you!
If you’re interested, you can download the following files from Luminous Works or CreativePro. This download includes:
- A new list file called FindChangeListMarkdown.txt
- A lightly edited version of the script (called FindChangeByListMarkdown.jsx) that looks for that text file
- An InDesign snippet (called MarkdownStyles.idms) that houses the styles you’ll use for Markdown content
Add the script to the User folder in the Scripts panel. Put the text file in the FindChangeSupport folder. Keep the snippet in a handy spot of your choosing.
Adding styles for Markdown content
Once you’ve placed the Markdown text in an InDesign document, you’ll need styles to format it. The InDesign snippet MarkdownStyles.idms has ’em. It’s just a small text frame with essential styles applied to the text within. Either drag the snippet onto a blank area of your document or use File > Place, putting the text frame somewhere out of the way, then delete it. Yup, that’s right, it will deliver styles to your Paragraph Styles and Character Styles panels and those will stay after you delete (Figure 7).
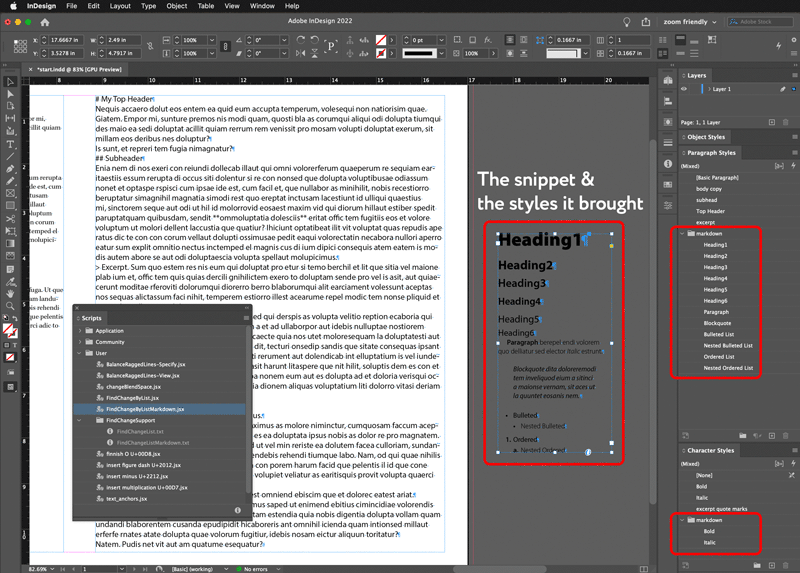
Figure 7. Pasting a text frame into InDesign or placing a snippet that has a text frame will bring along the styles it uses. If this snippet uses fonts you don’t have, you can choose to activate them from Adobe Fonts if you like, redefine the styles to use another font, or replace the styles with ones you have. (More on that shortly.)
Save your InDesign document. If the script goes wrong, it will require a great many undos to remedy it. But if you save before running a script, you can use File > Revert.
Running the script
The script uses the text file you downloaded and put into the FindChangeSupport folder. Figure 8 shows it in my favorite code editor. Rather pretty in its own way, don’t you think?
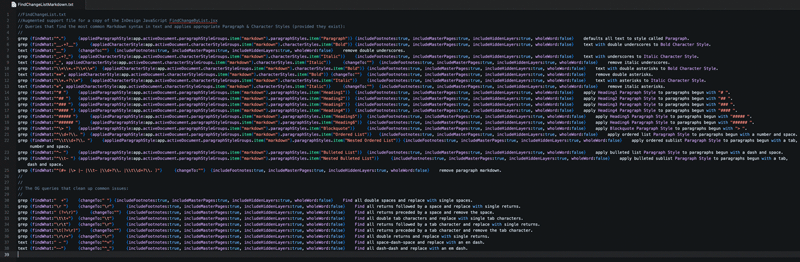
Figure 8. If you decide to edit this file, you may wish to put a copy aside for safe keeping. The first, larger section applies styles to the Markdown text. The bottom section is the original list for text cleanup.
If there is other content in your document besides the Markdown text, you should select the Markdown text to control the scope of the script. If it’s in its own InDesign story, you can simply put the text cursor somewhere in the story.
To run the script, double-click FindChangeByListMarkdown.jsx in the Scripts panel (Figure 9). That’s it!

Figure 9. Because I had other text that I wanted unaffected by the script, I put my text cursor in the Markdown text’s story before double-clicking the FindChangeByListMarkdown.jsx script.
The script is successful (Figure 10).
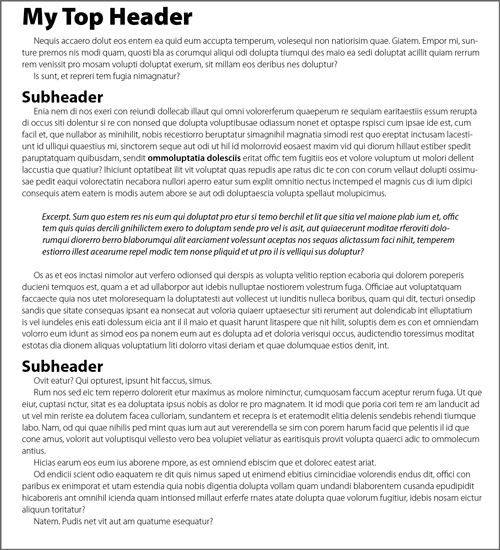
Figure 10. Not bad at all!
Mapping your own styles to mine
If you’ve already got styles in the InDesign document to format content like what you’ve just styled, it’s actually easy to replace my styles with yours and eliminate unneeded styles at the same time (Figure 11).
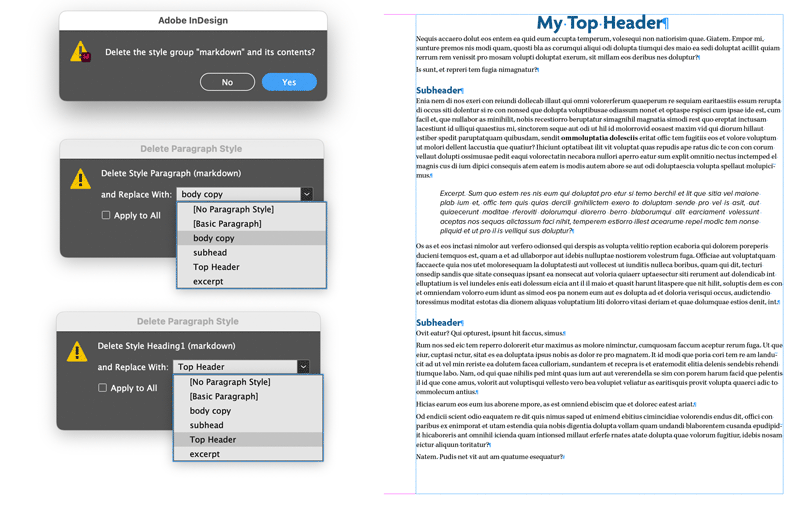
Figure 11. Deleting the markdown style groups causes InDesign to prompt you to choose substitutes. If you have such, you can choose them one at a time for each Markdown style supplied in the snippet.
- With nothing selected, highlight the folder (style group) called markdown in, first, the Paragraph Styles panel. Then click the small trashcan at the bottom of that panel.
- You’ll be asked if you want to delete that style group. Click Yes.
- For each of the styles that are actually used, such as the one called Paragraph, choose a replacement from styles that weren’t in the group being deleted. In the case of the style Paragraph, choose whatever you’re using for body text. Do not select the option to Apply to All!
In the example in the figures, I used only four paragraph styles from that group, so I had to choose only four substitutes. The rest were deleted without comment.
Do the same for the Character Styles markup group, replacing my Bold and Italic with yours, if you wish.
Make Mine Markdown
So, let’s recap the Markdown-to-InDesign (via FindChangeBy List) workflow.
-
- Place Markdown text with no formatting.
- Add (then delete) the Snippet MarkdownStyles.idms.
- If other (non-Markdown) text is in the document, select the Markdown text, or put your cursor in its story.
- In the Scripts panel, double-click the script FindChangeByListMarkdown.jsx to run it and replace Markdown code with formatting via paragraph styles.
- To replace my supplied styles with your own, delete each style group and choose a substitute style for each being deleted.
Formatting Markdown content is just one of many amazing things you can do with FindChangeByList. Check out these posts at CreativePro for much more.
A Major Job Gets Easier with GREP and FindChangeByList
Converting Text to Emoji with
FindChangeByList
Find-Change Scripting Goodness
It’s true that this workflow is intended for basic documents. Markdown supports elements like images, tables, and others that will be ignored by the script. You can remove any vestigial code by searching for it and replacing it with nothing. But if your content is relatively simple, this scripted solution offers you the chance to use Markdown content in InDesign without much fuss. Once you have all the assets in place, the whole thing really takes about Mark-a-minute. Enjoy!
Commenting is easier and faster when you're logged in!

Recommended for you

CreativePro Magazine Issue 10 Now Available
New articles on advanced photo techniques, Lightroom and Photoshop on the iPad,...

Going From Markdown to InDesign
How to use Markdown as an authoring tool in InDesign workflows
Choosing Numeral Styles in InDesign
Learn how to pick the right numeral style for your work with Khara Plicanic.