

Getting Organized
Even if you’re not going to organize a batch of images right away, you can at least take an initial organizational step and place them in their own folder. When transferring images, create new folders on your hard drive for each batch of pictures. Labeling the folders by date or by assignment or event creates a first layer of organization that will make it easier to find a particular image later.
Ideally, of course, you want each image file to have a somewhat descriptive name, which means you’ll need to look at each image and then rename it accordingly. The easiest way to do this is with an image-cataloging application. Such programs typically provide a thumbnail (or “light table”) view of a batch of images and often include the ability to sort and search images, as well as add keywords and rename files.
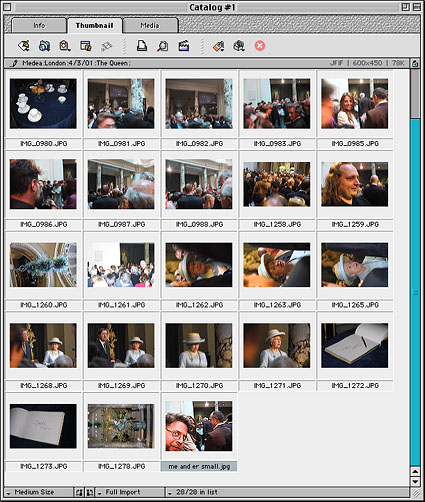
Image-management software such as iView Multimedia makes it easy to catalog large numbers of files.
Your digital camera may have come with a cataloging program of its own. If not, pick up one of a number of commercial and shareware cataloging apps. Excellent shareware catalogers abound, but three of the best are iView Multimedia, Digital Domain, Inc.’s QImage, and TawbaWare’s Thumber. All three offer thumbnail views, but QImage and Thumber also add a number of image-processing and automated features.
Commercial apps include Extensis Portfolio and Canto’s Cumulus — both excellent catalogers that offer slightly better performance than their shareware competitors.
If your cataloging app lets you rename files from within its thumbnail view, then all you have to do to start naming your images is drop a batch of them into your cataloger and begin renaming. If your cataloger doesn’t let you rename files, then you’ll need to look at images in your cataloger’s thumbnail view, but switch back to your file manager to rename your files.
With even the simplest cataloging application, you should be able to quickly organize and rename even a sizable batch of files. However, if you tend to shoot multiple exposures of the same image — with different exposure or white-balance settings, for example — then your cataloging needs might be a bit more complex.
EXIF
Whether you’re shooting digital or film, you may often find yourself bracketing your shots — shooting multiple exposures of the same image using different exposure settings. When editing and reviewing your images, it’s usually helpful to know the exposure settings of each image. In addition to making it easier to judge what types of edits and corrections to make, keeping track of which types of exposures worked well and which didn’t will help you become a better photographer.
In the old days, (circa 1995) you had to write down your exposure settings by hand. In contrast, almost all of today’s digital cameras store a complete list of exposure settings with every image. This list is stored in the image file’s header using a format called EXIF, or Exchangeable Image Format.
If your image-cataloging application knows how to read the EXIF information that is stored with each of your images, you can quickly and easily find out everything from the exposure compensation and white-balance settings, to the camera brand and focal length for each image you shot.
Not all cameras store every setting, and you may find out, for example, that your camera doesn’t store white-balance information. Most cameras do, however, store exposure-compensation settings as well as aperture and shutter speed. Fortunately, these are the settings you will usually be the most curious about.
Unfortunately, neither Extensis Portfolio nor Canto Cumulus can read EXIF data. If you’re committed to using one of these applications, though, you can always use shareware programs like iView Multimedia or Bibble (Bibble for the PC, MacBibble for the Mac OS) for the times when you want to read an image’s EXIF data.
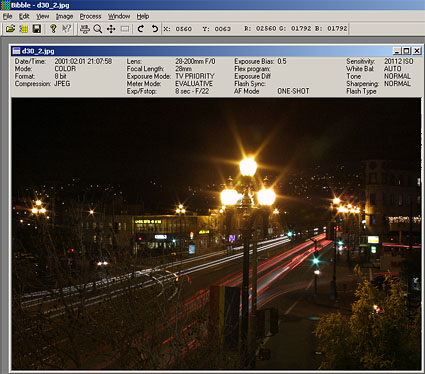
EXIF-capable software, such as the Bibble photo-editing program shown here, display exposure settings and other information that EXIF-complaint cameras safe with files.
Once you’ve used your EXIF reader to look up an image’s exposure data, you can rename your file accordingly. For example, say you’ve shot a bracketed series of 3 exposures of a duck. You shot one normally, one at one stop over normal, and a third at one stop under. You can use your EXIF reader to determine which image is which and then rename the files as DUCK 0.JPG, DUCK+1.JPG, AND DUCK-1.JPG.
To Compress or Not to Compress
Finally, a few quick words about saving your images. First, be aware that every time you save an image as a JPEG file, you run it through another round of lossy data compression. That is, every time a JPEG image is resaved, its quality degrades. And unless you were shooting in an uncompressed mode such as TIFF or Raw, then your images have already been compressed once by your camera. So, once you’ve transferred your images to your computer, use your File Manager to lock the files. This will ensure that you don’t accidentally re-save an image and thereby introduce more image loss. Think of these locked images as your digital negatives.
Once you start editing, save your edited images as new files using TIFF, Photoshop, or another lossless image format. There’s no need ever to save as JPEG unless you need to e-mail an image or post it on the Web. For these times, you can create new JPEG files from your edited TIFF or Photoshop files. You can think of all these files as your digital “print” files.
For the sake of your images, it’s very important to keep an eye on your compression workflow while working.
As your disk space wanes, you’ll want to find a place to offload your images. Though Zips and other removable media can be a fast and easy way to make backups and archival copies, it’s hard to beat recordable CDs for capacity, cost, durability, and ease of use. What’s more, CD-Rs can be used in nearly any computer that has a CD-ROM drive. Though CDs are far more durable than most magnetic media, it’s still worth making multiple archival copies of all your images, just to be safe.
Finally, if you throw out all those undeveloped rolls of film that are hanging around in your desk drawers, you should have plenty of room to stack dozens of CDs.
This article was last modified on December 14, 2022
This article was first published on July 3, 2001
Commenting is easier and faster when you're logged in!

Recommended for you
Photoshop Week 2014
Any time is a great time to expand your Photoshop knowledge, but you might want...

DesignMentor Training Teaches Creatives to Shoot, Color Correct and Edit with Camera RAW through Digital Photography Portfolio-B
DesignMentor Training offers Creative Professionals the means to add advanced di...

Mount July Camera Filters Take the Instagram Look to the Next Level (and into Real Life)
When digital designs imitate real life we sometimes label it “skeuomorphism,” bu...