


Have you been searching for ways to elevate your brand’s presence on social media? Look no further! With the power of Adobe Premiere Pro and Motion Graphics templates (MOGRTs), which let you conveniently add professionally designed graphics, titles, and animations to the video in your projects, you can create stunning video-based ads that captivate your audience and drive engagement. The best part? The workflow is intuitive, and working in Premiere Pro will feel familiar if you already know and love other Creative Cloud applications. Follow along with an example project.
The Interface
When you launch Premiere Pro, the Home screen will offer quick links to recent projects, online tutorials, and the option to start a new project (Figure 1).
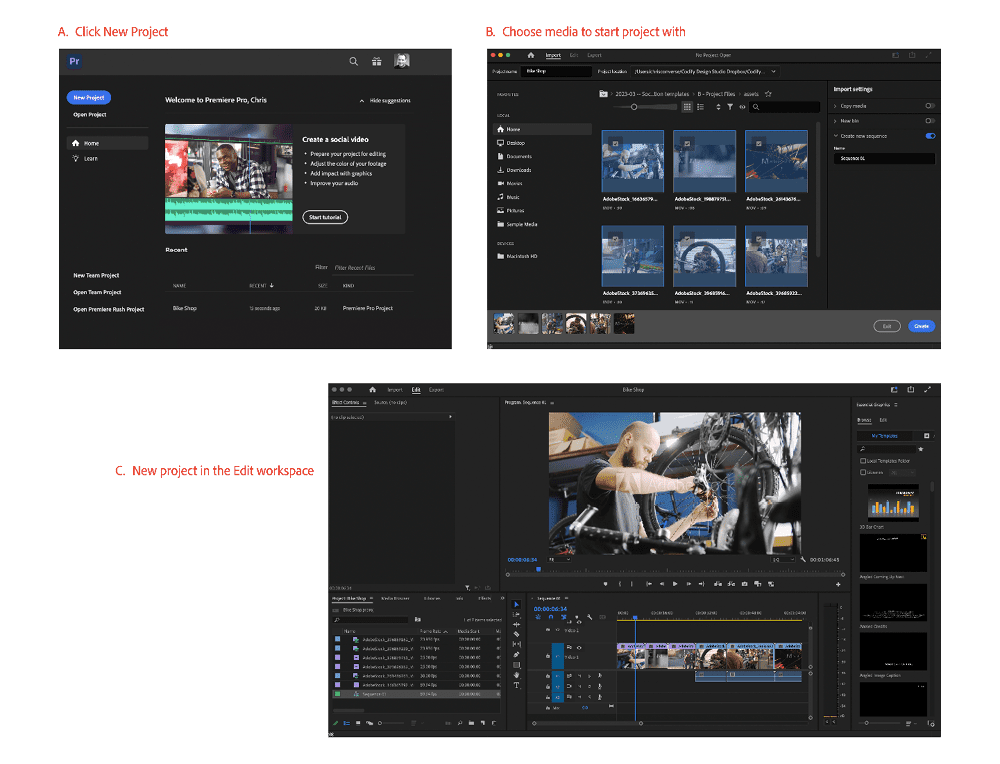
Figure 1. Start a new Premiere Pro project directly from the Home screen. Click New Project (A), locate your media files (in the Import workspace) to get started (B), and click Create to begin working with your files in the Edit workspace (C).
Project panel
When you import video, audio, or graphics into Premiere Pro, those assets are listed in the Project panel (Figure 2). This panel, with its overview of your digital assets, works much like the Links panel in both InDesign and Illustrator.
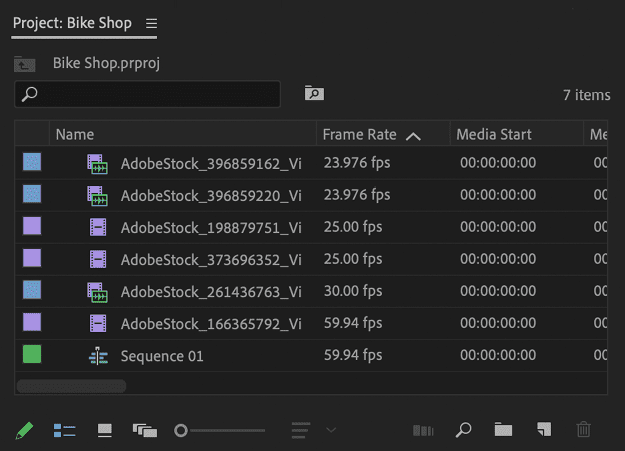
Figure 2. The Project panel shows all files that are linked to your project.
Timeline panel
A sequence acts as an individual video project within your main project. Your Premiere Pro project can consist of a single sequence (as we’ll create in our example) or a series of sequences. Tip: Think of sequences as analogous to pages in an InDesign document. You can have a single page as your document or a multi-page document. If you followed the steps for importing videos, Premiere Pro will create a sequence for you and place your assets along the timeline in the Timeline panel. Check out this page at Adobe.com for an introduction to working with timelines in Premiere Pro. You’ll spend most of your time in Premiere Pro working on sequences in the Timeline panel (Figure 3), where you’ll move your assets, adjust In and Out points (start and end points) for videos, and apply MOGRTs. You can drag any of your assets from the Project panel and drop them into the Timeline panel to begin editing your video.

Figure 3. Each sequence has its own tab in the Timeline panel, which consists of the assets being used within that sequence on a timeline.
Essential Graphics panel
The Essential Graphics panel (Figure 4) contains everything you need to search, browse, apply, and customize your MOGRTs. The Browse tab allows you to quickly locate and apply MOGRTs that you have imported, or you can use it to search for new ones on Adobe Stock.

Figure 4. The My Templates tab of the Essential Graphics panel (Browse tab) gives you quick access to the MOGRTs that you have added to Premiere Pro. You can use the Adobe Stock tab to search for new MOGRTs without leaving the program.

Figure 5. Each MOGRT contains a custom set of properties, depending on the specific template and the design choices of the template’s designer.
Editing Video
Once you’ve imported your video clips into Premiere Pro, you can simply drag them from the Project panel to the timeline in the Timeline panel (Figure 6). If you followed the import workflow above, then Premiere Pro will create a new sequence for you and import the video onto the timeline automatically. Once your videos are on the timeline, you can begin to create your final project.
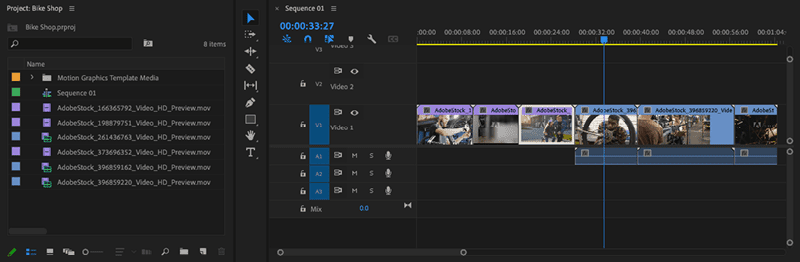
Figure 6. Video clips are arranged on the timeline in the Timeline panel.
Trimming clips
One of the first things you’ll need to decide is when you should start and stop a video clip, and how much of the clip you want to use. For most clips, you’ll need only a portion. The Selection tool (arrow) changes into a Trim tool (bracket arrow) when you move it to the beginning or end of a selected clip (Figure 7). When you see this icon, click and drag to the right to trim the beginning of the video clip and set a new In point (starting point). Drag the end of a clip left with the Trim tool to set a new Out point (ending point). The original video is not affected, but the final render will show only the portion of the clip visible on the timeline.

Figure 7. Hover over the beginning or end of a selected video clip to enable the Trim tool.

Figure 8. After adjusting a video clip with the Ripple Edit tool, the video clips on the timeline will automatically move to fill in the gaps the edit creates.
Transitions
Transitions let you quickly add visual interest to your video as you switch between clips in your project. The default transition between video clips is a jump cut, in which one video clip abruptly changes to the next, but Premiere Pro offers a variety of transition styles beyond the jump cut. (Technically, this common edit isn’t a transition—it’s the lack of one!) To view the available options, choose Window > Effects to open the Effects panel, then open the Video Transitions folder within that panel. Here you’ll find a series of transitions that you can drag and drop between two video clips. In the timeline, a transition is represented as a light tan box that overlaps the end of one clip and the beginning of another. In Figure 9’s example (next page), I used the Iris Round transition to match the shape of a bicycle wheel. The Iris Round transition creates a circular mask that reveals the upcoming clip within an animated circle that starts from a single point and opens up to reveal your clip on the full screen.

Figure 9. Adding a transition between clips allows you to add visual interest when switching between clips in your final video.
Applying Motion Graphics Templates
One of the most time-consuming aspects of a video project is creating animations of text and graphics. Creating consistent animated titles can take up valuable time—especially if you need to repeat the same animation with slightly different text throughout your project. This is where MOGRTs come in. They work like other templates you may be familiar with; however, their additional superpower includes animation. To demonstrate, I’ll use a template named Modern Title with Border, which is available for free on Adobe Stock. You can search for, download, and install it right from the Essential Graphics panel (Figure 10).

Figure 10. Search Adobe Stock for modern border in the Essential Graphics panel to locate and download a free template named Modern Title with Border.

Figure 11. The default animation of the MOGRT shows when you play the video.
Editing text and colors in a MOGRT
To reveal the customizable properties of your chosen MOGRT, select it in the timeline and open the Edit tab in the Essential Graphics panel. For some templates, like our Modern Title with Border, you can change the text by double-clicking and editing the text directly in the video preview. To change the color, select the text object in the list at the top of the Edit tab, then locate the color option below (Figure 12).
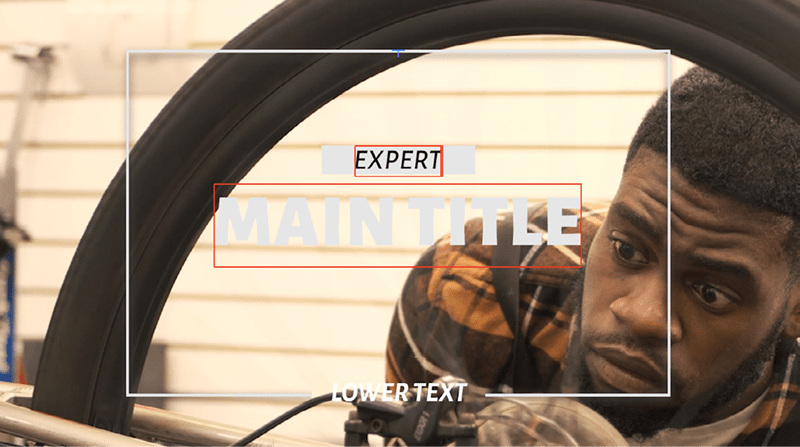
Figure 12. Edit the text of the template by double-clicking the text on the video preview and typing your desired text. For my project, I changed the small text in the box to EXPERT and set the color to white.

Figure 13. Use the object list in the Essential Graphics panel to target and edit specific properties of the template, including fill and border colors, text color, border, and shadow properties.
Disabling elements of a MOGRT
If your template contains a list of objects, then you can also individually hide those objects to give you even more control over the final look of the template. For instance, I decided I didn’t want the bottom text and the break in the border in our example, so I hid both the Lower Text and Bottom Border Mask objects (Figure 14). This resulted in the same animation, but without those graphic elements.

Figure 14. Customize the settings of each template instance in your project with custom text, colors, and visibility of objects. Compare this sequence of frames to the default shown in Figure 11.
Rendering Your Video
Once your project is built, there’s one last step to perform. Rendering is the process of converting the video, graphics, and text into a final, ready-to-view file suitable for sharing, uploading to social media sites, or importing into presentations, among other uses. One of the most popular digital video types in the MP4 format. This is technically a video container format, which stores the media files, including video, audio, and more. (It is sort of like a PDF file that contains images, text, vectors, and other components of the printed page.) To render your output file, follow these steps:
- In the Edit workspace, choose File > Export > Media, or choose the Export workspace instead.
- In the left sidebar, enable Media File. Select a location on your hard drive, then choose a preset in the Preset menu.
- Under Format, select H.264.
- Choose one of the Match Source options with a High or Medium Bitrate, then click Export (Figure 15).

Figure 15. To achieve a good quality video at a reasonable file size, try the Match Source—Adaptive High Bitrate preset, and set the format to H.264.
Roll ’Em!
While this article has been a streamlined look at the video editing and motion graphic process in Premiere Pro, our whirlwind tour has taken you through a majority of the key concepts you’ll need as you embark on your journey in video production. As you add video editing and production to your skill set, keep experimenting—and have fun along the way.
Commenting is easier and faster when you're logged in!

Recommended for you


Social Media Guide For Graphic Designers
As Creative Professionals we can’t ignore the value of Social Media and wh...

Premiere Pro Tutorial: Simple Color Correction for Video
Adobe Premiere Pro can feel a bit intimidating if you are new to the program and...