
Making Selections in Photoshop
Get familiar with Photoshop’s many selection tools, both old and new

This article appears in Issue 14 of CreativePro Magazine.
Photoshop’s selection tools have leapt in functionality and ease of use in recent years, with automated selections now providing reliable, trustworthy cutouts that typically require minimal hand finessing.
But there’s still a place for the original selection tools that shipped with the earliest versions of Photoshop. Let’s take a look at all the available tools, new and old, to help you get the most out of each.
Beyond the Basics
If you’re a regular Photoshop user, you’re (of course!) familiar with the original selection tools—the Marquee and Lasso. But unless you know the keyboard shortcuts that modify their use, you aren’t maximizing your efficiency. (See “Modifying Selections” below.)
Note that the modifier keys behave differently depending on whether you hold them before you start to draw a selection or while you’re dragging; I’ll explain the difference in this rundown of those important shortcuts.
The Marquee tools
The Marquee tools let you make selections by dragging over the area you want to select. Both the Rectangular Marquee tool and its curved cousin, the Elliptical Marquee tool, draw selections from corner to corner when you drag. The “corner” of an elliptical marquee is the corner of the imaginary bounding box that ellipse would fit into.
Hold the Shift key while drawing a selection, and you’ll constrain a rectangular marquee to a square and an elliptical marquee to a circle.
If you hold Alt/Option while you draw, you’ll draw from the center out—a big help when selecting a circular object. This modifier key also lets you draw from the center out when using the Rectangular Marquee tool.
One useful but little-known shortcut: If you hold the spacebar while drawing a selection, you can move the selection around; release the spacebar, and you can continue to drag to change the selection shape. This is particularly useful when drawing elliptical selections, as it means you can align them perfectly with circular objects.
There are also Marquee tools that allow you select a single row or column of pixels. They have some obscure uses, but you could probably spend your entire career in Photoshop without ever touching them—you wouldn’t be missing anything.
The Lasso tool
A basic selection tool, the Lasso tool is still useful for modifying existing selections (see below). If you hold Alt/Option while drawing, it acts like the Polygonal Lasso tool and will draw straight lines between points where you click—a handy way to select an object that has a few straight lines in it.
Modifying Selections
The modifier keys affect the way a new selection interacts with an existing one. Hold Shift before making a new selection, and it will add it to the existing one; hold Alt/Option to remove the new selection from the old one.
If you wanted to select a tire but not a wheel, you could first select the whole wheel and then hold Alt/Option to remove the inner portion, leaving just the tire selected.
If you hold Shift and Alt/Option together when making a new selection, the result will be the intersection of the new selection with the existing one—in other words, the region where the new and old selections overlap.
When using any of these combinations, you can release the keys after you start to drag, and then hold the modifier keys once again to draw from the center or to constrain a rectangle to a square, for instance (Figures 1–5).
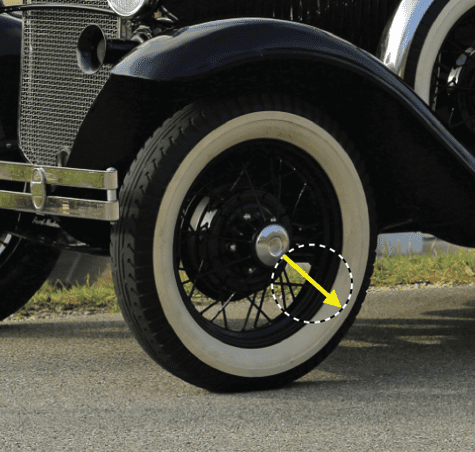
Figure 1. The Elliptical Marquee tool draws from corner to corner—despite the fact that ellipses have no corners.
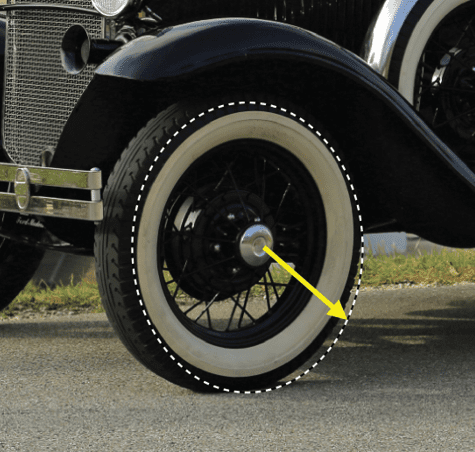
Figure 2. To select the wheel, hold Alt/Option after you start to drag to draw from the center out.
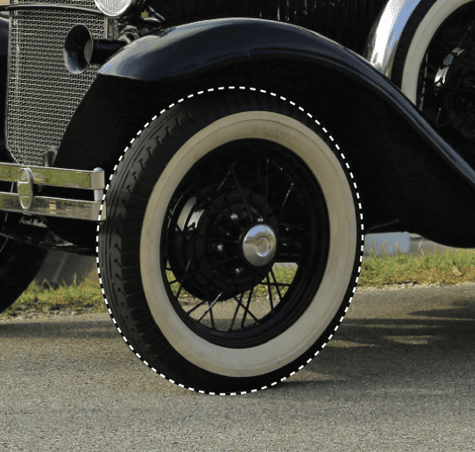
Figure 3. Hold the spacebar to move the selection area around as you’re drawing it, then release the spacebar to continue drawing—a technique that will give you precisely the shape you want where you want it.

Figure 4. Hold Alt/Option before you start a new selection to remove it from the original selection. You can then release the key and hold it again to draw from the center.

Figure 5. Hold Shift before you start a new selection to add it to the existing selection. You can release it once you’ve started to draw.
Quick Mask: Select by painting
The Quick Mask tool is quick, intuitive, and probably the easiest manual selection tool of all. This selection option is often overlooked—in fact, most Photoshop users are barely aware it exists. You activate Quick Mask mode by clicking the icon at the bottom of the Toolbar or by using the keyboard shortcut Q.
As its name implies, Quick Mask was originally designed to mask areas; but if you double-click the icon you can change the behavior so areas you paint are selected, rather than masked (Figure 6).

Figure 6. Double-click the Quick Mask icon at the bottom of the Toolbar to change the mode so that selected areas rather than masked areas are highlighted.
Quick Mask behaves much like a layer mask. Paint with black to select an area, paint with white to deselect. As you paint, you’ll see a red overlay showing the area that will be selected. To turn this overlay into a selection, exit Quick Mask mode by pressing Q again.
The real power of Quick Mask comes from the fact that you can use any of the painting tools with it.
You can use a soft-edged brush (with a low Hardness value) to paint a feathered selection. Use a hard-edged brush (high Hardness) to easily select shapes by tracing around the outline. If you make a mistake, you can just swap the foreground and background colors using the shortcut key X. Paint out the error in white, then press X again to continue painting in black. When you’re done, press Q again to exit Quick Mask and turn the overlay into a selection.
Tip: Use the Gradient tool, set to black-to-white, to paint a selection that fades from 100 percent to none.
Using Quick Mask
One of the benefits of Quick Mask is that it can combine hard-edged and soft-edged selections. In Figures 7–10, I used it to select the upper eyelids on this wide-eyed character to make him stare less intently.
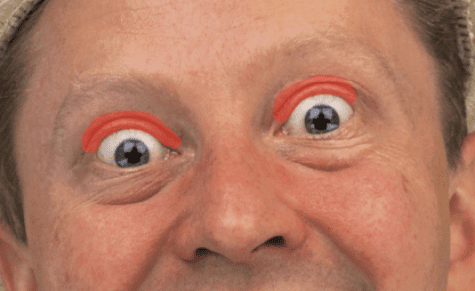
Figure 7. In Quick Mask mode, use a hard-edged brush to paint in black over the eyelid. This shows up as a red overlay.

Figure 8. Change to a soft-edged brush to paint the top of the eyelid, producing a feathered edge.
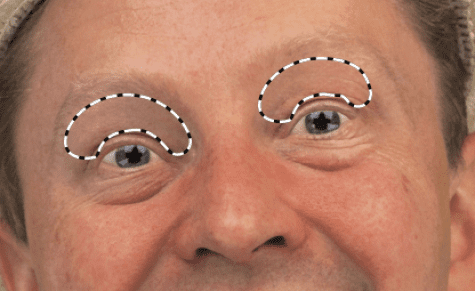
Figure 9. When you now exit Quick Mask mode by pressing Q again, the selection will be crisp at the bottom and soft at the top. Make a new layer from the selection and move it down.

Figure 10. In the final image, you can see the feathered top has blended smoothly into the original face.
Enter Quick Mask mode by clicking the button at the bottom of the Toolbar, or use the shortcut Q.
The Pen tool
The Pen tool draws paths, which can be tweaked to follow the shape of any object. These paths—combinations of points, lines, and Bézier curves—can be stored within any Photoshop document, including JPG files, which is why most cutout objects found in photo libraries use paths.
Paths are the best way of outlining any smooth object, from microphones to televisions, from shoes to rubber ducks (Figure 11). The Pen tool is, however, notoriously difficult for beginners to learn. Let’s just say that if you’re serious about Photoshop, you owe it to yourself to master it. You’ll certainly need to if you also want to make the most of Illustrator and InDesign.

Figure 11. The Pen tool is the best way to create smooth cutouts that can be
stored inside your images—even in JPG files.
Automated Selection Tools
Over the years, Photoshop has amassed a range of tools to automate the selection process in a variety of ways. Although now in many instances these tools have been superseded by the intelligent selection tools (see below), these simpler tools will still sometimes give you exactly what you need.
Select Color Range
The Select > Color Range menu item allows you to select all similar colors in a layer. With its dialog box open, click the image. Colors similar to where you click will be highlighted; when you exit the dialog box, those highlights will become your selection.
The Fuzziness slider will increase the range of color—the higher the value, the wider the range of colors that will be selected. But this approach can add unwanted colors to your selection, so a better approach is to hold the Shift key to add another range of colors. It’s a great tool for certain tasks, such as changing a red car to a green one (Figures 12 and 13).
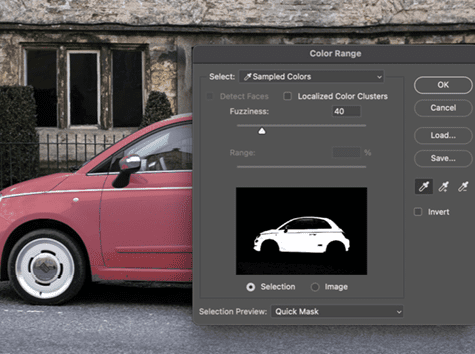
Figure 12. Use the Color Range dialog box to identify areas of a similar color within an image.
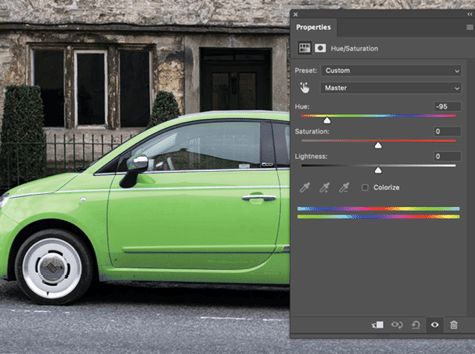
Figure 13. Once you’ve selected the color, you can use an adjustment layer to change the color.
If you want to select similar colors in only one area of the image, select the Localized Color Clusters checkbox, then drag the Range slider to increase the radius around where you first click. Similar colors from this area will be added.
This dialog box can also select faces, as well as highlights, midtones, and shadows.
Magic Wand
The Magic Wand has been around since the earliest days of Photoshop. It simply selects colors similar to the first one you click. It’s still the go-to tool for selecting a white background behind a cutout image, before using Select > Inverse to reverse the selection to the object.
As with the Marquee and Lasso tools, you can use modifier keys to adjust the selection: Hold Shift to add to the selection as you click elsewhere in the image, and Alt/Option to subtract from it.
You can set the Magic Wand tool to find only contiguous areas—that is, groups of pixels within the range of colors defined in its Tolerance setting. This mode is useful for finding, for example, all the white around an object without including any white areas within the object itself.
Select Focus Area
Select > Focus Area will find parts of an image that are fully in focus, omitting those that have some blur to them (and you can drag a slider to set how much blur is allowed in your selection). It’s good for images with a strong depth of field effect, but it rarely produces perfect results immediately (Figures 14 and 15).

Figure 14. The Focus Area dialog box interprets images depending on depth of field.

Figure 15. You can drag on the image to add missing areas—like the grass in the lower-right corner—or open the results in the Select and Mask workspace.
Intelligent Selection Tools
Where the automated selection tools identify similar areas by color, the intelligent tools use artificial intelligence to bring machine learning to the process. This technology, which Adobe has named Sensei, is the area in which the company has been concentrating its resources. The results are often impressive.
Select Sky
Choosing Select > Sky will automatically identify areas of sky within an image, even when surrounded or occluded by trees (Figure 16).
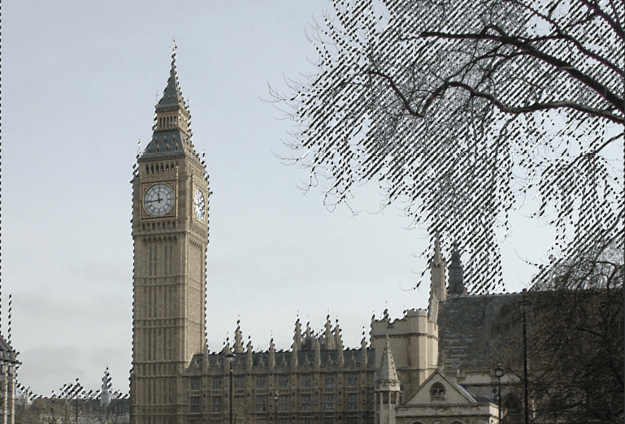
Figure 16. The Select Sky tool finds areas of sky within an image—even inside complex tree branches.
You can then apply adjustments, such as brightening or changing hue, to the selected area. It’s always best to apply them as adjustment layers, in which case the selection will be turned into a layer mask, which you can modify manually if necessary.
Using the same technology, the Edit > Sky Replacement dialog box takes the process a stage further by enabling you to choose from a range of skies that are built in or that you have added from your own photos. This tool also lets you tint the foreground to match the sky. For example, when you add an evening sky to an image, Photoshop will also add an adjustment layer that darkens and colors the foreground appropriately.
Quick Selection tool
The first of the automated selection tools, the Quick Selection tool was revolutionary when it first appeared in 2007. Drag the tool over an object (a person, a car, an animal, whatever you choose), and it will attempt to isolate that object.
Tip: The Quick Selection tool is nested beneath the Magic Wand tool. If you don’t see, click and hold the Magic Wand tool to reveal it, or press Shift+W to cycle through the three automatic selection tools.
The Quick Selection tool works well with images of people, but if your subject is wearing highly patterned clothing, such as a plaid suit or a striped shirt, it is likely to misinterpret boundaries (Figure 17).

Figure 17. Drag the Quick Selection tool over an image to select objects. Note: The tool does have trouble with complex patterns.
As with the other selection tools, you can use modifier keys to adjust the selection: Hold Shift and drag over a different area to add it to your selection, or hold Alt/Option and drag over a selection to remove an unwanted area.
You may have trouble producing a perfect cutout with this tool alone. It can be used in conjunction with Quick Mask mode, as explained above. You might have better results if you follow it with Select and Mask (see below).
Object Selection tool
Where the Quick Selection tool requires you to drag over the object you want to select, the Object Selection tool automates the task further.
Once it’s active, you can move the cursor over your image, and Photoshop will highlight in blue those objects it can identify easily within the pixels of your image. The Object Selection tool can make a fair attempt to highlight any hard-edged object (Figure 18), but the machine learning technology has been more extensively trained to recognize everyday objects such as people, animals, and cars.
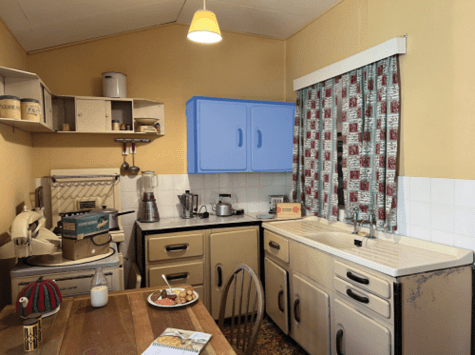
Figure 18. The Object Selection tool highlights each found object in an image as you pass the cursor over it—like the cabinets highlighted in blue—and does a remarkably good job.
If you want to select an object that has not been found automatically, you can draw a rectangular selection around it with the tool. Photoshop will then examine the contents of that rectangle and will usually be able to identify the object in question.
Select Subject
Choosing Select > Subject—the precursor of the Object Selection tool—will cause Photoshop to find the most prominent subject of the image. It works well if there’s just a single clear subject in the scene, and it generally does an excellent job of identifying and selecting people (Figures 19 and 20).

Figure 19. Using Select > Subject works particularly well with images of people, like the one of this woman. Her hair is especially difficult to discern against a similarly colored background…

Figure 20.
…but the tool manages a near-perfect cutout.
But if your image is of a landscape or an empty room, the tool will fail to find a single subject. In this case, the Object Selection tool will do a better job.
Using Select and Mask
The powerful Select and Mask workspace does a good job of automating even the most complex cutouts, and it works especially well with hair.
You can access it from the Options bar at the top of the window after any selection has been made or by pressing Ctrl+Alt+R/Command+Option+R. Select and Mask includes tools that let you smooth selections, perform perfect cutouts on hair, and even remove color fringes around cutouts by recoloring them.
The Quick Selection tool and the Object Selection tool are built into Select and Mask, so you don’t even need to make an initial selection first—you can just open the workspace and start making selections using these tools. They behave the same as their standard counterparts, except that rather than seeing a standard “marching ants” outline, you can choose how you view your selection.
At the top of the Properties panel are the View mode settings. You can choose views including a Quick Mask overlay, or you can decide to see underlying layers or a checkerboard background. Most useful of all, you can view your object against a black or white background, and it’s often helpful to switch between these backgrounds using the shortcuts A and T. You can change the opacity of this background, so you can see the full image ghosted behind your selection.
The Brush tool lets you paint to add to your selection, just as it does in Quick Mask mode; hold Alt/Option to subtract from the selection. You can even use the Lasso tool, if you prefer.
Because automated selections often result in ragged selection edges, the Smooth slider in the Global Refinements section of the Properties panel lets you smooth out these jaggies. For even more smoothing, increase the Feather amount to make the edges truly soft, then drag the Contrast slider to tighten up that feathering.
The Radius slider in the Edge Detection area is best for selecting soft edges, such as hair or fur; turn on the Smart Radius option to let Photoshop work out the amount of detection. If you’re selecting a person, though, you’d do best to drag the Refine Edge Brush tool over their hair instead. You can scale this tool to the size of the flyaway hair, and as you drag it you’ll see it intelligently separating the hair from the background.
But that’s not to say it produces perfect results every time: Fine hair photographed against a textured background, for instance, will always prove problematic.
The Select and Mask workspace allows you to export the results in a number of ways: as a standard selection, as a new layer, or as a layer mask. This last method is the most useful, as it allows you to hand-tune the selection afterwards by painting on the mask with any of the painting tools. You can, for example, use the Smudge tool to make a ragged hair cutout look more natural.
If your subject has been photographed against a very different color background, you’ll sometimes see a fringe around a selection where the background color has crept in.
One way to get rid of this is to tighten it up using the Shift Edge slider. If the background color is tinting the edges of your cutout, you can use the Decontaminate Colors slider to mitigate the results, but because this necessarily adds extra colors to the background, it will always output the result as a new layer with a layer mask.
Select and Mask, Step by Step
The Select and Mask workspace contains multiple tools and offers several ways of viewing your cutout. Here are the steps you might follow in a typical use (Figures 21–27).
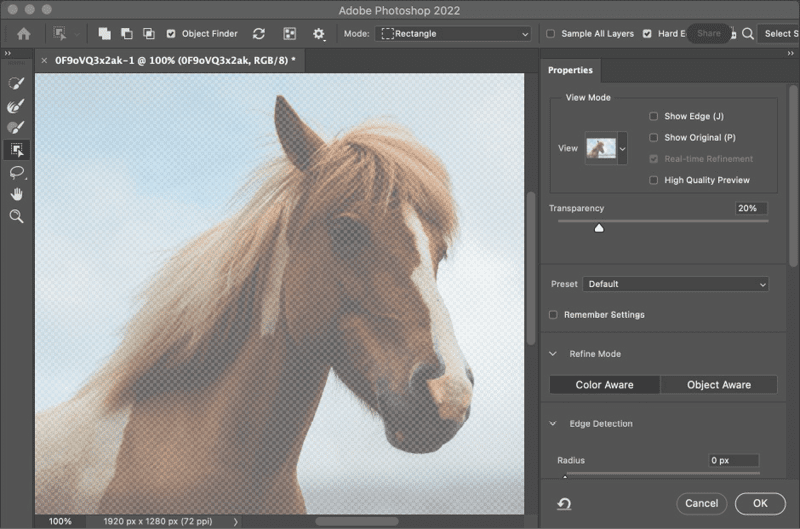
Figure 21. When you first enter the Select and Mask workspace, if you have no existing selection, you’ll see your image ghosted against a checkerboard background.
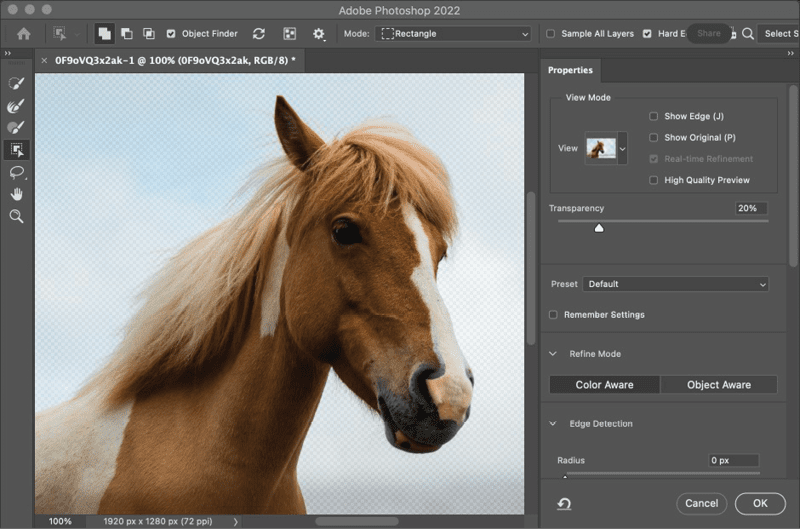
Figure 22. The Object Selection tool will highlight your object as you move the cursor over it: Click or drag over it to convert the highlights to selections.
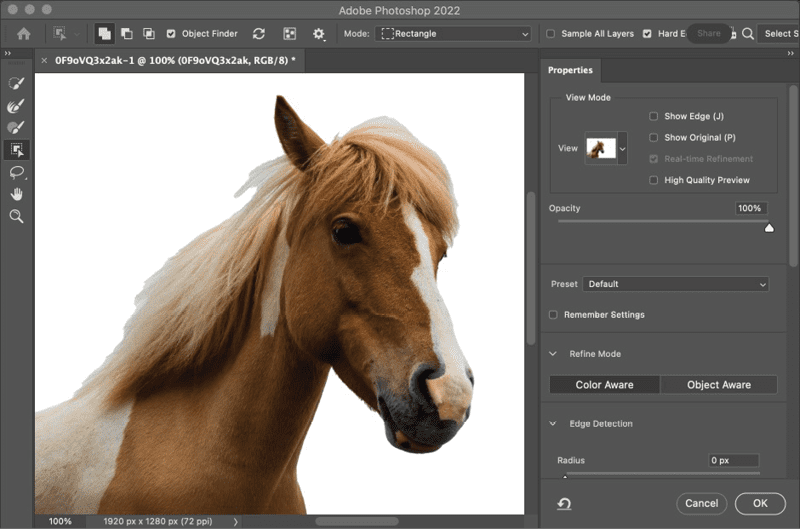
Figure 23. When you switch to viewing against white (shortcut: T), you can see that the mane has been poorly cut out.
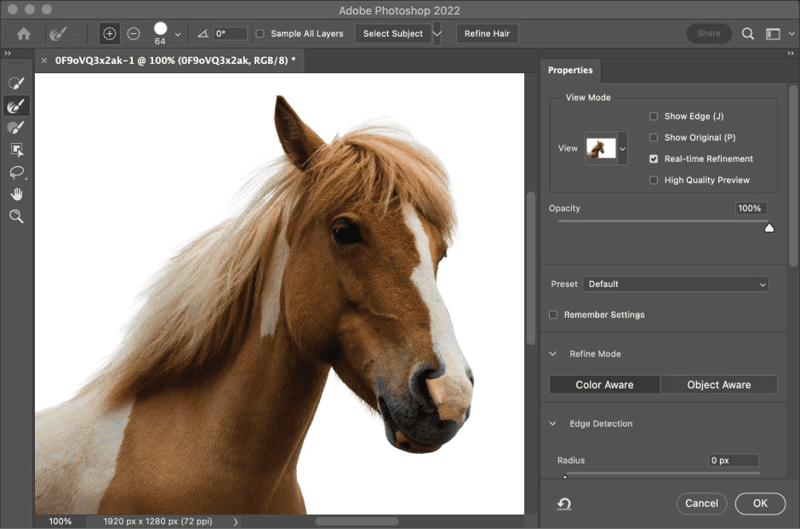
Figure 24. Drag the Refine Edge brush over the hair, and Photoshop will try to intelligently separate it from the background.
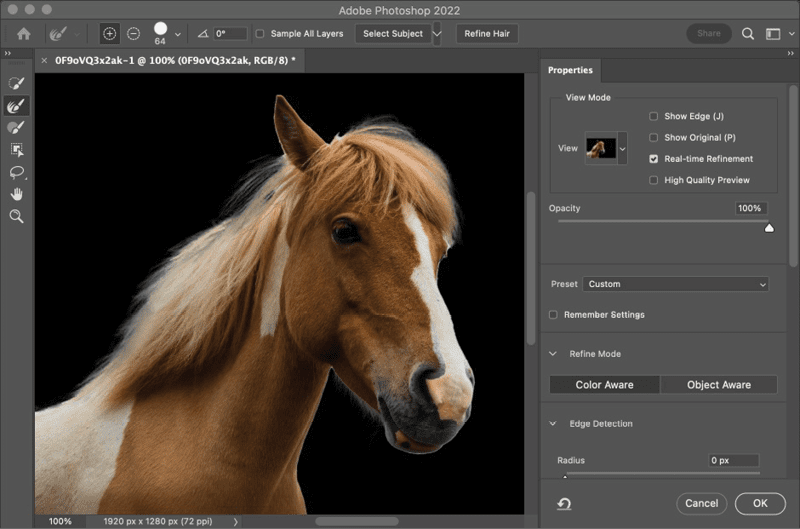
Figure 25. Switching the background to black (shortcut: A) shows a few errors: a white fringe around the head and too-bright hairs under the chin.
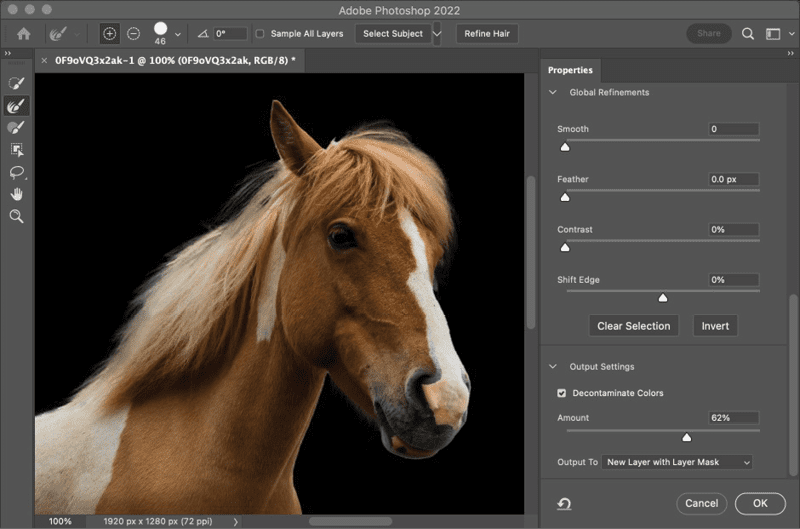
Figure 26. Checking Decontaminate Colors will tint those edges to match the interior of the object.
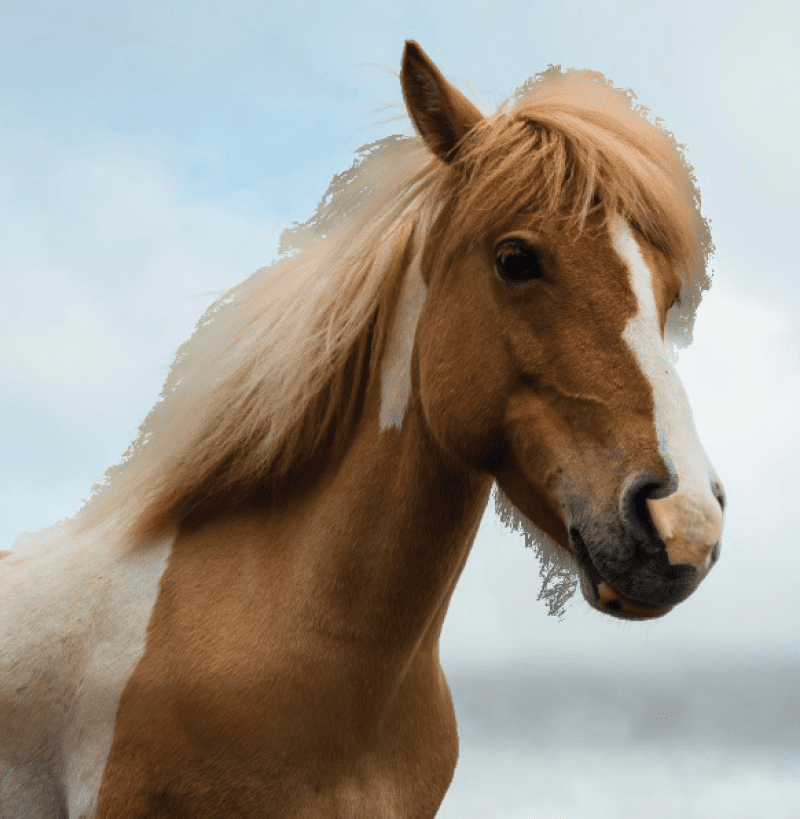
Figure 27. If you check Decontaminate Colors, you must export the result as a new layer with a layer mask. To see why, disable the layer mask (hold Shift and click it in the Layers panel). You’ll see how those edges are decontaminated by adding pixels around the mask. You’ll still have the original to go back to if you change your mind.
Commenting is easier and faster when you're logged in!

Recommended for you

Neue Haas Unica: The Lost Sequel to Univers and Helvetica
Pardon me for waxing enthusiastic. Some things are just too cool to stay calm ab...

6 Tips to Speed Up InDesign
Sometimes, things just don’t run as smoothly or as quickly as we’d l...

Putting Headings in Rounded Rectangle Background “Frames”
You want a heading in a rounded-corner rectangle, but you don't want them in a s...