
Making Forms with InDesign and Acrobat Sign
Use text tagging to take your forms to the next level of functionality.


This article appears in Issue 16 of CreativePro Magazine.
Today’s technology allows many of us to work from anywhere—from the office, home, or that coffee shop around the corner. And it enables our co-workers, manager, or customers to do the same.
The modern hybrid system of working, where we’re always connected but rarely find ourselves in the same physical space, has created a greater need for online collaboration, automation, and document security. And this need will only grow in the future. Recent research by Adobe has found that 74% of companies plan to permanently shift to more remote work.
But exactly what tasks? Most of the internal processes required to run a successful business are based on data input and information processing. These examples can apply to virtually any business across any industry, and they can have an impact on the entire organization:
- Creating quotes for customers
- Onboarding customers and staff
- Creating and signing nondisclosure agreements
- Creating change authorizations
- Processing approvals for budget, travel, training, and so on
And to create and gather such information? We primarily use forms, whether they’re on paper, online, or in PDFs.
There is a long list of arguments against the use of paper forms in a digital world, including loss of time due to printing, completing, scanning, and processing data. Not to mention the environmental impact—or the risk of losing documents.
According to a survey in my home country of Belgium, 70% of small- and medium-sized business owners stated that they could go out of business in a matter of weeks if they suffered a catastrophic loss of paper documents due to flood, fire, or other incident. So, now is a great time to start your company’s digital transformation if you haven’t already done so.
Word, Web Forms, and InDesign
Covering the basics of creating interactive forms is beyond the scope of this article. But let’s take an overview of some of the most common methods: using Word, web forms, or InDesign.
Word
One way to get started is to build your form in Word and export a PDF, which you would then fine-tune in Adobe Acrobat. Or you can simply convert an existing PDF document to an interactive form using the Prepare Form feature in Acrobat using these basic steps (Figure 1).

Figure 1. You can use Acrobat to add fields to a PDF to create a form.
You can use Acrobat to change the look and feel of the individual form fields, set specific actions for interactive buttons, or add form field calculations. None of that is very challenging.
The problem comes when the source document needs to be updated. Usually, this means you’ll need to make the changes in Word, create a new PDF, and then retrace your steps in Acrobat. Or, in some cases, you could copy and paste the form fields in Acrobat from the old PDF into the new one.
Either way, it’s a tedious and inefficient process.
Web forms
While web form solutions are often completely free and easy to use, they also often come with a few disadvantages:
- Many web form services give you limited design options. It may be difficult (or impossible) to stick to your brand guidelines or otherwise customize the form.
- Advanced features are often hidden behind a paywall.
- It can be difficult to determine how safe a web form solution is because it’s not clear where the data is stored, or who has access to it.
- The captured data isn’t always available to everyone in your organization.
- It’s often impossible to connect a web form solution to your own internal system for data storage and processing.
- Because many web form solutions are free to use by anyone, they can be exploited for phishing or other attempts to illegally gather information.
Why Can’t I Simply Stick to Microsoft Solutions?
It’s true you can accomplish a lot by using Microsoft Forms. It’s a fully integrated solution, it’s secure (and by a company your IT department trusts), and the captured data can easily be repurposed.
But by combining Microsoft with Acrobat, Acrobat Sign, and Creative Cloud you can make the experience even better.
I have already mentioned the advantages of using InDesign for designing visually engaging forms and documents. And you can choose from several options to collaborate on this document:
- InDesign Share for Review
- PDF review
- Microsoft Teams (using the Acrobat plug-in for reviews
and the Acrobat Sign plug-in for formal approvals) - Acrobat from within SharePoint or OneDrive
Once the document is sent via Acrobat Sign, you can repurpose the data from Adobe’s servers to existing Microsoft solutions like Power Automate. There are many more possibilities than I can cover in this article. But the best answer to the question “Microsoft or Adobe?” is that it should actually be “Microsoft and Adobe.”
Building interactive forms using InDesign
InDesign offers a great way of designing interactive forms, using the Buttons and Forms panel (Window > Interactive > Buttons and Forms). It has become the tool of choice for many form designers. Why?
InDesign is far superior to Word when it comes to making a document look good. This also means it’s easy to turn the design of an existing project into an interactive form.
Designers can set frames as text frames, pull-down menus, check boxes, radio buttons, or interactive buttons, which will export accordingly in an interactive form. In many cases, this will greatly reduce the amount of work needed to fine-tune the resulting PDF in Acrobat. You may even be able to go straight from InDesign to distribution, saving a ton of time and effort.
InDesign’s ability to export to a print PDF offers a myriad of different settings, including image resolution (allowing you to control the file size of the PDF for easy distribution).
We simply love InDesign. Amirite?
Drawbacks of PDF Forms
Personally, I always prefer a PDF form over a paper document, but there are a few disadvantages to using PDF forms:
- You’re never quite sure how the recipient of the form will open and use the form. If the recipient uses a generic PDF viewer instead of Acrobat Reader, some fields may not work properly, especially those that include special buttons or calculations. These also make it more difficult for users to complete the form on a mobile device.
- It’s not always simple to extract the data from the form and enter the data into a large system for easy access and analysis.
- There might be problems sending the completed form back to the sender. Unless you include a Submit button to return the form data to the sender, a manual action is required for sending the form and its data (e.g., attaching to an email or uploading it to another system).
- There might not be a system in place to validate the identity of the form-filler/signer. Most forms don’t require an advanced security system, but it is essential in financial transactions.
Introducing Adobe Acrobat Sign
Adobe Acrobat Sign is Adobe’s service for creating, sending, tracking, signing, and automating digital document processes.
Despite the name, Acrobat Sign can do a heck of a lot more than simply sending a document for e-signature, although that is how most people think of it. Few people realize that it lets you create both web forms and interactive forms as part of a signature workflow.
Acrobat Sign is available in many versions and flavors, including its plain-vanilla version with a standalone Acrobat Pro license or Creative Cloud membership. The features available to you will depend on your plan: Teams or Enterprise for Acrobat Pro, or Individual, Teams, or Enterprise for Creative Cloud.
If you’ve purchased your subscription via Adobe.com or in a Teams edition, it comes with:
- Unlimited signature transactions
- Web forms (including the ability to collect online payments)
- Form calculations
- Sending forms in bulk (which is similar to InDesign’s Data Merge, where a personalized form is sent per recipient)
In addition to these features, the Enterprise version of Acrobat Sign offers enhanced security settings, automation, and available APIs.
Sending a document
There are various ways of sending a document via the Acrobat Sign service:
- Send from Acrobat Pro: You can send a document from within Acrobat by opening the Acrobat Sign tools and clicking the Request Signatures button. This will open the Acrobat Sign inter-face within Acrobat Pro and send the document to your recipient with instructions for signing it.
- Send from the E-Sign web portal: Go to acrobat.adobe.com, click the E-sign tab at the top, then click the Request E-signatures button which will take you to the Sign web portal.
- Send directly from Microsoft Office 365: Download and install the free Adobe Acrobat Sign add-in for Word and PowerPoint (Figure 2). Or have your IT service deploy it as part of OneDrive and SharePoint.
- APIs and third-party integrations are additional options, typically in the domain of the IT staff of large companies.

Figure 2. The Adobe Acrobat Sign add-in puts a Create and Share Adobe PDF button in the Word ribbon.
Once a document is sent through any of these methods, the data (including input from interactive forms and web forms) is stored on an Adobe server. From here, it can be repurposed, moved, or deleted using integrated solutions, such as Microsoft Power Automate.
Text Tagging for Acrobat Sign
Text tagging is the process of inserting text-based placeholders that represent future form fields into a source document. Text tagging offers a smart way of inserting simple (or complex) form fields into Word documents, which get converted into real fields once sent via Acrobat Sign.
There are many advantages to text-tagged documents. First, text tags reflow in your document as you’re working on it because a text tag is simply a string of typed characters. This means it’s easy to add or remove text within an existing document or to copy and paste tags from one Word document into another.
Second, it’s possible to include extra strings in a text tag for adding specific attributes to an existing tag. Typical examples include:
- Setting a limit to the number of characters that can be used
- Setting a specific notation (e.g., dates, phone numbers, social security numbers)
- Masking field entries when inserting credit card numbers and other sensitive information
- Adding field calculations
- Setting conditional fields to show, hide, calculate, or update other fields when one or multiple conditions in the document have been met
Adobe has provided a comprehensive guide for getting started with text tags, which is available here.
Is Acrobat as powerful as text tagging?
Adobe Acrobat also offers a few ways of making the fields in a PDF form more interesting. For example, you can do calculations in fields or create trigger buttons to execute Acrobat actions.
But a more advanced form that doesn’t make use of Acrobat menu commands is more difficult to build in Acrobat. This is because any field validation or calculation in Acrobat that needs to go beyond the basics requires JavaScript. You might know that JavaScript can do amazing things, but its power comes with a huge learning curve for the average user. This is why nearly all advanced form capabilities within Acrobat Sign come with a user interface instead of relying on JavaScript.
I’d argue that the form capabilities within Acrobat Sign are more powerful than those within Acrobat. But as with most things, the devil is in the details.
You can’t tweak a Sign document with the advanced form capabilities in Acrobat. Let’s say you create a document with Acrobat Sign with one field that adds the values of two other fields. If you download that document as a PDF, you’ll find that Acrobat doesn’t recognize that field as a calculated field. This is because Acrobat Sign adds all field capabilities as metadata, which is then interpreted by the Acrobat Sign system upon sending or publishing the form. It’s not using Acrobat features at all.
So, you need to decide whether you’re going to use to Acrobat’s form capabilities or those of Acrobat Sign.
You can convert your Acrobat form into an Acrobat Sign form. At the top of the Acrobat Pro window, click Tools. Under Forms & Signatures, click Prepare Form to enter the form editing mode. Click Start.
From there, click the More menu (next to the hammer and wrench icons) and choose Prepare Form for E-signing to convert the document into an Acrobat Sign form (Figure 3).

Figure 3. Acrobat’s Prepare Form section offers tools for creating PDF forms. You can find the Prepare Form for E-signing command in a menu there.
Tip: The Prepare Form tool is not available by default; to add it to the menu of tools on the right margin of the Acrobat window, click the Tools tab and, under the Prepare Form icon, click Add.
Text Tagging and InDesign
A little-known fact is that you can use Acrobat Sign text tags to set up additional features (e.g., field calculations) in interactive form fields in an InDesign document. This will allow you to specify additional parameters, including some not available via InDesign’s Buttons and Forms panel, and it could let you complete the form in InDesign, bypassing Acrobat entirely.
Setting text tags within an InDesign document can be tricky: You can’t simply copy a tag from Adobe’s text tagging guide or an existing Word document and paste it into InDesign. This is because InDesign provides an interface for setting field options that Word doesn’t, like the value of a radio button, or making a field mandatory. Because the text tags were designed to be used in apps like Word, you’ll have to keep an eye out for these discrepancies and simplify some tags so they don’t conflict with the options InDesign can already bake into your form.
The only way to test the text tag is by actually sending the document for signature via Acrobat Sign, so you’ll need to send out a few test documents for signature as you fine-tune your form. This can be tedious, but once you know a text tag works, you can save it for use on other forms.
A text tag is not particularly hard to understand or enter, but it has a very specific, exacting structure that includes various parameters in a particular order. One simple typo can render the entire field useless.
Figure 4 shows an example of a basic text tag that will work in Acrobat Sign by pasting it into Word. It describes a field called Name which requires the person identified as signer1 to fill out their full name.
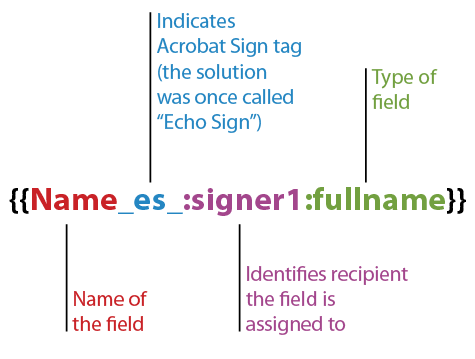
Figure 4. The syntax of a basic text tag is simple, but exacting.
To make this work in InDesign, however, you need to remove the braces that you’d use in Word: Name_es_:signer1:fullname.
Before you can assign a text tag to a field in InDesign, you need to create a form field by converting a frame using the Buttons and Forms panel (Window > Interactive).
Generally speaking, you can use the same form field types available in the Buttons and Forms panel (e.g., Radio Button, List Box, and so on). Once the form field is created, you can add extra functionality to the field by adding the text tag in the Name field within the Buttons and Forms panel (Figure 5).

Figure 5. When building a form in InDesign, you can create a form field with the Buttons and Forms panel and, in the Name setting, add a text tag to extend the possibilities. This text tag adds the requirement that the person using the form use month-day-year format when inputting the date.
In this example form field, the tag specifies that the text in the field needs to be entered as a date format using month-day-year.
Example: Building a T-shirt Order Form
I’ve created a practical example of a text-tagged InDesign form to order CreativePro T-shirts online. This form (Figure 6) offers an easy way of:
- Inserting personal information
- Specifying T-shirt size and quantity
- Choosing shipment options
- Automatically calculating subtotals, taxes, and totals (taking into account the selected shipping options)
- Providing a masked field for entering credit card details
- Signing the order electronically (as opposed to using a digital signature field, which InDesign offers by default)
- Adding notes

Figure 6. The sample form uses a number of fields with functionality extended by text tags.
Creating the personal information tags
The first fields in the form allow the recipient to insert personal information such as name, email, and phone. By default, InDesign has no way of validating data, which means it would be possible to enter an invalid email address or a phone number with a missing digit. By adding text tags, we can enforce a specific format for numbers and dates, and we can also set acceptable numeric ranges or a maximum number of characters.
Because we want to require this form to include a signature field—whether it’s created in InDesign or added later on—I used signer1 in every tag. You don’t have to require a signature on every document you create (yes, I know that seems counterintuitive, given that you’re using Acrobat Sign). You can also simply assign a different role to your recipient, like “approver” or “form-filler.”
Our first special tag validates an email address. Using the Buttons and Forms panel, I created a Text Field and added the text tag in the Name setting. I used the tag *emailAddress_es_:signer1, which defines the field name as emailAddress.
:isemail
I used a similar scenario for the phone number field. The tag *Mobile_es_ forces the user to insert the phone number using a US-based phone number, e.g., (555) 123-4567 (Figure 7).
:signer1:phone

Figure 7. The text tag in this field forces customers to enter their phone numbers in the correct format.
Tip: You can also change the text tag to accommodate other strings of numbers and punctuation. To validate UK phone numbers, use :phone(country=uk) instead of :phone to change the number format. And for other custom strings (e.g., product numbers or other serial numbers), you can use regular expressions or other tags.
In this example, I used a basic Text Field for the address. But you could instead create separate—and individually validated—fields for the street, number, postal code, state, and country entries.
Creating tags for T-shirts
The form offers T-shirts in four colors (black, pink, multicolored, and white) in four sizes (small, medium, large, and extra-large). Underneath a photo of each color shirt, I created four Text Fields in which customers would enter the number of shirts purchased for each size.
Each of these shirts is identified in the Name setting (Figure 8). A large pink T-shirt was named plarge, a small white T-shirt was named wsmall, and so on.

Figure 8. The Name field identifies the T-shirt’s size and color.
Tip: It’s best to keep the names of fields as short as you can. Calculation tags, which you build using other referenced field names, can get very long, and you can enter only 100 characters under Name. If you do need more space, you can add more field properties, such as complex calculations or conditional fields, using the Acrobat Sign portal.
Calculating T-shirt subtotals
To calculate the subtotals, we need to add a calculation tag to the field. Here I used the tag blacktotal_es_:calc.
(([bsmall]+[bmedium]+ [blarge]+[bxlarge])*15)
:format(Number,"$,0.00")
This tag (Figure 9) names the field black-total and is the sum of the fields bsmall, bmedium, blarge, and bxlarge, and then multiplies that number by 15 because each black T-shirt costs $15. The format syntax displays the number with a period, two decimals, and a dollar symbol.
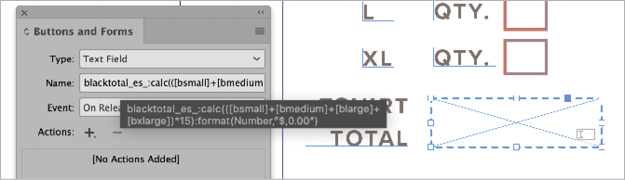
Figure 9. This calculation tag determines the total cost of the black T-shirts and formats the result as a two-figure decimal with a dollar sign.
I used a variant of this formula for the other three T-shirt colors and prices.
Setting delivery options
The recipient can now choose a delivery option by using a set of three radio buttons (Figure 10). When building each of the three form fields in InDesign, I chose the Radio Button option within the Type menu, then made sure all three buttons have the same value—shippingchoice—in the Name setting.

Figure 10. These three Radio Button fields work together because they have the same Name.
In the Button Value field at the bottom of the Button and Forms panel, I defined a value for each radio button: 0 for the first radio button, 10 for the second, and 18 for the third, each representing a cost associated with a shipping option.
Calculating totals
The last calculation fields are similar to the T-shirt subtotal fields. The first (subtotals) is simply the sum of all four T-shirt subtotal fields (blacktotal, pinktotal, colortotal, whitetotal). Here I used the tag subtotal_es_.
:calc([blacktotal]+[pinktotal]+
[colortotal]+[whitetotal]):format
(Number,"$,0.00")
The taxes field (Figure 11) calculates 6.25% of subtotals: taxes_es_:calc.
([subtotal]*0.0625):format
(Number,"$,0.00")

Figure 11. A calculation field determines the sales tax of the order.
I added the shipping cost with the field shipping (Figure 12) and the tag shipping_es_:calc([shippingchoice]+0), which simply takes the value of
:format(Number,"$,0.00")shippingchoice and formats it as a price.

Figure 12. The customer’s choice of shipping in the shippingchoice radio button field determines the value of the shipping field, which uses tags to display the price properly.
And to finish things off, grandtotal (Figure 13) adds up all previous values using the calculation tag grandtotal_es_:calc.
([subtotal]+[taxes]+[shipping])
:format(Number,"$,0.00")

Figure 13. This field automatically calculates the grand total for the order, including all merchandise, taxes, and shipping.
Creating a masked field
You can use text tags to hide credit card numbers, Social Security numbers, and other sensitive data when viewing or printing the form. Data in such a field will be shown only while the user is completing the field and when all form entry information is gathered using Acrobat Sign’s document management module. This is the central page from where you manage all agreements in your account, including agreements currently out for signature, canceled, or signed. It’s also the place where you manage agreements sent in bulk, web forms, and templates.
To create the credit card field (Figure 14), I used the tag: *creditcard_es_:signer1. The :mask property tells the system to
:mask:string(char=num,maxlen=16)
mask the information in the field (Figure 15).
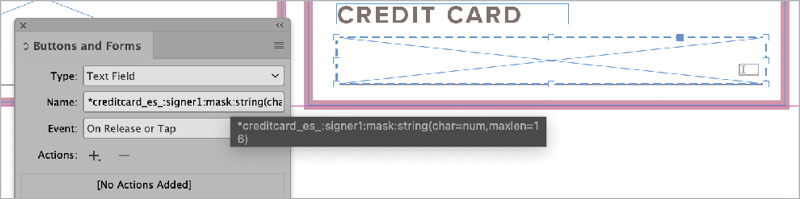
Figure 14. This field accommodates the 16 digits of the customer’s credit card

Figure 15. You can automatically mask sensitive information as it is input.
The :string property is defined here to accept only numbers and only up to 16 of them.
Adding a signature field
InDesign already offers a Signature field option that uses a digital signature, but we can use text tags to allow an electronic signature. (View this short video to learn the difference between the two.)
There are situations that require secure digital signatures, but I wanted to use a more standard electronic signature field on this form. To do so, I created a text field that uses the tag Sig_es_:signer1:signature to convert it to an electronic signature field when the form is sent (Figure 16).
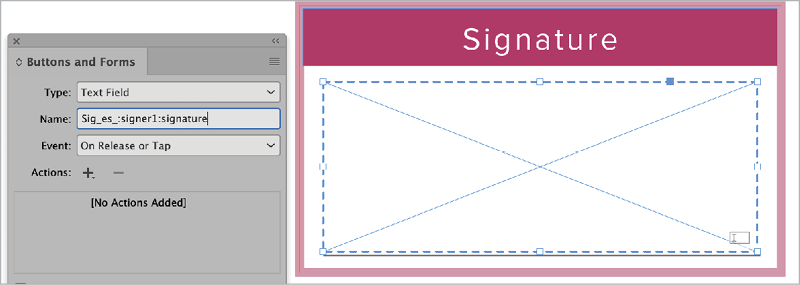
Figure 16. This tag will create an electronic signature field.
Tip: If you want to reuse tags, save them in a Creative Cloud Library, which will let you simply drag and drop them into new documents. It’s also important to use the Add Description command (Figure 17) to identify to your library item—it will make your tag easier to find, and as you scroll through the Library, the information will pop up as you hover your cursor over each tag (Figure 18). Share the Library with the rest of your team as read-only, so only you can change, add, or delete your tags.
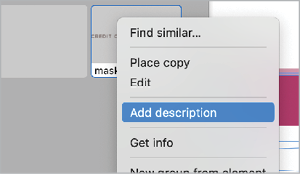
Figure 17. Take a minute to
document your tags for future use.

Figure 18. Your descriptions will pop up as you scroll through your Creative Cloud Library.
Finally, a PDF
And now, you can export the document as an interactive PDF, which supports the buttons and form features we’ve used here.
- Choose File > Export.
- From the Format menu, choose Adobe PDF (Interactive).
- From the Export to Interactive PDF dialog box, click Compression to display the Image Compression options, where you can increase the resolution if you wish.
- Click Export to create the PDF.
Sending a Tagged Document
Once the PDF has been created, you need to send it using Acrobat Sign.
You can open a web browser and navigate to the Acrobat Sign web portal (sign.adobe.com); from there you can send the document and access many other options.
Alternatively, you can send the document by accessing Acrobat Sign from within Acrobat Pro:
- Open the interactive PDF using Acrobat Pro.
- To send the form, go to E-Sign > Request E-signatures, or in the Acrobat interface, click the Request E-signatures tool (Figure 19).
- Set the document recipient and add a title and message. Note: The signature icon next to the name of the recipient clearly indicates the person’s role. Remember how we included the text signer1 in every tag? This meant that all the tags we created were meant for the first signer of the document—the person we specify here.
- Click the More Options button to expand the interface and access the full range of available options within Acrobat Sign. This includes setting the language of the document invitation, deadlines, password protection, and more (Figure 20).
- The next screen opens Acrobat Sign’s form editor (Figure 21). Notice how it already recognizes the fields we created earlier in InDesign, thanks to the text tags. You can also place and configure form fields into a PDF here by toggling Advanced Editing on and dragging and dropping fields from the right side of the screen.
- Optionally, double-click any of the text-tagged fields to view additional options. Notice how advanced these forms can become (Figure 22).
- Click the Send button to send the document, and you’ll see a confirmation (Figure 23).
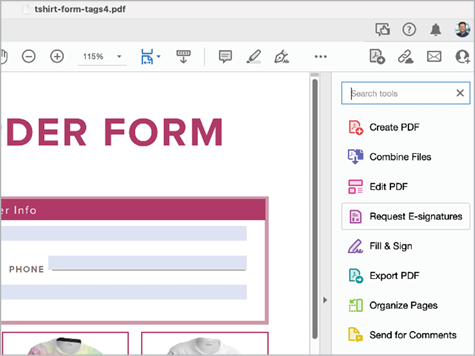
Figure 19. The Request E-signatures interface

Figure 20. Clicking More Options lets you access a full range of features.
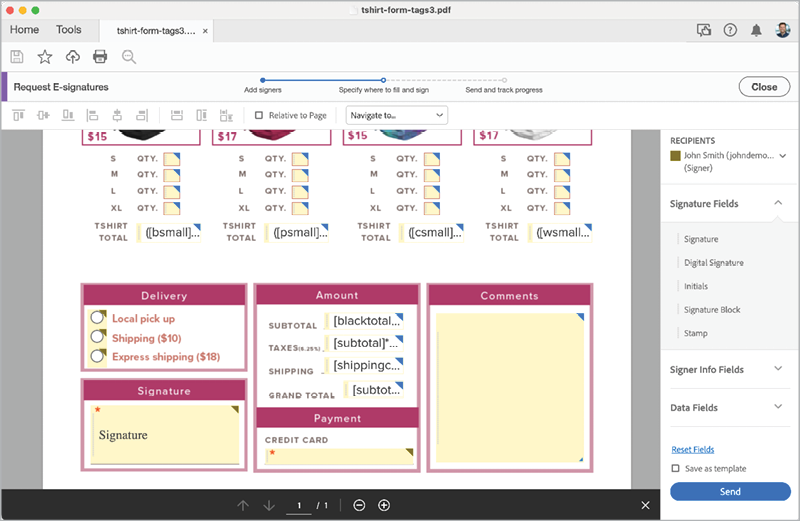
Figure 21. You can add fields to your form or refine the ones you built in InDesign using the form editor.
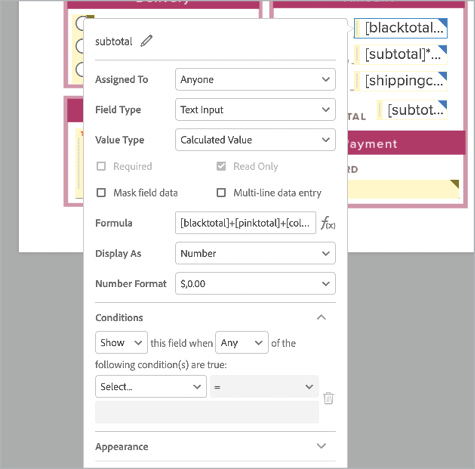
Figure 22. Advanced options for the subtotal field
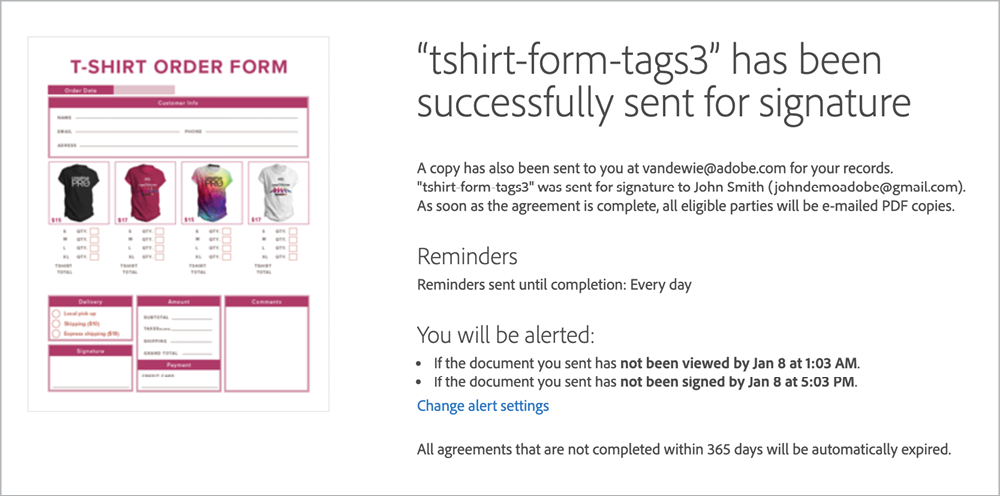
Figure 23. Acrobat Sign will confirm that your form is on its way to those who must sign it.
Opening and Completing the Form
Once the document is sent, it is registered within Acrobat Sign, and the recipient(s) will receive an email inviting them to open and complete the document.
All a recipient needs to do is click a link in the email to open the form, which can be completed using any device. Once the form is complete, the recipient clicks a Click to Sign button to submit (Figure 24).

Figure 24. Signing your form is one click of a button away.
All parties will receive a copy of the signed document, along with an audit report that captures details of all participating parties, including time and date of completion, email addresses, IP addresses, and a unique transaction ID (Figure 25).

Figure 25. An audit report displays the status of your form as it awaits completion and signature.
Once completed, the document becomes unchangeable, with a certificate included as part of the electronic signature, making it tamper-proof (Figure 26).
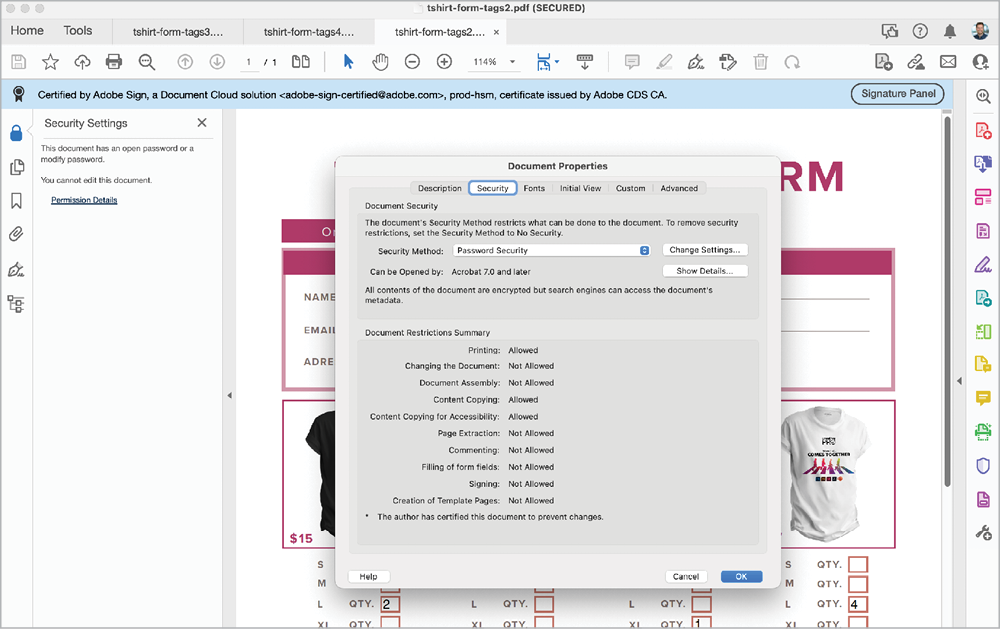
Figure 26. The final document is secured by a certificate and locked from editing.
The sender can now access the completed document using the Manage module within the Acrobat Sign web interface to download the form information as a CSV.
Try It Yourself!
We’ve only scratched the surface of what is possible by combining Adobe InDesign with Acrobat Sign. With a few basic text tags you can design a variety of interactive forms for a variety of uses—including publishing your InDesign form as an interactive web form on your own website.
Tip: If you want to learn more about text tagging, consult Adobe’s text tagging guide and calculated fields guide.
If you want to try our example form, click this link. Unfortunately, I won’t be sending you any T-shirts. But at least you’ll have an idea of what the final document looks like, created 100% using InDesign.
Commenting is easier and faster when you're logged in!
Leave a Reply

Recommended for you

Illustrator Downloadable: Summer Citrus Pattern Set
Downloadables are an exclusive benefit for CreativePro members! (Not a member ye...

InDesign Downloadable: Tables SuperGuide
Downloadables are an exclusive benefit for CreativePro members! (Not a member ye...

How to Be a Better Designer: Learn About Type
It’s all about the type. Or, as James Carville might have said, it’s the typogra...
This is a fantastic resource for anyone looking to create forms using Adobe InDesign and Acrobat Sign.