
Making Flash Roar
Everyone remembers the music from Jaws, the sound of the light saber fight in Star Wars, the comic sound effects of the Road Runner cartoons. Sounds help tell the story and enhance the mood, letting the audience know whether something is funny, scary, or important. The term “cinematic” gets tossed around a lot when it comes to talking about great Web sites, and one of the keys to a “cinematic” experience is a great sound track.
If you’re creating content in Macromedia Flash, (this tutorial was written using version 5) you’re probably either creating interface elements such as animated text and buttons or short streaming movies. Both types of Flash content creation can be greatly enhanced by a good sound track. Music adds ambience and enhances splash screens, sound effects highlight elements in the interface and help guide the user through the interactive elements of a site, and dialogue and voice-over serve as important story-telling tools for streaming movies. Luckily, with a typical Flash animation, you won’t need the full, developed soundtrack that a movie or TV commercial has; a few well-placed sounds can go a long way.
Digital Audio 101
Before you start editing a soundtrack, you should know a little about how digital audio works. The sound we hear in the real world — analog audio — is caused (or carried) by sound waves. To turn this analog signal into a digital signal, the software or hardware performing the conversion samples the sound waves, meaning it captures so many discrete data points along the continuous analog waveform. The higher the sampling rate — the more data points captured per length of analog waveform — the better the quality of the resulting digital audio file.
As with other digital data, each sampled audio point is represented by a binary number — in this case, comprising either 8 or 16 bits. Using 16-bit audio doubles the storage requirement but affords roughly 250 times the number of audio values, which translates to big gains in audio quality and realism. Audio sampling rates are specified in kilohertz (kHz), and 44.1kHz, 16-bit audio is considered CD quality.
Another factor is whether the audio file is mono or stereo. Mono means there is one track of sound and stereo means there are two tracks, balanced for left and right speakers. The standard for Web delivery is 22kHz, 16-bit, mono audio, but we recommend that you start out with the best quality available to you — typically 44.1kHz, 16-bit stereo. The better the audio you start with, the more quality you can afford to lose when you compress the audio for your final export from Flash. Also, the sampling rate of the files you import won’t affect the size of the final MP3 audio that you’ll export.
Getting Sounds into Flash
Chances are, the audio you’ll be using in your Flash animation is from an audio CD. To import this audio into Flash, you’ll need some encoding software — that is, software that will take a track from a CD and encode it into the format you’ll use in your Flash file. Apple’s new iTunes will do the job for those of you running Mac OS 9 or later; Audion, SoundJam, or N2MP3 will work for users of Apple’s older OSes. Windows users will need something like MusicMatch, CD Copy, RealJukeBox, or the latest version of Windows Media Player. One of my favorite tools for this job is QuickTime Pro, the professional version of the Apple QuickTime 4 utility. The QuickTime Player lets you open tracks from an audio CD and save them to your hard drive as QuickTime audio-only movies and export them into any format you wish — .WAV, .AIFF, etc. Because the audio files are digital, you won’t lose any sound quality when you do these conversions as long as you stick with the CD-quality, 44.1kHz sampling rate. Also, having QuickTime 4 installed on your computer adds some functionality to Flash, allowing for an expanded set of compatible file formats for importing.
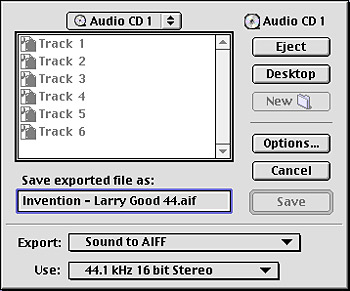
Place the audio CD into your CD-ROM drive and view the disc’s contents through whichever of the above software you chose. Next you’ll need to convert this file to the AIFF format if you’re a Macintosh user or the WAV format if you’re a Windows user.
A new feature of Flash 5 is the ability to import MP3 format audio files. This is great if you’re planning to download all your music from the Web, but MP3 audio is already compressed, and by importing it into Flash and then exporting (or publishing) the animation, you’ll be compressing it a second time. If quality is one of your concerns, it’s best to stick with uncompressed AIFF or WAV files.
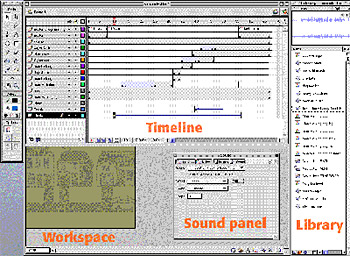
Working with Sounds in Flash
Once you’ve got audio files in one of the three compatible import formats, the hard part is over: Simply launch Flash and import the files into the Library. Flash handles sounds in two different ways. Streaming sounds download as they play, a big plus for larger/longer sound files like music and voice-over. Event-based sounds must download entirely before they can play but allow greater control, plus synchronization with visual elements like buttons.
Adding a Music Track
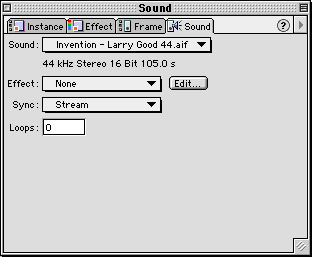
The simplest way to enhance an animation is to add background music. After importing a track into Flash, simply add a layer in your project and add a keyframe in that layer where you want the music to start. Select the new keyframe and press Command F (Macintosh) or Control F (Windows). The Panels window appears. Select the Sound panel. You can now use the Sound pop-up menu to choose a track from your Library and the Sync pop-up menu to select the streaming option. Because a music track is typically a longer (and therefore larger) file, choose streaming to keep download times to a minimum.
This article was last modified on January 18, 2023
This article was first published on January 17, 2001
Commenting is easier and faster when you're logged in!

Recommended for you

Using Color Fonts in Photoshop with Fontself
Color fonts have been touted as the Next Big Thing. They aren’t universall...

The Digital Art Studio: 5 Favorite Illustrator CC Features
If you’ve ever experienced a power outage, you’ve also likely found yourself ref...

Heavy Metal Madness: Put on a Happy Face!
When I met my wife Patty back in the very early ’80s, it made perfect sens...