Making a Magnifying Glass Text Frame in InDesign
David shows how to apply magic properties to a text frame so that all the text inside it gets bigger (or smaller) automatically.

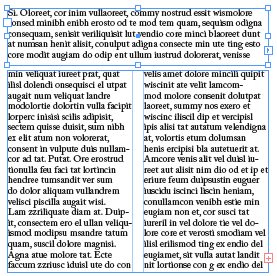
Some magazines set up a style in which the first few lines of text in an article need to be set in a larger font size. This cannot be done with nested styles, but you can “fake” it with this little-known trick: Turning a text frame into a magnifying glass, so that any text that enters it is enlarged automatically.
(I showed how to do this in InDesign Magazine — October/November, 2005 — but after demoing it at a recent conference, I realized that many people still aren’t subscribers so they didn’t see it back then. If you’re not a subscriber, what are you waiting for?!)
The first step is to set up your text frames — you’ll need two of them: one for the regular text and one for the magnified frame. Here, these two frames are threaded together:

Then you need to resize the text frame that you’re going to want to magnify. I’ve selected the top frame and typed “50%” in the H and W fields to cut the frame in half. (If you replace an absolute value, such as 25mm, with a percentage, InDesign assumes you mean you want the result to be that percentage of the original value.)

Now, the key to this whole process is to select Adjust Scaling Percentage in the General pane of the Preferences dialog box. (That’s what it’s called in CS3. It has a slightly different name in CS2, which I can’t recall at this moment.) I don’t like having this feature on most of the time, for reasons I’ve discussed here and here. However, it’s great for this trick. When that is on, you can scale a frame and it remembers it scaling!

Now I type 200% in the X and Y scaling percentage fields, the frame gets twice as big — and so does the text inside it!

The first thing I do after that is to head back to Preferences and set it back to Apply to Content. That way I won’t mess myself up on other frames later. However, changing the preference doesn’t affect this text frame I’ve already scaled, so any text in there is twice as big as it should be. In fact, if you look at the Size field in the Control panel (when you have some text selected), you’ll see two numbers: The size of the text and then the “visual size” of the text in parentheses or brackets. That’s the size it appears to be, with the scaling applied.
This article was last modified on December 19, 2021
This article was first published on September 8, 2008


