

A recent InDesign Secrets Podcast offered some great solutions for document collaboration with others. While there are a variety of ways to get comments from others, this article will explore a great way that we can share our comments/questions with others, right out of InDesign.
Most of my work is in creating technical documents. During the draft cycle of each project, I often have questions for my clients regarding content and photographs. I needed a way that I could generate a PDF from InDesign and have my questions/comments appear as sticky notes throughout the document. Creating the sticky notes within the InDesign document allow me to keep them in context, even if the text reflows. This greatly reduces the possibility of my questions/comments getting lost in an email trail, or overlooked by the client.
I found two solutions for PDF Sticky Notes. The first is a free tomaxxi script. It offers extreme sticky note customization, but there are several steps involved.
The second solution is low-cost plugin by Kerntiff Publishing. It is a one-step sticky note solution that will create yellow Sticky Notes in your PDF document. Any customization (color, icon, etc.) must be done in Acrobat.
Tomaxxi Annotations
This first method was developed by Marijan Tompa. tomaxxiAnnotations is a companion script to the popular tomaxxiForms script. To create annotations, you’ll run one script in InDesign, and a second script in Acrobat.
In InDesign:
1. Create a text frame containing your sticky note content.
2. Color the text frame.
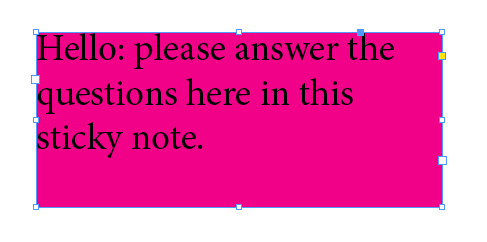
Text Frame with Content and Color
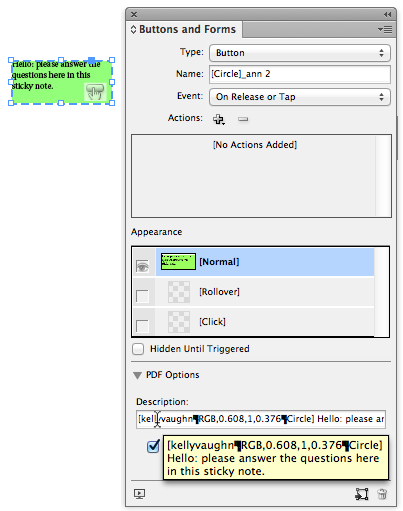
3. Convert the text frame to a button.
4. Name the button accordingly. In order for tomaxxiAnnotations to recognize the buttons, you’ll need to include _ann within your button name.
If you want to have different icons, you can specify the icon by naming the button like so:
- [Check]_ann
- [Circle]_ann
- [Comment]_ann
- [Cross]_ann
- [Help]_ann
- [Insert]_ann
- [Key]_ann
- [NewParagraph]_ann
- [TextNote]_ann
- [Paragraph]_ann
- [Right Arrow]_ann
- [Right Pointer]_ann
- [Star]_ann
- [UpArrow]_ann
- [UpLeftArrow]_ann
5. Run tomaxxiForms [Annotations].

tomaxxi Annotations script

All buttons processed successfully!
The script will populate the button description with your User Name, the color value, the Annotation type, and the text from the text frame. (If you do not specify an icon type, you’ll get the default “Comment” icon.)
What the script does
Note: If you’ve previously created PDF annotations in your particular InDesign document, sometimes the script won’t process all the buttons correctly.

When this happens, it’s no big deal. The buttons just need to be “cleaned.” Marijan wrote a second InDesign script which will “clean” the buttons.

tomaxxi Annotations Cleaner script
Once you clean the buttons, you’ll get this dialog box.

Now you can run the tomaxxiForms [Annotations] script. Here is my sample document as it looks in InDesign.

Buttons in InDesign
6. Export an Interactive PDF. Be sure to include forms and Media.
In Acrobat:
7. Run the tomaxxiForms script. See the excellent instructions here.
The buttons will be processed into sticky notes.

PDF, after buttons have been processed into Sticky Notes
IMPORTANT: if you want to use tomaxxiAnnotations script, you MUST have tomaxxiFORMS 1.8 or later installed, too!
If you like, you can anchor the objects within the text flow, so that when the text reflows, the buttons will stay in context and reflow along with the text.
Note: This feature works best with InDesign CS6. While it can be used with InDesign CS 5, it only works with Interactive PDF spreads ON. There is a fabulous script by Keith Gilbert which will turn Interactive PDF spreads OFF, but if you use tomaxxi Annotations with the interactive spreads off, the buttons will jump locations when exported to PDF. So it’s best to either leave spreads ON, or to use CS6.
Also be sure to check out Annotations from DTP Tools, which you can use to import comments/annotations back from PDF to InDesign.
Assets
TomaxxiFORMS [Annotaions] Script version 1.3 (unzip after downloading)
IDML Form (for testing)
PDF Forms (start and end)
PDF Stickies
PDF Stickies is a plugin that converts InDesign Notes to PDF sticky notes. This plugin is super easy to use and works for Cs4, CS5, CS6? single page spreads, double page spreads, Print PDFs, interactive PDFs? even InCopy users can use this plugin.
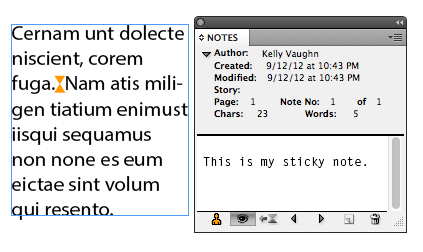
Create an InDesign note. The plugin does the conversion for you.

There are a few different options in the Preferences, and you can even turn off the plugin entirely if need be. Checking “Include User and Date” will include that information in the body of the sticky note. The “Pre Pend” field can be used to automatically include standardized text of your choosing.
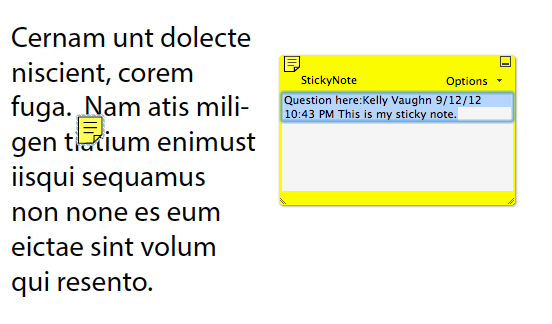
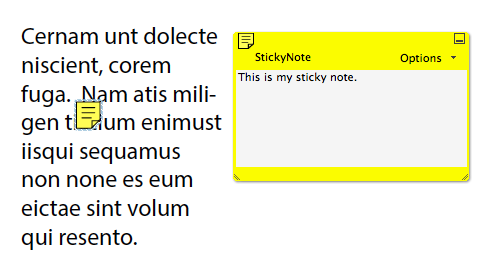
Here is what the resulting sticky note looks like in Acrobat.
I prefer to omit the User Name and Date, as well as the Prepend text. But these preferences might be useful for you if you have multiple people working on the same document. I like a simpler sticky note.

Simpler PDF Stickies Preferences
And here is the resulting simpler PDF Sticky Note;.
Simpler Sticky Note
So once I’ve exported my PDF, I like to make a couple of minor adjustments in Acrobat. The plugin lists the official Author Name of the sticky notes as “StickyNote.” The plugin also makes the sticky notes all yellow. I like to make use of Acrobat’s Sort Comments by” features (Sort by Author, Sort by Color, Sort by Type, etc.), so I change the Author Name and the color to suit me.
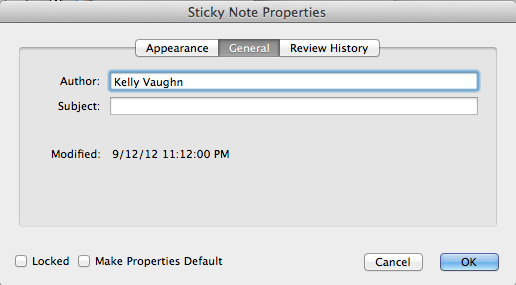
To change all the sticky note properties at once, first sort comments by Author, and then you can change all the comments globally.

After sorting by Author, right click on the comment list, then choose “Properties.” I like to change the icon and color (in the Appearance tab) (under the General tab), and then the author name. This allows me to take full advantage of Acrobat’s “Sort Comments by” features. (The icon really doesn’t matter. I just prefer the “Comment” speech bubble icon.)

Change Icon and Color
Changed Author Name

Completed Sticky Note
According to the developer’s website, the plugin works only when creating Interactive PDFs. However, I stumbled across a workaround that allows the plugin to also work when creating Print PDFs. All you need to do is put your InDesign document file into an InDesign book, and create the PDF using the book panel flyout menu.
This plugin is great because it is a very simple way to create PDF sticky notes. Once the plugin is installed, all you have to do is create Notes right within InDesign. The plugin handles the sticky note conversion for you. So simple!
This article was last modified on December 21, 2021
This article was first published on October 4, 2012
Commenting is easier and faster when you're logged in!

Recommended for you

Making Christmas Ornaments with InDesign
InCorporate InDesign into your holiday celebrations with this little papercraft...

Show the InDesign Notes Tool Some Love!
I use InDesign’s notes feature all the time, at least a few dozen times pe...

Choosing a Print-on-Demand Service
A review of print-on-demand options from Amazon, Barnes & Noble, Lulu, and Blurb