Make an Image Flow with the Text
"Oh, why can't InDesign behave more like a normal program, like Word?" she said, only semi-sarcastically. For example, how can you get your images to move with the text flow?

Stephen e-mailed us a simple, short question:
How do I link images with text? I want the images to follow the text.
This is a frequently-asked question by new page layout program users, especially if they’re accustomed to importing images into Microsoft Word, where images are part of the text flow by default.
In a page layout program, the usual behavior is for a placed image to stay where you put it, no matter what happens to the text on the same page. They’re in two separate frames that don’t interact, other than stacking order and text wrap settings if they overlap. For some artwork (page elements, display ads) that’s exactly what you want. For others, you might prefer the image to be “linked with the text” as Stephen put it, so that as text is edited, the image moves position so that it’s always next to a certain paragraph or subhead.
To make an image flow with the text, you have to actually insert the image into the text frame, as though it were a type character. You do this by selecting the image with the Selection tool and cutting or copying it to the clipboard (Edit > Cut or Copy). Then you switch to the Type tool, click an insertion point in the destination text frame, and paste it in (Edit > Paste).
The image comes in as what’s called an “anchored object” because it’s anchored to an insertion point in the text flow. As you edit the text or change its frame dimensions, the image moves with the text flow accordingly.
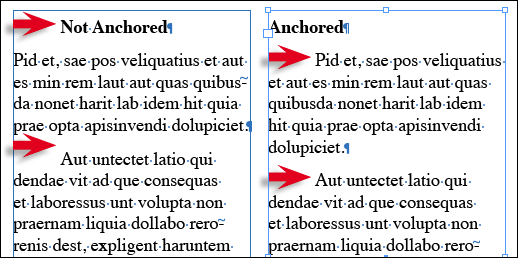
In the example below, the graphic arrows are supposed to appear as the first character in the body text paragraphs. The two text frames used to appear identical until I added the bold subhead at the top. In the frame on the left, adding a line of type pushed the text down but the graphics remain in position (with text wrap still active). In the frame on the right, the arrows travel with their paragraphs because they’re anchored objects.
Anchored objects have special rules because they are part object, part text character. For example, while you can select them with a Selection tool while they’re anchored; you can do some manipulations (scale, move) but not others (group with another object). Similarly, you can select an anchored object with the Type tool just as though it was a character and then do things like change its baseline offset or leading, but you can’t, say, convert it to outlines.
I have a video on anchored objects I did for Adobe that you can watch for free on their site. I cover most of the above plus custom anchored objects and align to spine.
The video was for the CS3 release (one of the tutorials that came on a DVD in the box) but there’s nothing different with anchored objects in CS4.
Actually, all of the tutorial videos for CS3 are still available on Adobe’s web site, they’re pretty useful! Here you go: Adobe Video Workshop.
This article was last modified on December 19, 2021
This article was first published on September 11, 2009
Commenting is easier and faster when you're logged in!
Recommended for you

Making the First Page a Left Page in InDesign
Learn how to use InDesign's Pages panel to make a document start on a left page.

Making a Custom Character in a Font
TK wrote:I have a client whose design agency has come up with a product that mak...

Changing Kerning/Tracking Increments
James wrote: Is there any way to track incrementally? That is, I'd like to be ab...


