

Setting Up Your Company Page
Assuming you pass muster on all the requirements listed above, and you’re ready to set up your company page, here’s how to proceed.
First, head to the Add a Company page. To get there, click on the Companies menu in the black navigation bar the top of your LinkedIn profile or home page. (You can either just click on Companies itself or choose Search Companies from the pop-up menu — both take you to the same place.)

Figure 6: To get started, click on Companies in the black navigation bar.
When you get to the Companies home page, click the Add a Company link over to the right.
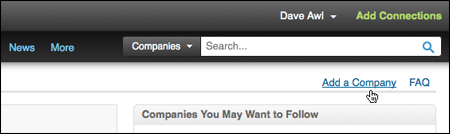
Figure 7: The Add a Company link on the right side of the Companies home page
That should land you on the Add a Company page, where you’ll be asked to enter the name of your company and your company email address, and then select the checkbox to verify that you’re an official representative of the company and have the right to set up the page on its behalf. Then click the Continue button.

Figure 8: Your next step is to fill out the Add a Company page.
Assuming you don’t run into any unforeseen glitches (like, say, you’re trying to create a page that already exists), at that point LinkedIn will take you to the Overview Edit page, where you can enter all the basic info about your business.

Figure 9: When you arrive at the Overview Edit page, your company’s name will already be filled in; your next step is to add a description.
Add a company description (you can probably cut and paste this from your business’s website or Facebook page), add your website’s URL, and use the pop-up menus to specify the company’s type and size, main industry, operating status, and year of founding. You can also specify a default language for your page and add up to five different locations in which your company operates.

Figure 10: Some of the fields over on the right side of the Overview Edit page, including the Publish button that you’ll click once everything is filled out.
A little further down the page is an area where you can add other admins to help you manage it, if desired. (You’ll need to be connected on LinkedIn to whomever you’re trying to designate as an admin before LinkedIn will let you add them.)

Figure 11: If you need to add other people to help manage your company’s page, this is where you can do it.
Below that is the place where you can upload your banner image and company logos.

Figure 12: Add images by clicking the links next to the green plus signs.

Figure 13: The upload dialog lets you browse your hard drive for the image files you’d like to upload, and reminds you of the proper file formats and dimensions.
Underneath that, you can list some specialties for your business, and also any relevant LinkedIn Groups that you’d like to feature on your page. (You’ll need to be an admin or member of any group you’re trying to add.)
All of that should keep you busy for a few minutes. You don’t have to fill in absolutely everything here before you publish, but several of the most basic fields are required — and those are flagged out with red asterisks.
Once you’re ready you can click the blue Publish button at the top of the page. At that point, assuming you haven’t neglected any of the required fields, and you haven’t fudged any of the requirements described earlier, LinkedIn will generate your new company page and you should find yourself beholding the thing of beauty within a matter of seconds.
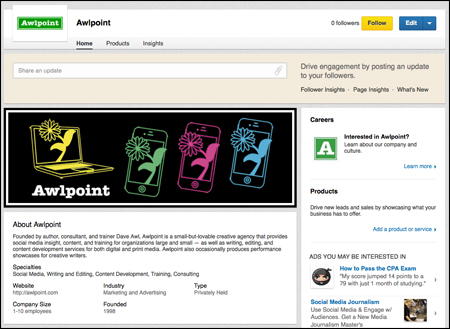
Figure 14: The brand-new page I created for my company, Awlpoint, complete with banner and logos
Of course, this is just the beginning. You’ll probably want to keep tweaking your page and customizing it over time. You can get back to the Overview Edit page whenever you need to just by clicking the blue Edit button in the top right corner of your company page.
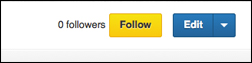
Figure 15: The Edit button lives over in the top right corner of your company page.
Making Sure Your Profile Points to Your New Page
After I set up the LinkedIn page for my company, Awlpoint, one of the first things I noticed was that the entry for Awlpoint on my profile wasn’t pointing to the new Awlpoint page just yet — clicking it still took me to the search page. I found I needed to go in and edit the entry by retyping the name of my company until it appeared in the pop-up list of choices, clicking on it to select it, and then clicking the blue Save button.

Figure 16: Editing the name of my company in the Experience section of my professional profile on LinkedIn. I started typing the name of my company, and then clicked on the entry for my company page when it popped up.
Success! Once I’d done that, the entry on my profile did indeed point to the new Awlpoint company page. And mousing over the company’s name brought up the pop-up window for the company as well.
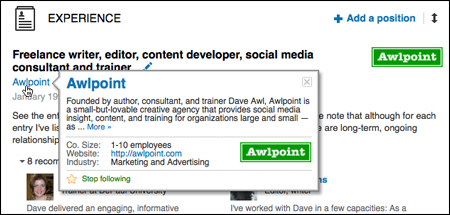
Figure 17: The pop-up window that appears when I mouse over the name of my company on my profile displays basic info from the company page I created.
Keeping Tabs on Your Tabs
Company pages come with three tabs by default, with the possibility of a fourth.

Figure 18: Adobe’s company page shows all four tabs
— The Home tab is the landing page, obviously, with all of your overview info.
— The Products tab allows you to list the products and services your company offers.
— The Insights tab automatically rounds up some info about your company’s recent activity. It may display recently changed positions at the company, a listing of employees that LinkedIn thinks the viewer might know, and other company pages that visitors have looked at.
— A Careers tab will appear if and when you post job listings for your company. (To find out more about posting jobs, click the triangle menu next to the Edit button on your page and choose Add Jobs from the menu. See Figure 19 below.)
Adding Products and Services
Don’t be fooled — although this tab says Products by default, you can also add services. (And once you do, if you have only services listed, the tab will change to read Services instead of Products.)
To get started adding content to this tab, click the triangle menu next to the blue Edit button, and choose “Add product or service.”

Figure 19: The triangle menu lives next to the Edit button at the top of a company page
That will take you to the page where you can begin entering products and/or services. (If you’ve got more than one product or service you want to list, you’ll be adding them one at a time — it’s a lather/rinse/repeat sort of process.)

Figure 20: The Services tab on the Awlpoint page, after adding several services
Communicating with Your Followers
Citizens of LinkedIn can choose to follow your company by clicking the Follow button in the upper-right corner of the page (and you might want to set a good example by following your own company toot sweet).

Figure 21: The Follow button lives in the upper-right corner of a company page on LinkedIn, and next to it you can see how many followers the company currently has.
Posting updates for your followers is easy — just look for the “Share an update” field at the top of your page.

Figure 22: The “Share an update” field
Paste in a link, or just start typing a message. (A Share button will appear once you start typing in the box — click that once your posting is all set up and ready to go.) Your updates will appear on your company page as well as the home pages of LinkedIn users who’ve chosen to follow your company.
This article was last modified on December 14, 2022
This article was first published on March 30, 2013
Commenting is easier and faster when you're logged in!

Recommended for you

It’s a Brochure! It’s a Poster! It’s the Bookster!
Need an idea for an attention-grabbing print piece? Then you have to check out T...

How to Design an Amazing Portfolio
For a grpahic designer, the importance of a portfolio cannot be overstated. In f...

Scanning Around with Gene: Giving Until It Hurts (to Bring in the Mail)
I sincerely appreciate the many comments regarding last week’s post about...