


This article appears in Issue 82 of InDesign Magazine.
Scripts can keep the magic alive in your ongoing relationship with your work.
When you first learn InDesign, almost everything you do is new and exciting. The simple act of freely positioning text and images on a page, without constraint, is thrilling. But when the novelty wears off and you’ve attained a certain level of proficiency with InDesign, you may become frustrated by the many repetitive, mundane tasks involved in page layout and production. Learning “secrets,” keyboard shortcuts, and advanced techniques can help make some of these tasks easier. But true efficiency and automation comes through learning to script InDesign. A script might mean the difference between spending minutes vs. hours on a project. Every InDesign user should at minimum know how to find, install, and use scripts. So, at the very least, read that portion of this article. Then, once you’ve found how useful scripts can be, my hope is that you’ll want to continue on and learn to edit and create scripts specific for your work.
What is a Script?
Scripts are computer programs that tell InDesign what to do. Almost all of the functionality of InDesign can be controlled by scripts. Scripts can:
- Increase your accuracy by allowing you to repeat the same process over and over without error
- Increase your speed by helping you do something faster than you could manually
- Relieve boredom by automating repetitive tasks
- Extend functionality by increasing the scope of what can be done in InDesign
For examples of scripts that extend what InDesign can do, see the following articles: Undocumented Feature: Export to “Fixed-Layout HTML,” Free Script Identifies Word Stacks, and IndyFont Quick Demo: Add Diacritics to an Existing Font.

alt=”laptop robot” width=”300″ height=”300″ />
Download These Scripting Samples
You can download a zip file of several scripts referenced in this article here. The zip file contains the following scripts and resources:
- Paste and format URL.jsx Copy a URL to the clipboard, choose an insertion point in your text, and run this script. The script will paste the URL into the text, remove the https:// or https://, convert the URL to a hyperlink, and format it with the Hyperlink character style.
- Find text size range.jsx A completed version of the script that you will learn to write in this article
- Example_while.jsx An example of a While loop
- Example_for.jsx An example of a For loop
- Example_if-else.jsx An example of an If-Else statement
- Example_switch.jsx An example of a Switch statement
- Example_try-catch.jsx An example of a Try-Catch statement
Scripting Languages
InDesign can be scripted with three different programming languages: AppleScript on a Mac, VBScript on Windows, or JavaScript on Mac or Windows. I’ll focus on JavaScript in this article. I prefer JavaScript because it is cross-platform, and because there is a huge community that knows JavaScript, so help is often just a simple web search away. Also, don’t confuse JavaScript with Java. JavaScript and Java are two completely different programming languages, so the names are not interchangeable. Technically, InDesign uses ExtendScript, which is Adobe’s implementation of JavaScript. But for clarity, I’ll use the more familiar term “JavaScript” throughout this article.
Where to Find Scripts
Despite what you might think, your design and production workflow probably isn’t completely unique. So when you begin thinking about automating portions of your workflow, you’re likely not the first one to attempt this. Chances are, someone has already written scripts to at least partially solve some of your challenges. So before you go to all the work of creating a script, it’s worth checking out a few sources to see if your problem already has a scripted solution. To begin with, did you know that InDesign comes with a bunch of scripts? To see these, open the Scripts panel (Window > Utilities > Scripts), and twirl open the Samples folder, and then the JavaScript folder. You’ll see 20 or so scripts listed. Some of these are quite useful. See What Do the Default Sample Scripts Do in InDesign? for a description of what each of these scripts can do for you. There are countless free and low-cost scripts to be found on the web. Scripter extraordinaire Peter Kahrel features many useful scripts at his website. Indiscripts is a source for several amazing scripts. In-tools.com contains an assortment of really useful scripts, as does my website at gilbertconsulting.com. An index of many more InDesign scripting resources is located at github.
How to Install a Script
A script usually consists of a single file, and depending on how the script was written, the file will have a .js, .jsx, .jsxbin, .applescript, .scpt, or .vbs extension. This file just needs to be copied to a specific location, and then it will automatically appear in the InDesign Scripts panel. The easiest way to determine this location is to first display the Scripts panel (Window > Utilities > Scripts) in InDesign. Then right-click the User folder, and choose Reveal in Finder (Mac) or Reveal in Explorer (Windows). The folder that is highlighted (“Scripts Panel,” not “Scripts”) is the folder that you want to copy your scripts into (Figure 1).

Figure 1: Right-click on the User folder to reveal the folder that you should copy script files into. You can organize your scripts into any subfolders that you wish within this folder.
How to Run a Script
To run a script, double-click its name in the Scripts panel. You can also assign keyboard shortcuts to scripts (Figure 2). 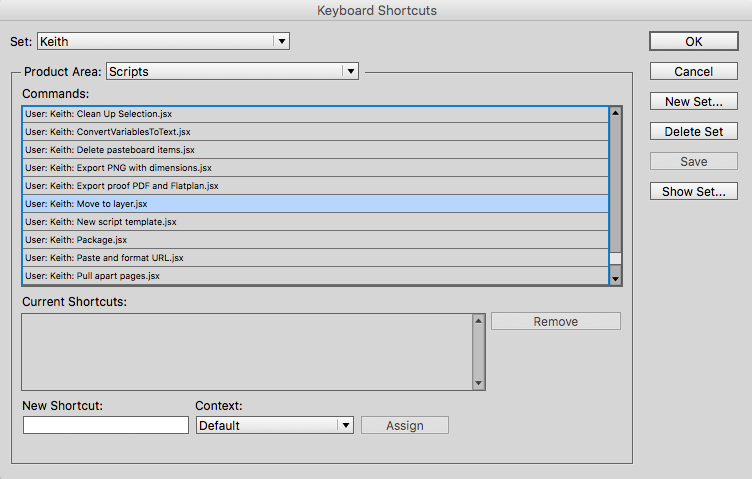 However, with most scripts, you will need to know what the script is supposed to do, and what is required of you before you can run it successfully. The name of the script may or may not be self-explanatory. Try the following: Create a new InDesign file, and don’t put anything on the page. Then, double-click the AddGuides script in the Samples folder. The script “sees” that nothing is selected, and displays a nice message that you need to select something on the page before the script will do anything. Draw a rectangle on the page, select the rectangle, and try running the script again. This time, you’ll see a dialog box that gives you a bunch of options for adding guides around the object. Now, again with nothing selected on the page, double-click the MakeGrid script. This script also requires that something be selected on the page, but it doesn’t display any kind of helpful message so that you know what to do. So some scripts will give you useful instruction about what to do first, while others will just refuse to do anything, or worse yet, display a cryptic error message, unless you do all the right things first.
How to Edit a Script
The easiest way to edit scripts written with the JavaScript language is to use the ExtendScript Toolkit (aka the ESTK), which is a script editor included with Creative Cloud. (While this was installed automatically in some earlier versions of InDesign, if you use CC you will need to download and install this program from the CC app. For more information, see this page at Adobe.com.) To use the ESTK, just right-click on a script in the Scripts panel, and choose Edit Script. This will launch the ExtendScript toolkit and open the script for editing.

ESTK: A Necessary Evil?
As of this writing, the ExtendScript Toolkit has some severe performance issues for many users on the Macintosh platform. Thankfully, JavaScript files are just text files, so you can use any text editor to edit them. A dedicated code editor like Sublime Text or Brackets makes the job easier. Unfortunately, no third-party tools offer the integrated debugging functionality of the ESTK, so you may need to switch back and forth between editors to accomplish your work.
A Few JavaScript Basics
When you give instructions to a fellow human, you can get by with some misspellings and punctuation errors, and the recipient should still be able to understand your directions. But computers aren’t nearly as smart as us humans. (Yet!) You must dot all your is and cross all your ts if the computer is to understand your exact intent. This is known as proper “syntax.” Open the file Paste and format URL.jsx in the ESTK. There are five things you should know about JavaScript syntax:
- You may notice that certain words sprinkled throughout the script appear in blue. These are “reserved words;” reserved words have a specific use in JavaScript, so they can’t be used for other things in a script. If you misspell one of these words, or capitalize any of them incorrectly, they will no longer appear blue, which is a helpful warning hint.
- JavaScript is a case-sensitive language, meaning that False is not the same as FALSE or false. You need a sharp eye for detail. This has tripped me up more than once!
- Notice how lines are indented, and that there are spaces on either side of each equal sign. “White space” is ignored in JavaScript, so you can add spaces, tabs, and extra returns anywhere that you’d like in order to add clarity to your scripts.
- Note that most lines of the script end with a semicolon. The exceptions are lines that end with an opening parenthesis or lines that consist of only a closing parenthesis. While these semicolons can often be omitted and your script will still function, it is a good practice to close single-line statements with a semicolon.
- Lines that display in green are comments. Comments don’t do anything—they are just notes. Anything after a
//at the beginning of the line is a comment, or anything between/*and*/. Add lots of comments to your scripts as you write them. This will make it much easier when you return to a script months later and try to understand why you did what you did.
Variables
Every script you write will likely contain one or more variables, so it is important to understand what they are and how to use them. A variable is a way to store and manipulate objects and data in a script. You create a variable with the var command. See line 26 in the Paste and format URL.jsx file. In this line, I create a new layer in the document and assign it to the variable named myTempLayer. This way, later on in line 32, I can remove the layer easily by referring to it by its variable name.
Decision Making and Looping
Almost every script will contain some sort of a decision-making or looping mechanism. You will encounter five primary types:
- If/else
- For
- Try/catch
- Switch
- While
Open each of the example files to see their proper use. It is beyond the scope of this article to examine each of these in detail, but you can use these examples as templates to get the syntax right. The logic of each is fairly straightforward.
The InDesign “Document Object Model”
I suspect this might surprise you: you will likely be a better InDesign scripter than a programmer who has been using JavaScript for years without ever using InDesign. Why? Because in order to automate InDesign with a script, you must have a good understanding of how InDesign documents and pages are constructed. This is right in your wheelhouse. Now you just have to learn how to parlay that knowledge into an understanding of the InDesign “Document Object Model,” or DOM. You know, for example, that text in InDesign always resides in text frames, and text frames can reside on the pasteboard, on a page, or anchored within another text frame. The InDesign DOM specifies the specific language you must use to “get at” a particular item. For example, a specific text frame on a specific page of a document might be addressed as app.activeDocument.pages[2].textFrames[5]. (Notice that this is read “backward,” like “a text frame on a page in the active document of the app (InDesign).”) How do you know what the precise syntax for the DOM is? Thankfully, there are two good references you can use to look this up. The reference that I prefer to use is located at indesignjs.de. You can see an alternative by choosing Help > Object Model Viewer in the ESTK, but I find this clumsy to use and navigate. The same information is presented in both of these resources, so it is simply a matter of which presentation you prefer. The DOM is supposed to make sense… and sometimes it does (Figure 3).
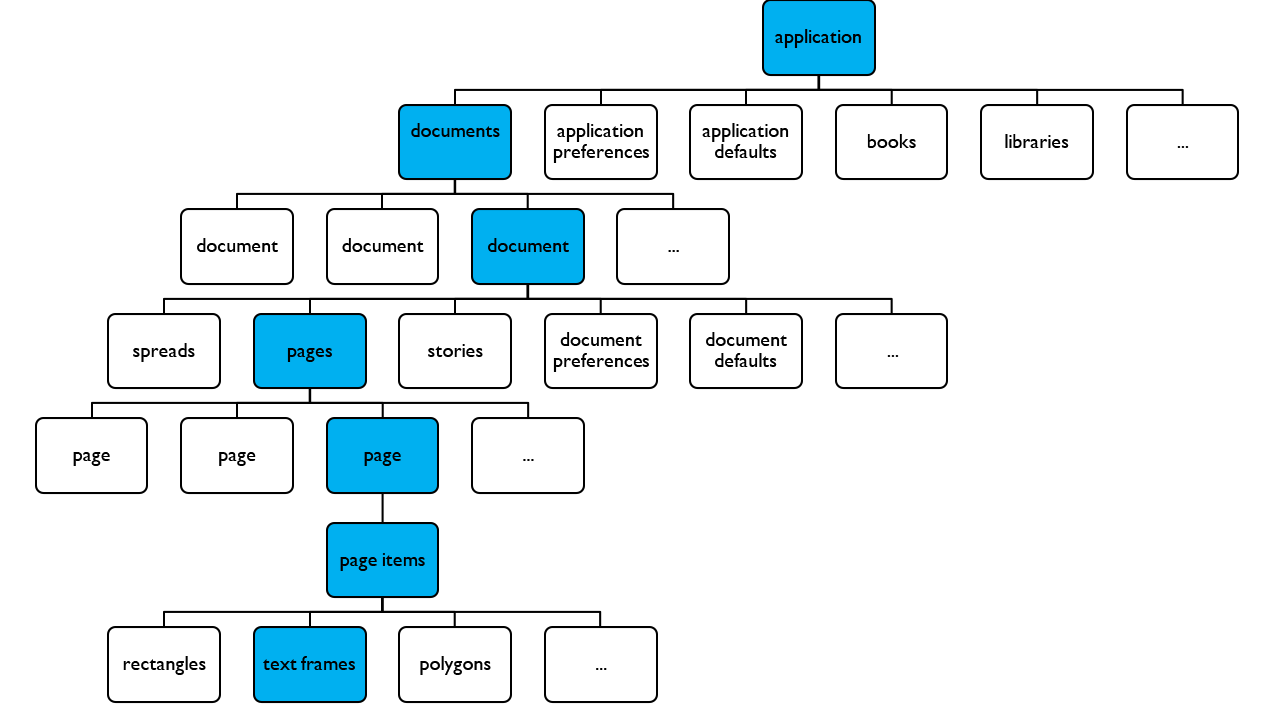
Figure 3: A visual representation of the InDesign Document Object Model. In this visual example, we see that the application (InDesign) contains a collection of documents, an individual document contains a collection of pages, an individual page contains page items, and page items are rectangles, text frames, polygons, etc.
An Example
To put this all together, let’s write a script that finds all the text in the current story that is between 12 and 16 points in size and colors the text with a red fill. This script shows why you need a good working knowledge of InDesign in order to be able to write a useful script. You might start out thinking that we could use find/change. And, looking at the specifications for a story in the InDesign DOM, you’ll see there is a findText method that we can use to easily script InDesign’s Edit > Find/Change command. But when you start to think this through, you realize that InDesign doesn’t let you search for a range of sizes using the Find/Change command. With very few exceptions, scripting doesn’t add functionality that doesn’t already exist in the InDesign interface. So how do we solve this problem with a script? Imagine how you would do this by hand. With extreme patience, you could select the first character of the story, check the size of the character, and if it is between 12 and 16 point, fill it with red. Then, select the second character, and do the same thing. Repeat the process for every character in the story. While this would quickly drive anyone nuts, scripts are very good at automating extreme tedium and repetition very quickly. So this is the approach we will take with our script. In the ESTK, choose File > New JavaScript, and then choose File > Save As to save the file to your Scripts Panel folder. On the first line, type var mySelection = app.selection[0]; to tell InDesign “whatever is selected on the page, take the first item in the selection and give it the name mySelection.” Note that the first item is item zero. (For scripting purposes, everything is numbered starting from zero.) So the first item in the selection is item 0, the second item is item 1, the third is item 2, etc. Also note that in this article, most of the bits of code break across two lines, but in your script they won’t. For simplicity, this script isn’t going to do any error checking. It’s going to assume that you have some text selected, or an insertion point set with the Type tool. If you have something else selected, such as a frame, the script will not work. When you write a script for your own use, you might choose to not include any error handling. If you’re creating a script for others, you should probably build in some more graceful ways for handling user error. On the second line, type var myStory = mySelection.parentStory;. Again, you can read the part with the dot in it backward, like “the parent story of my current selection.” So, this first creates a variable named myStory and then assigns the story that the selected text (or insertion point) is a part of to this variable. Every object in InDesign has a parent. The parent of an insertion point is a story. The parent of a story is a document. The parent of a document is the application. You will use parent, parentStory, parentTextFrame, and parentPage frequently when writing scripts to help you “get at” objects in your document. On line three, type var myNumCharacters = myStory.characters.length;. MyStory.characters refers to the “collection” of all the characters in myStory. Next, Length refers to the number of characters in the collection. So myNumCharacters is now the value of the total number of characters in the story that contains the selection or insertion point. On line four, type for (var i=0; i<myNumCharacters; i=i+1) {}. This is the start of a “for loop.” It says to create a variable named i and set its value to zero. Then, check to see if the value of i is less than the value of myNumCharacters. If it is, then do the commands that appear between the {} brackets. After executing the commands between the brackets, come back and add one to the value of i. Check to see if i is still less than the value of myNumCharacters. If it is, then do the commands between the brackets again. Repeat this process over and over until i is no longer less than myNumCharacters. Place your cursor between the brackets after the for loop, and press Enter or Return twice. That gives you a little extra space to work with. On line five (the first blank line), type var myCharacter = myStory.characters[i];. The first time through the for loop the variable i is zero, and characters[0] is the first character of the story. That first character then gets assigned to the variable myCharacter. The second time through (when i equals 1) it is assigned the second character, and so on. On line six, type if ((myCharacter.pointSize > 12) && (myCharacter.pointSize < 16)) {}. This means if the size of the character is greater than 12 and less than 16, then do the commands between the curled braces (we’ll add those commands in a moment). The double ampersand (&&) means and. A double pipe character (||) means or. You might ask how I knew about the pointSize command—where did it come from? It can be located in the DOM by looking at all the properties of the character object. If you keep looking in that section, you will also discover that the character object has a fillColor property, which we’re going to use. Place your cursor between the two brackets on line six, and insert two return characters. On line seven (the first line after the if statement), type myCharacter.fillColor = "Red";. The script assumes that you have a swatch named Red. If not, the script will fail. Also, note that in general, you want to make sure all the quote marks in your script are straight quotes (not curly, typographer quotes)! Your completed script should look like this: var mySelection = app.selection[0]; var myStory = mySelection.parentStory; var myNumCharacters = myStory.characters.length; for (var i=0; i<myNumCharacters; i=i+1) { var myCharacter = myStory.characters[i]; if ((myCharacter.pointSize > 12) && (myCharacter.pointSize < 16)) { myCharacter.fillColor = "Red"; } }
Congratulations!
You just wrote your first script… way to go! Now you can save it (remember to save it in the correct location—the Script Panel folder—and use a .jsx filename extension) and run it from the Scripts panel inside InDesign. I hope this brief tutorial and the background information in this article helps to demystify the scripting process so you can start finding scripts, installing and using scripts, and then modifying, editing, and writing your own scripts. For further learning, I’d encourage you to complete my Lynda.com course, InDesign Scripting Made Easy. This 1 hour, 55 minute course, targeted at designers and production artists, expands on the information in this article, and then walks you through the process of creating three practical and useful scripts. And when that happens, you’ll rediscover the thrill and excitement you had when you first started learning InDesign.

Scripting Synergy: Automating Other Adobe Apps
The focus of this article is scripting InDesign. But other Creative Cloud products, specifically InCopy, Illustrator, Photoshop, and Bridge, can be scripted too. The concepts for scripting these products are largely the same, so once you learn how to script InDesign, you will be well on your way to learning to script other Creative Cloud products as well!
…
Commenting is easier and faster when you're logged in!

Recommended for you

Power Styles Plug-in Is for Anyone Who Uses Styles
Compare styles, create styles automatically, create style reports, remove local...

The Secret to Naming InCopy Stories
It sounds like a simple thing doesn’t it? You name your InCopy stories usi...

Fixing CMYK Images Over Your Ink Limit with Photoshop
Learn how to lower total ink in an image and still get the best results for your...