


Flexible Film Handling
The single feature that differentiates the RFS 3600 from other scanners in this range is the film transport mechanism. It handles single mounted slides through a slot in the front like other scanners, but it also allows you to feed strips of unmounted film — up to 36 frames — directly into a slot in the side of the scanner, without using a film holder. Buttons on the top of the scanner let you advance the film one frame at a time, or nudge it in very fine increments (the frame advance is also available through software control from the Kodak plug-in.
It takes a certain leap of faith to insert an unprotected strip of film into a scanner, but the RFS 3600 behaved well. We didn’t, however, try to scan an uncut roll of 36 frames: The scanner would probably have handled it perfectly, but it’d leave a long strip of unprotected film hanging out of either side, vulnerable to dust and scratches. If you plan to scan entire rolls of uncut film, give some thought to how you’ll protect it.
Cluttered, But Quick
Kodak’s scanner driver, which operates as a Photoshop plug-in, is clearly designed around the autofeed capabilities of the scanner. It allows you to scan single frames and mounted slides, but the small previews and fairly rudimentary controls are aimed at fast automatic scanning of batches of images. It scans positives about as well as other scanners in its class, but where it really excels is in scanning color negatives.
All the controls are found in a single somewhat cluttered window (see Figure 3), which would be overwhelming but for the rollover help that appears as you mouse over each button. You always have to perform a prescan of the first frame, whether you’re scanning a single mounted slide or a film strip. (The controls might lead you to believe otherwise, but if you ask for a prescan of the whole strip, you get a message warning you that no autofocus has been done. If you ask for the auto-focus, you get a prescan of the first frame.) Once you’ve done so, you can set the crop and resolution, and make any desired edits to color balance, levels, or curves, and proceed to the main scan.
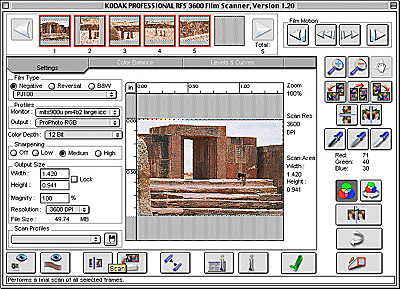
Figure 3: Nearly all the scanner controls are found in the rather cluttered main window of the RFS 3600 acquire plug-in. The rollover help that appears at lower left makes the plug-in easy to learn.
With strip film, you have the alternate option of performing a prescan on all the remaining frames on the film strip. The thumbnails for each frame then appear at the top of the window (see Figure 4). The prescans are pretty speedy — even when connecting to the scanner through USB, each prescan takes about 10 seconds.

Figure 4: When you prescan a film strip, each frame appears as a thumbnail at the top of the window. You can set different scanning parameters for each frame by clicking its thumbnail, then setting the parameters.
Once you’ve done all the prescans, you can specify edits for each image by clicking its thumbnail. The plug-in offers a Color Balance panel and a Levels and Curves panel, each of which show a before and an after version of the image. They’re pretty small, so there’s a limit to the precision you can achieve. You can get a larger preview, but it simply magnifies the pixels in the prescan, so you don’t see any more detail (see Figure 5).

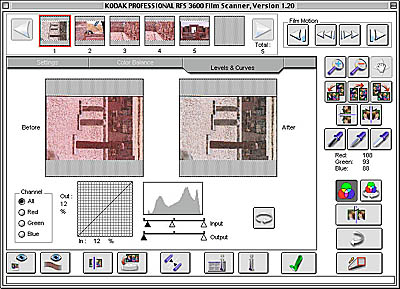
Figure 5: The Color Balance and Levels and Curves panels show rather small before-and-after versions of the image.
For color management, the plug-in lets you specify your monitor profile (it doesn’t pick it up automatically) and an output profile (which would normally be your Photoshop working space). The scanner comes with presets for most popular Kodak transparency and negative film stocks, but it doesn’t let you use custom scanner profiles, which may be a problem if you scan a lot of non-Kodak media. On correctly exposed slides we found that we needed only minimal editing, if any, but with color negative scans we almost always needed to make significant edits to tone and color balance. Despite the relatively small prescan image, we found we were able to make good edits that produced very satisfactory final scans.
This article was last modified on January 3, 2023
This article was first published on November 20, 2001
Commenting is easier and faster when you're logged in!

Recommended for you

Adobe Introduces the Photoshop Photography Program
In a move that acknowledged the need for a cheaper, focused alternative to its e...

Placing Items on an Irregular Surface in Photoshop
Placing items on an irregular surface, such as grass or sand, will only look nat...
Photoshop Tip: Pasting into a Selection in Photoshop
Learn how to create layers with layer masks with Photoshop's Paste Into command.