is now part of CreativePro.com!

Introducing Multiple Page Sizes in InDesign CS5

33

As David and Anne-Marie described in their InDesign CS5 overview, one of the most useful and exciting features is InDesign CS5’s ability to create multiple pages sizes in the same document. This is accomplished through the use of the new Page tool.

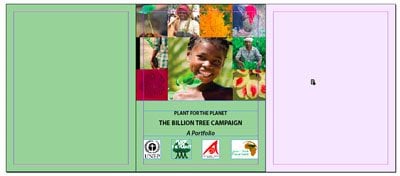
There are two main scenarios for how you might use this feature: In one scenario, you have a facing page document, and you want to create a gatefold (a foldout in a magazine or book). Alternatively, you might be designing a book cover, and you’d like to create layout with a back cover, spine, and front cover on the same spread as three pages. We’ll describe how to do that in this post.

The second scenario is that you’re creating the pieces of a company identity?perhaps a letterhead, envelope and business card. For convenience, you’d like to keep these pieces in the same InDesign document. In this case, each piece would be set up as non-facing pages.

I’ll start with a two-page spread to which I’d like to add a gatefold.

Initial Spread

To add the narrower gatefold page on the right side of the spread, you need to be sure to deselect Allow Document Pages to Shuffle from the Pages panel menu.

Turn Off Page Shuffling

Turn Off Page Shuffling

Then insert a page to the right of the spread. Initially it will be at the same of the other pages in the spread. Then select the new Page tool (it’s in the selection tools because it’s used to select pages). Click the page whose size you want to change in the layout (not in the Pages panel).

Select with the Page Tool

Select with the Page Tool

The page will show a light purple highlighting. (You can also Shift-select or Command/Ctrl-select multiple pages in the layout to change the size of multiple pages at the same time.) When the Page tool is selected, the Control panel shows a new set of controls for setting page size and orientation. You can choose from preset page sizes, or enter a new width and height value to create a new page size.

Control Panel Commands

Control Panel Commands

The result is that the gatefold appears at the new size within the spread. (An alternative way to do the same thing would be to select the right page of the spread and make it wider to include the original page and the gatefold.) The first method is shown below.

Gatefold Added

Gatefold Added

On the right side of the Control panel when the Page tool is selected, there are three other controls:

  • Enable Layout Adjustment gives you control over what happens to objects on the page when a page is resized. You’re using the same controls found in Layout > Layout Adjustment.
  • Show Master Page Overlay shows you the outline of the master page applied to the current page. This is useful for several reasons: (1) You can see which master page is applied to a page. (2) If a page is a different size than the master applied to it, you can visually see how the master page is positioned relative to the page. (3) Finally, you can actually change the position of the master page applied to a page (see below).
  • Objects Move with Page makes page objects move with the page if you adjust its position. (We’ll describe this in the next post.)

When you turn on Master Page Overlay, a purple border indicates the dimensions of the current master page as they are applied to the page. Using the Page tool, click on the border and drag to change where objects from the master page will appear on the document page. In the example below, the yellow star is on the master page, and it’s been moved to center it over the gatefold page. Notice that the master page name “C-Stars” also appears.

Master Page Overlay

Master Page Overlay

This feature lets you share master page content across multiple pages, but gives you the freedom to reposition where the master page content is positioned on each page it is applied to independently.

In the next posting, I’ll show you the second scenario for making multiple page documents?creating different sized pieces in a corporate identity within the same document.

Steve Werner is a trainer, consultant, and co-author (with David Blatner and Christopher Smith) of InDesign for QuarkXPress Users and Moving to InDesign. He has worked in the graphic arts industry for more than 20 years and was the training manager for ten years at Rapid Lasergraphics. He has taught computer graphics classes since 1988.
  • Garrett Guillotte says:

    Ok, I started a whole new branch of outrage when I asked about INX export in the announcement thread, which I hadn’t realized was dropped. I’m not sure if my more pressing question was really answered.

    If you export a document with differently sized pages to IDML and open it in CS4, what happens?

  • Since altering the page size requires a new tool (why a whole tool to do something that could be accomplished in the Pages panel or through menus? Dunno), I assume when you make a new document you can only specify one page size. New pages would adopt that default page size and the Page tool would be required for new sizes.

    So I guess only the default page size would be recognized in InDesign 6. The question then becomes how are objects shifted on altered page sizes? My guess: they stay centred.

  • Eugene Tyson says:

    Well now I can have my book covers with a spine page in the middle, just adjusting the middle page size to adjust spine width.

    I can also create proper tri-fold sized documents without resorting to drawing guide lines everywhere. Normally – I’d draw the guides on a single page where the folds go, then insert page 2 and insert the guides again, but opposite the first page, so they marry-up. Surely now I can just do a three page spread, then reverse the page order in the 2nd spread. Should be very useful.

    I believe that “fold” marks are also included when you have different page sizes, is that correct?

    I’ll get plenty of use out of this feature, that’s for sure :D

  • Lou Kash says:

    Yet another Freehand feature incorporated into an Adobe app a mere decade later.
    And bad news for DTP Tools. (Although, Page Control is likely still more useful than this?)

  • Eugene Tyson says:

    What’s with all the negativity? They finally added this feature – let’s rejoice. It can only get better from here-on out.

    I for one am overjoyed with the different page size feature alone!

  • Fred Goldman says:

    Yes, I agree, it is wonderful to see this native within InDesign. Altough, it’s unfortunate that it was a feature that a third-party developer invested time into, it makes me wonder if that discourages third party developers from developing for InDesign.

    Scott, you have to use a separate tool to change the page size, it can be done from the Pages panel, too.

  • Jerome says:

    Adobe is not the only one to incorporate third party additions into their software, nor is this the first time. There was a time when Photoshop (or any other Adobe program for that matter) did not have scripting support, and as I recall it was a third party that created a plug-in for it. Quark 4 had a lot of features that were plug-ins from third party developers, including drop shadows and .psd import.

    This is progress, the third parties come up with solutions for the deficiencies in the program and if the developer thinks that it is a feature that needs to be added in the next iteration of the program they will add it go give additional reasons to upgrade. If they didn’t add new features that add value to the product with the upgrades how many people would buy the upgrade?

  • To answer Garrett’s question (“What happens when you export mixed-page size docs to IDML and open them in CS4”), the answer is that in CS4, all the pages use the same page size, the one defined in the CS5 doc’s Document Setup. Content is centered within.

    You can see for yourself in these 2 files: 1) A PDF export of a mixed-page size doc showing the page sizes and crops; and 2) An IDML export from that CS5 file. The file itself is just 3 virtually empty pages except for a text label I added to each, so they’re fast to download.

    PDF file
    IDML file

    Open the IDML file in CS4 and compare it with the PDF.

  • Garrett Guillotte says:

    Thanks, Anne-Marie! That answered my question.

  • @Scott Falkner: “…why a whole tool to do something that could be accomplished in the Pages panel or through menus?”

    There are actually several ways to change the size of a page in ID CS5.

    1. Select the page(s) in the Pages panel as you always have. You do not have to switch to the Page Tool first. Once you have the pages selected in the Pages panel, you can chose a new page size from the pop-up menu at the bottom of the Pages panel. There are several “preset” sizes to choose from, and you can add your own presets to this list.

    2. Apply a different size Master Page to a regular page. This is actually one of my favorite methods and is especially handy when working with mixed page sizes in a non-facing pages document which Steve mentions he’ll cover in a future post. When you add a Master Page to your document, simply choose a size that is different than the document default size. Then just drag that MP to any other page thumbnail in the Pages panel to change the size of that page. If you then go back and change the size of the Master Page, as you’d expect, all the pages tagged with that Master Page will inherit the new size.

    3. The Page Tool. This tool was added to take advantage of InDesign’s contextual Control panel interface. Meaning, the Control panel provides options relevant to the current selection. You’ve never been able to select pages in the Layout view before. Now you can. And when you do, you now have options in the Control panel relevant to your page selection. Stay tuned for Steve’s next post, as you’ll start to see why and when the Page Tool is really handy and intuitive when working on projects with non-facing pages…

  • Eugene Tyson says:

    Very cool Michael, all sounds very interesting. I can’t wait for more awesome tips from Steve on this.

  • almaink says:

    Although I haven’t seen this in acting yet and I may be wrong, I see this as yet another PITA feature thats not needed. I have a hard enough time getting people to make a page the right size now. so with this new “tool” I’ll have to worry about multiple page sizes all being wrong? Adobe please stop this making the designers life easier, by making the job we prepress people do harder! How do these pages export to postscript or PDF? I used a plugin tool that did this same thing and it was a nightmare exporting to any file format.
    The pages all exported to one size with printable rules defining the trim. Try dumping that in Preps! If you need multiple sized pages, as for a perfect bound book, add the size of the pages together, plus the spine and make one page with fold marks.

  • Steve Werner says:

    almalink,

    I couldn’t cover everything in one post. There will be more to come.

    Quick answers:

    Creating a PDF from multiple sized pages works beautifully.

    There is a new Preflight profile option to check “All Pages Must Use Same Size and Orientation.”

    As usual, it’s up to the printer to define for their clients how files should be prepared. It requires education.

  • SD Marc says:

    As a prepress lead for many years, I’ll be interested to see how this pans out. Not many folks out there build a multi-panel doc we don’t have to rebuild. Even when all the panels are technically the same size, at least one needs to be shortened, to fold flat, often more if it’s a long roll fold. That said, I look forward to seeing it work, as long it outputs good PDF spreads, I don’t see a problem. Right now, we either have to move all panels to a single page, the final flat size, or center the short panel in imposition, which doesn’t always work.

    As for “It’s up to the printer to define for clients how files should be prepared.” If only people asked…

  • James Wamser says:

    Great post Steve! As you know, I work for a commercial printer (web, sheet-fed and digital) and love the new multiple page sizes.

    The example Eugene gave is really good: “Well now I can have my book covers with a spine page in the middle, just adjusting the middle page size to adjust spine width.”

  • Eugene Tyson says:

    James – I see that alone as a wonderful time-saver. Anytime I adjust a spine on a single sheet layout – I have to mechanically move the items on the back page and the front page the appropriate distance on the X-co-ordinance.

    Working mainly in publishing of large books, 15 in total, and the page counts are quite high – 1,000 to 3,200 pages, when the paper weight changes up or down (depending on publication) the spine width can change dramatically.

    How cool now to just select the middle “spine” page and then just resize that to the printers spec.

    It’s something I’ve always wanted.

  • Crackerjax says:

    I am working on a roll-fold – 4 panel brochure. I just changed the sizes of my pages to correct printing/folding sizes. There are 2 spreads in my document – pages 1-4 and pages 4-8. When I made slight changes to page sizes there is a space between the pages. How do I get rid of that space?

    • I to not mention my fellas ended up truly examining the excellent recommendation located on your website and at as soon as designed a terrible suspicion I received not thanked the site proprietor for those people recommendations. All in the vibrant boys turned definitely energized to review them and have now actually been doing probably the most of them. We appreciate you becoming rather considerate after which it for using this type of great concepts thousands and thousands of people are actually desirous to find out. Our own personal straightforward apologies for not expressing gratitude to sooner.

  • @Crackerjax: Sounds like maybe you changed the page size with the Page tool. Try changing it from the File > Document Setup instead.
    Or, select all the pages in the spread with the Page tool, turn on the Use Spacing checkbox in the Control panel, make sure that spacing is set to zero, then click the Distribute Horizontal Space button. That means “make zero space between all selected pages.”

  • John Goldsmid says:

    Thanks for this Steve – it’s going to be a real time saver when spines or jacket flaps need to be re-sized (ie: every time we re-print, and paper specs change), and I’d not spotted it before. Good thread too, people :)

  • Jeff says:

    I have a long document with three types of pages, letter portrait, letter landscape and tabloid landscape all in the same document. Is there a way to have all of the header and footer information in one master page for all three page sizes?

    Right now I have each page type set up as its own master which works, but at the start of each new document I need to modify the header and footer on each master page. Can the text objects be linked back to the first master without having the whole master applied? Or can the master file layout on the pages be adjusted for the change in page size? Thanks in advance for the assistance!

  • @Jeff: What you want is tricky, but possible. See this blog post about the Master Page Overlay.

  • Brad Kumar says:

    Hi guys. Similar to @CrackerJax, I’m doing a roll-fold brochure, where the third panel is smaller in width. There are two spreads, pages 1-3, and pages 4-6. Everything looks good in the Indesign document. However, when printing to a printer or to PDF, and I turn on the ‘crop marks’, the crops (or fold marks to be more exact) are correct on the first spread, but they are incorrect on the second spread. It looks like Indesign is printing the same crop marks for the second spread. Am I doing something wrong?

    Not sure if this link will work, but I’ve done a quick screenshot to show you what I mean.

  • Brad Kumar says:

    GAH!

    Uh, never mind guys, I figured out the answer. Thought I might as well post what I figured out here, just in case anyone else runs into this problem.

    So the problem was that I changed the page size with the Page Tool. But Indesign doesn’t care what your document pages look like when it comes to crop marks. You have to manually drag the third page to the left in your Pages palette in order for Indesign to understand that the pages should be reversed.

    Have a look at the before screenshot that shows the pages looking just fine in my document, but the Pages palette shows that the spreads do not match.

    See the after screenshot where I’ve manually dragged the third page to the left.

    Once I did this, the file printed with correct crop/fold marks.

  • AaronA says:

    Does seem rather lame that it rejects a page that does not allow for the current Margin/Column settings. It should allow an override in this case instead of requiring you to cancel and go tweak the guides.

  • SeanVash says:

    I have a document and each page show me the standard letter size (51p0 x 66p0) but I don’t know what that stands for. what I want to do is set the page up to 9″5/8 x 11″5/8 . how do I convert this file into inches? how do I use inches in indesign?

    Can you please help me?

  • Shlomit says:

    Thank you for the Tutorial.
    I have a question I could not figure out:
    I have a master with 3 pages. I want to move the right page to the middle.
    Or
    I have a master with 5 pages, and I want to move the right page (5) to the left so it will become the first page.
    I would like to do it on the Master page and not on the document pages…
    I can’t figure out how to do it – can i?
    thanks
    Shlmit

  • JUDITH says:

    I had to redo a document in a different size–went from 8.5×11 pages to half pages. 44 pages in all. Now no matter what I do it tells me I can’t used the make booklet function because it said there are multiple page sizes. I can’t figure out what the !@#$%%^ it means! There are no other page sizes. I’ve tried everything to rid the document of this. Drug over the pages one by one into a new document, checking each size as I go. Nothing helps. How do I get rid of that multiple size???? Where is that information????

    • Judith, it’s hard to know. I suggest selecting the first page in the Pages panel and then Shift-click the last page (which selects all the pages in the doc) and then click the Page Size button at the bottom of the panel. If all the pages are the same size, you’ll see that selected in the list. If there is a page that is a different size, nothing will be selected (because you have more than one page size).

  • Ric says:

    I have a document set up as spreads, 210mm x 210mm. The client has provided some oversize content, a detailed map. I could span this across a double page spread, but given that the document is only going to be circulated via PDF, I was though a neater solution would be to have a single A4 landscape page for the map, which would have the added benefit that the end user could print the map at home straight form the document.

    I know how to add pages of different sizes, but how do I add a single page of a different size between double page spreads? So: p1, p2+3, p4, p6+7, etc.

    I know I can probably add this via Acrobat instead, but then the page numbering would be off. I’d prefer to do it all in a single document too if it’s possible.

    Any ideas?

  • David says:

    The link to the second article seems broke atm. Here it is for reference!

    https://creativepro.com/creating-multiple-page-sizes-in-cs5%e2%80%94part-2.php

  • Michelle says:

    thanks was easier to understand than the Adobe help page! :)

  • >