

The great folks over at Rorohiko have developed an amazing plugin called Magneto Paths. This plugin makes objects stick together while they are being drawn, resized, and reshaped. This means you can effectively apply more than one stroke or fill to (what appears to be) a single object.
To demonstrate the true beauty of this plugin, we need multiple items, with the same geometry but different appearance. In my previous article, I showed how to use custom stroke styles and stacked objects to make a striped geometric shape.

Magnetize Your Objects
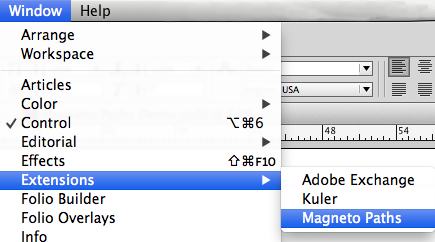
Once you have installed Magneto Paths, you can launch it here: Window > Extensions > Magneto Paths
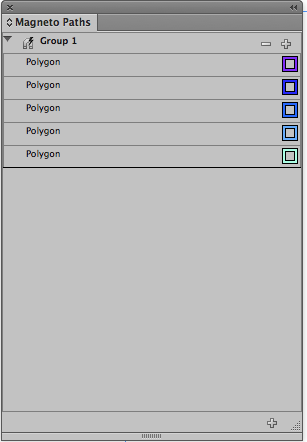
To make a new Magneto Group, select your entire stack of objects and then click on the plus sign at the bottom of the Magneto Paths panel.

The panel is then populated with all the objects in the Magneto group, complete with handy color indicators. The order of the objects in the Magneto Paths panel will match the layer of the objects in the Layers panel. If you need to reorder the objects, be sure the reorder them using the Magneto Paths panel. Otherwise, if you reorder the objects in the Layers panel, Magneto Paths will override the stacking order in the layers panel with its own order.
Modify Your Paths
So now we’ve got our various objects sets up as a Magneto group. Let the magic begin! Using the Selection tool, click on the topmost object (you can change any of them, but the topmost is easiest to select) and change it somehow: stretch it, move it, add more points, skew it, etc. All the other objects in the Magneto group will be transformed right along with it.

You can even use the pen tool to draw the path longer.

All you have to do is select and resize/reshape a single one of the objects in the objects in the Magneto group, and all the remaining objects in the Magneto group will have their geometry resized accordingly. Check out this video for an example:
https://youtu.be/XX9Aiulpd4g
You can select items scattered around the page and add them or a Magneto Group (or create a new Magneto group from them). The items do not all have to have the same geometry in order to be added to a Magneto Group. As soon as you move one of the items in the Magneto group, all the other items in the group will have their geometry update to match. See it live here:
https://www.youtube.com/watch?v=fJHl6FKftNs
I can see this especially useful when working with sidebars. Now you can magnetize two frames (a text frame on top and a second frame containing a background image). When the text frame is resized, the image frame below will resize as well, to show or hide more of the background image. Here’s a video of it in action:
https://www.youtube.com/watch?v=v3TrjKBChSQ
Using the Panel
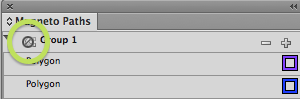
To temporarily demagnetize objects in the Magneto group, simply click on the magnet icon. That will change the icon, indicating that the group has been demagnetized.

To remagnetize the objects in the group, click the magnet icon once again.
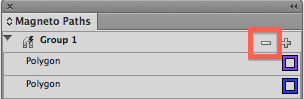
To remove an item from a Magneto group, or to remove an entire group, first select the item in the panel that you want to remove; then click the minus button.
You can even set up more than one Magneto Group, and drag items from one group into another (even if they’re a completely different shape and located elsewhere on the page).
Magneto Paths is available at the Rorohiko website, with a 30-day free trial!
This article was last modified on December 30, 2021
This article was first published on October 1, 2013
Commenting is easier and faster when you're logged in!

Recommended for you

Pointer Lines for Technical Writers: Part 2
Several years ago, I wrote a blog post called Pointer Lines for Technical Writer...

Spaced out dots…
I love my dots, but want more from InDesign when it comes to dots. Let's space o...

Deluxe Holiday Lights
It's time to celebrate the season by lighting up a document with InDesign CS5.