
InStep: Preflight to the Rescue!
InDesign's real-time error checking reduces headaches when designing screen and print documents.

This article appears in Issue 61 of InDesign Magazine.
InDesign’s built-in preflight system is useful, but it’s very basic. Fortunately, customizing a profile to your needs can be done quickly, and is an incredibly powerful resource. With Live Preflight turned on, InDesign warns you of issues with your document as they occur. Though preflight was originally used for print documents, it’s also very helpful when designing for tablets, eReaders, and other kinds of screens.
1. The [Basic] Profile
 Let’s start with the default “Basic” settings. Open any document. At the lower left corner of the document window you’ll see a dot on the Preflight menu. If Live Preflight is off, the dot is gray. If it is on (which it is by default), the color will be either green or red—green means no errors, and red means ”Excuse me, Master, I’ve found some problems.” Just to the left of that dot, InDesign displays the name of the preflight profile. Clicking that drop-down menu lets you change your current profile. As you can see, I have created a few extra custom profiles that check for different sorts of errors. In this article, I’m going to show you how I did that and what kinds of things a preflight profile can check. To open the Preflight panel, use one of the following methods:
- Choose Window > Output > Preflight.
- Click the Preflight menu at the bottom of the screen (the one to the right of that green or red dot), and then choose Preflight Panel from there. Checking and unchecking the “On” box toggles Live Preflight on and off.

2. Make a New Profile
The “Basic” profile will catch some problems, like missing links and overset text, but
for profiles to be really useful we need to make our own. An easy way to start is to use the Preflight menu at the bottom of the screen and pick Define Profiles from there.  Click the plus (+) sign at the bottom of the Preflight Profiles dialog box to make a new profile and give it a name. For example, I’ve called mine “Headache Remedy”. You can also fill out a description if you want. There are six sections in this dialog box; you already finished the first one when you added a name and description. Now go through the dialog box, section by section, and pick the features you want InDesign to check. Some options have details nested inside. You need to click the twirly triangle to make each section and its details visible.
3. Link Settings
 It’s rare that you’ll need to make changes in this section. Do you want to be notified of missing links? You probably do, so leave these checkboxes on. Do you use an OPI workflow for images? Probably not, so leave it off.
4. Color Settings
 Do you need to use a specific transparency blend space? You can specify RGB or CMYK here. Are there plates, color spaces, or modes that should NOT be used? What about spot colors? You can tell InDesign to warn you if you suddenly have 40 Pantone swatches because you placed an oddly made graphic, or if you want to use only one spot color and be sure the process colors are off. You can specify if your spots use Lab or CMYK (they probably ought to be set to Lab in the Ink Manager, so you can check for that), and see if Overprinting has been applied, or if someone used the Registration color (a common mistake). I love Preflight Profiles, but I do have one frustration. The dialog box does not resize! You have just a few inches of vertical space to work with, and then you’ll need to scroll. Use the little triangles to collapse each section when you’re done with it to make this easier.
5. Image and Object Settings
 Have you asked for assets and received images suitable for screen, but not for print? Setting a minimum resolution gives you a reminder to replace these images with high resolution versions before you’re at the end of the project. Select the checkbox for maximum resolution to avoid working with huge images or those that have been scaled down too much. If you do have images scaled out of proportion, you can get a warning of that here as well. Would you benefit from a heads-up on transparency use? If so, check the box. What other headaches can we solve today? What about color profile conversions or overrides? For example, I like to select Layer Visibility Overrides so I can see if there are overrides on placed layered images like Photoshop or Illustrator files. Turning on the Minimum Stroke Weight option is super helpful, as it gives you warnings for strokes that might not print well because they are too thin. But wait… there’s more! Have you made a file for Interactive PDF that you now want to adapt for an iPad? In the Interactive Elements section of Preflight Profiles, you can ask for a Flash object warning, as well as to be reminded about videos, animations, form elements, audio, and Multi-State Objects. You can also make sure you never have issues with hidden objects and objects not positioned cleanly in the live area, by using the check boxes in the end of this section.
6. Text Settings
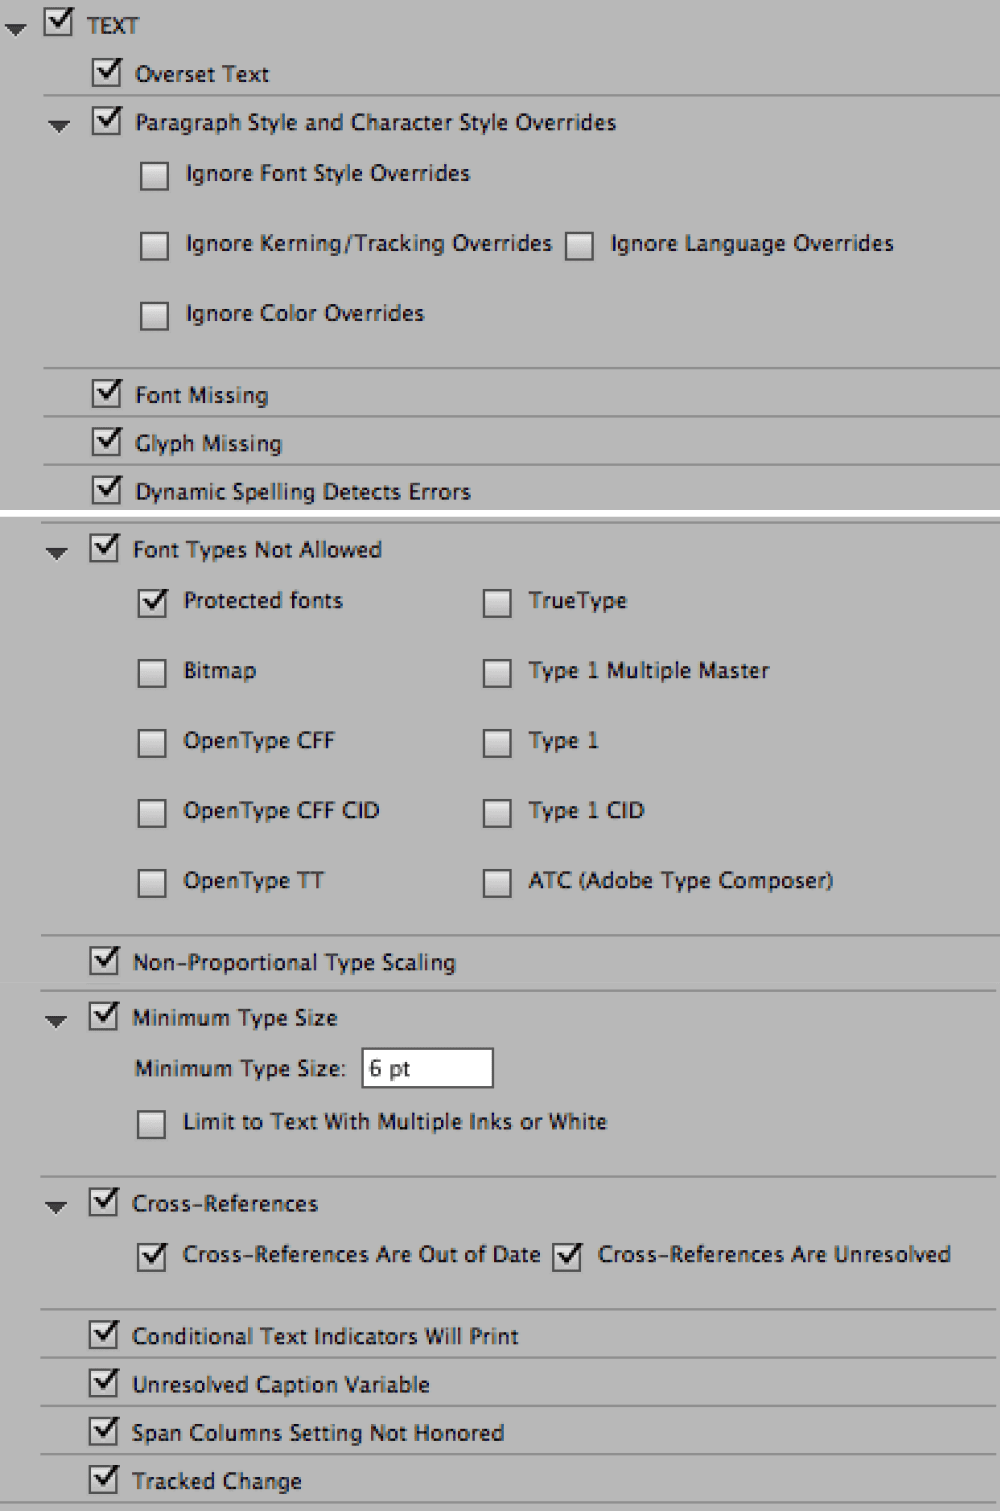 The Overset Text warning is on by default, which makes sense as you’d almost always want to know about that! But there are a bunch of settings inside the Text section of this dialog box that I bet you didn’t know you about, and which are really helpful.

Using the Story Editor can be a huge help when dealing with overset text. Put your cursor in the text, and type Command+Y/Ctrl+Y to open the Story Editor. You can also choose Edit > Edit in Story Editor. Overrides are shown with a line labeled “Overset” and a red bar marking whatever doesn’t show in the container. Any edits you make in the editor are reflected live in the design.
7. Document Settings
 InDesign can monitor everything from the size, orientation, and number of pages in a document to checking if you have blank pages and the correct bleed and slug settings. Are any of these potential headaches? If so, select them for your profile. That’s it! When you’re done setting up all the checkboxes and fields, click OK to complete your profile. But note that you aren’t using your new profile yet! Select the profile from the Preflight menu at the bottom of the screen or in the Preflight panel. Now you are testing against your new profile.
8. Fixing Errors
OK, you see a red dot. Now what? In the Preflight panel, click the twirly triangles to reveal the error details. (If you need more details, open the Info area at the bottom of the panel.) Double-click the error to go to it in the document. Then go through and fix the problems one by one. When the color changes from red to green, you’ve fixed them all.  Some profiles catch more errors than the panel will show at one time, so in the Preflight panel menu, you might want to increase the Limit Number of Rows Per Error:
9. Working with Profiles
Now that you have a working profile (or more than one, if you decide to make one for screen, one for print, and one for that “special” client), you can tell InDesign how you want profiles to behave. For example, which one do you want to load by default (the working profile)? And do you want to share it so that others can use it, too?
10. Embed the Profile
 You can embed a profile in a document so it travels with the document wherever it goes. To embed a profile, use one of the following methods:
- In the Preflight panel, click the page-and-paperclip icon to the right of the profile name.
- In the Preflight Profiles dialog box, select your profile, and then choose Embed Profile from the Preflight Profile menu.
11. Export the Profile
 Instead of embedding your profile in the document, you could share it with your colleagues by exporting the profile file itself and sending it to them.
- In the Preflight Profiles dialog box, choose Export Profile from the Preflight Profile menu at the bottom left.
- Save the .idpp file to disk where you want it to go.
12. Load a Profile
If someone creates a premade profile for you, you can just load it in and start working like this:
- In the Preflight Profiles dialog box, choose Preflight Profile > Load Profile.
- Navigate to the .idpp file, and click Open.
13. Set the Working Profile
 What defaults do you want? In the Preflight Options dialog box, you can control the default profile, how InDesign handles profiles when opening documents, and what should be included in testing.
- From the Preflight panel menu, choose Preflight Options.
- Set your preferences for the working profile, and click OK.
14. Wrapping Up
That’s it! This was your quick introduction to making a custom Preflight Profile. I hope you find that making a profile specific to your workflow saves you hours of production time and makes annoying stress headaches a thing of the past.
Commenting is easier and faster when you're logged in!

Recommended for you

Tackling Missing Glyphs
When a document mysteriously opens with dozens of characters set to the "dreaded...

How to Find Overset Text in InDesign Fast
InDesign tells you that you have some overset text, but sometimes it's hard to f...

How to Prepare and Preflight Ads in InDesign
Want the ad you’ve built in InDesign to soar? Preflight is the key!