
InStep: Making Figure Legends
Take the pain out of creating labels for complex figures and diagrams with the help of some style tricks and the table of contents feature.

This article appears in Issue 94 of InDesign Magazine.
In my work, I produce publications such as technical manuals and parts pricing lists. These documents contain complex images with elaborate legends labeling all the important details. The process of creating and updating these legends was always tedious and error-prone, so I wondered if there was a better, more automated way to do it in InDesign. I found that I could use the Table of Contents feature along with a nested paragraph style to deal with these legends easily. This method might be a little bit laborious to set up, but the payoff is great, especially when working with long legends. Here’s how it works.
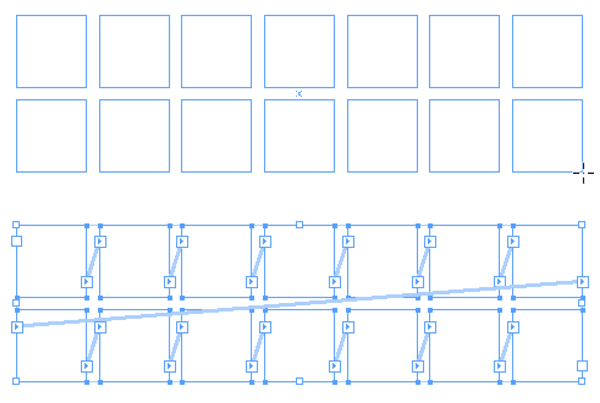
1. Create a set of threaded text frames
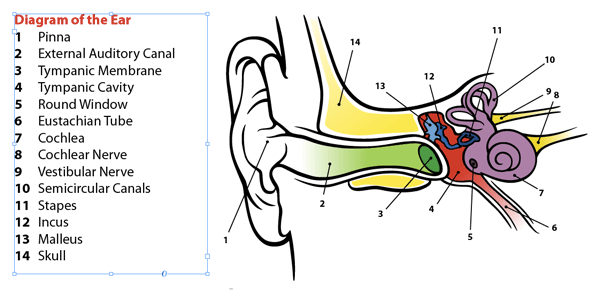
For each part of the picture you want to label, you need to create a separate text frame. The frames should be threaded together so that they constitute a single story.
One way to create a set of threaded text frames is to use the Gridify feature with the Type tool. Simply start dragging with the Type tool, and without releasing your mouse button, press the arrow keys on your keyboard to add rows and columns of text frames. For example, to create a set of 14 threaded text frames, press the right arrow six times, and the up arrow once (this gives you seven columns and two rows of frames). Then release your mouse button. Voilà! You now have 14 frames, all threaded together.
page for details.
2. Add legend text
In each frame, add the text that you want to appear in the legend. This text won’t be visible in these text frames in the final effect! But we need it here so the table of contents feature can find it when we build the legend.
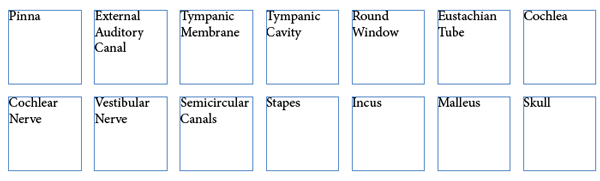
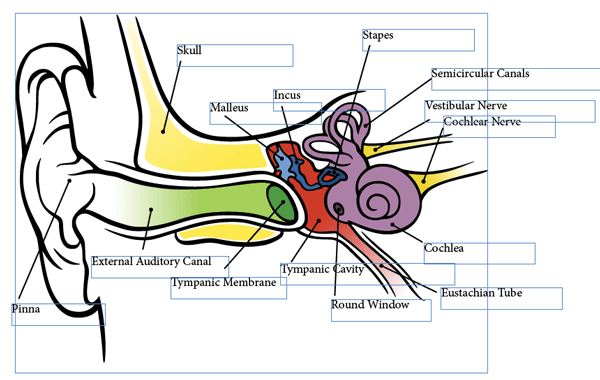
Position each frame where you want it over the illustration.
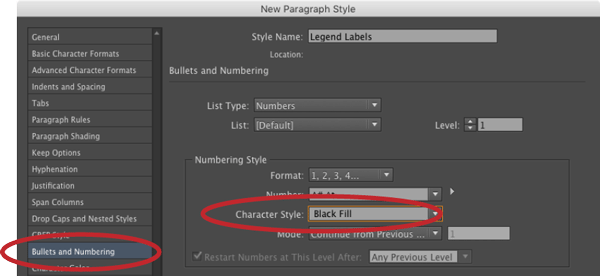
3. Create a paragraph style that shows only numbers
The next step is to create a numbered paragraph style to apply to the text within each frame, and use the style options to hide the label text while leaving the numbers visible.
In the Bullets and Numbering options, choose (or create) a character style that includes a fill color for the Numbering Style.
In the Keep Options, make sure Start Paragraph is set to In Next Frame. This way, only one number will appear in each text frame.

To make the text disappear while keeping just the numbering visible, set the character color of the paragraph style to None. Click OK to save the paragraph style.
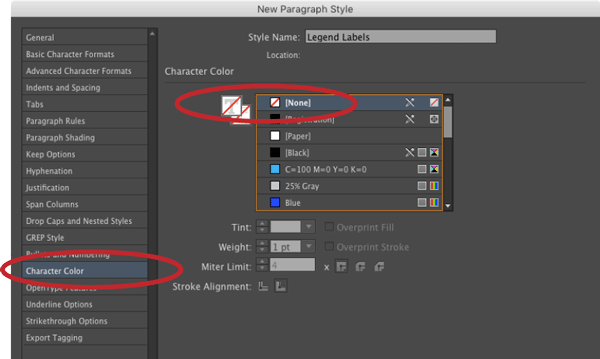
Select all the text in the story, and apply the new paragraph style to show just the numbering and not the label text. Note: If you need to edit the invisible text, open it in the Story Editor.

4. Create a table of contents
To create the legend, build a new table of contents. Choose Layout > Table of Contents. In the Title field, add any text that you want at the top of the legend.

Then, locate your numbered paragraph style in the list of Other Styles, and click Add. In Entry Style, select a paragraph style to format the legend text. If you don’t already have a style for this purpose, you can create a new one directly from this menu. Lastly, make sure that No Page Number is selected in the Page Number pop-up menu. (You may need to click the More Options button to see that feature.)
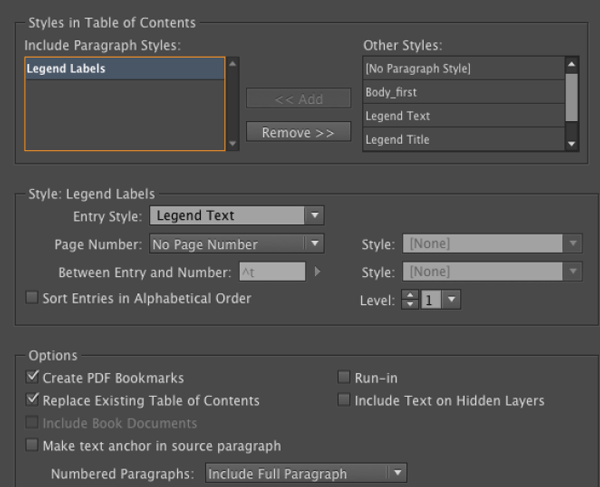
Click OK to build your table of contents/legend and load it into your cursor. Then just click to place it into your layout.
To build multiple legends in one document, you will need to use table of contents styles (one per legend), which you can read about here. Also, you can use this handy script to update all the TOCs/legends in an InDesign document at once.
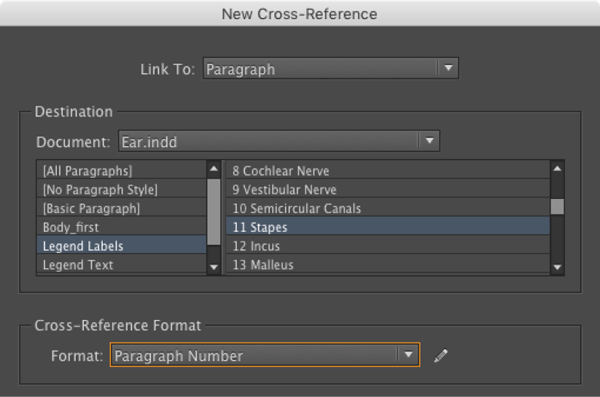
5. Use cross-references for repeat entries
If you need to indicate the same element multiple times in one figure, you can use cross-references. Simply create a new text frame where you want the duplicate label to appear. Then choose Type > Hyperlinks and Cross-References > Insert Cross-Reference. In the dialog box, first select the paragraph style you applied to your legend numbers. Then select the specific one you want to duplicate. From the Format pop-up menu, choose Paragraph Number, and click OK.
Creating legends for complex figures and diagrams may not be the most exciting task, but I think you’ll agree this method of using tables of contents offers several nice advantages over doing it all manually:
- You can be more precise when naming each part (using specific terms instead of generic numbers).
- When the figure or diagram changes and parts are added or deleted, you can quickly update all the numbers.
- There are fewer opportunities for manual mistakes.
- All legends can be updated at once with the help of a script.
Commenting is easier and faster when you're logged in!

Recommended for you

Filling Live Text with Images in InDesign
Want to get an image inside some text in InDesign? You don’t have to convert it...

Tip of the Week: Adding Alt Text to Images With Object Export Options
This InDesign tip on adding alt text to images with object export options was se...
InReview: Footwork
Footwork by Bookraft Solutions is powerful alternative to InDesign’s automatic f...