InStep: Excel to InDesign Via XML
Excel is a great application for capturing and managing data. But for maximum flexibility, XML is often a more robust choice for InDesign workflows.

This article appears in Issue 88 of InDesign Magazine.
Most InDesign users know that Excel spreadsheets can be placed into an InDesign document, and rendered as native InDesign tables. This is an excellent solution when you want a table-based structure in your final design. But what if you don’t want to mimic a spreadsheet? Recently I was creating a directory of information based on data from a spreadsheet, and the client wanted the information to “flow” in a layout, instead of being listed as a table. In the past, I’ve saved Excel files as .csv or tab-delimited files, and then run some creative GREP searches to achieve the desired result. But that still left me with a lot of manual formatting to do. I love nested styles in InDesign, but they require very consistent content, with “triggers” that allow me to determine how content within a paragraph is formatted. If you don’t have consistent content from one paragraph to the next, nested styles just don’t work. Now you might say that Data Merge would be a logical choice, and it works well for some projects. But Data Merge alone doesn’t allow you to create flowing text, and it requires each field to be a separate text frame. Loic Aigon wrote a handy script called InlineMerge to overcome this limitation, but I still wanted a bit more control. XML gives me the ability to import content into InDesign in a story format, and provides the control that I need to style content based on tags in the XML file, instead of specific characters in the content. Editor’s note: See issues 23 and 24 for a full rundown of XML workflows. The first challenge is getting clean XML out of Microsoft Excel. Excel has a format in the Save
As dialog box called XML Spreadsheet. However, when you open this XML file, you’ll notice that it doesn’t contain clean code. To get clean XML code from your spreadsheet, you’ll need to tag the content in Excel, using a specific process. Don’t worry; we’re going to walk through each step to show how this works. Disclaimer: This process relies on the Windows version of Excel. For whatever reason, Microsoft omitted this (and other features) from the Mac version.
1. Create an XML schema
You’ll need a sample XML schema file that replicates the XML tags you’ll be using to represent the data in the Excel spreadsheet. In a plain text file, create a few records to indicate the structure and tags for the XML you will bring into InDesign. 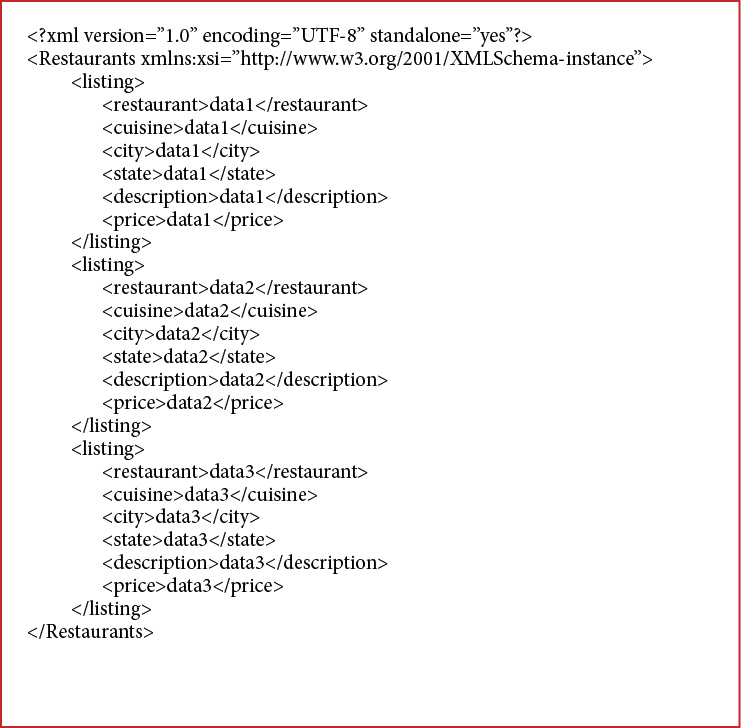 Note that you need more than a single record in order for this schema to work. Make sure that the root element is named the same as the Excel file that you’ll be using. Aside from that, you can name the tags whatever you wish. I named the elements the same as my column headers to make things easy, and then saved the file as Schema.xml. See the figure on the previous page for the schema that I created. I should also point out that this is less of an actual schema like you might see in other workflows, and more of a prototype of what you want your resulting XML file to look like.
2. Load the schema in Excel
In the Windows version of Excel, enable the Developer tab in the Ribbon. Next, click the Source button in the Developer tab to display the XML Source task pane. Click the XML Maps button at the bottom of the XML Source task pane to display the XML Maps dialog box. Click the Add button, and select the Schema file that you created in step 1. Excel may display a message indicating that it will create a schema file based on the XML file that you selected. You may also see a confusing message pop up, but simply click OK to dismiss it, and then OK again to close the dialog box. With the source defined, you’ll see all of the tags that you created in the XML file listed in the XML Source task pane. 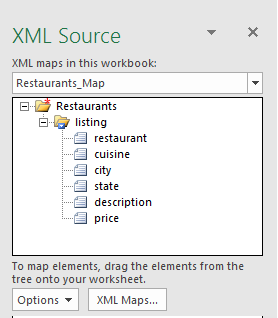
3. Tag the Excel content with XML tags
Next, you’ll tag the Excel content using the tags in the XML Source pane by either right-clicking on an element in the XML Source pane, choosing Map Element, and defining the header cell; or simply dragging and dropping the element from the XML Source pane to the column header. As you tag the content, you’ll see the entire column change color, indicating that the XML tag has been applied. Repeat this for as many tags as you want to apply to the content in Excel. 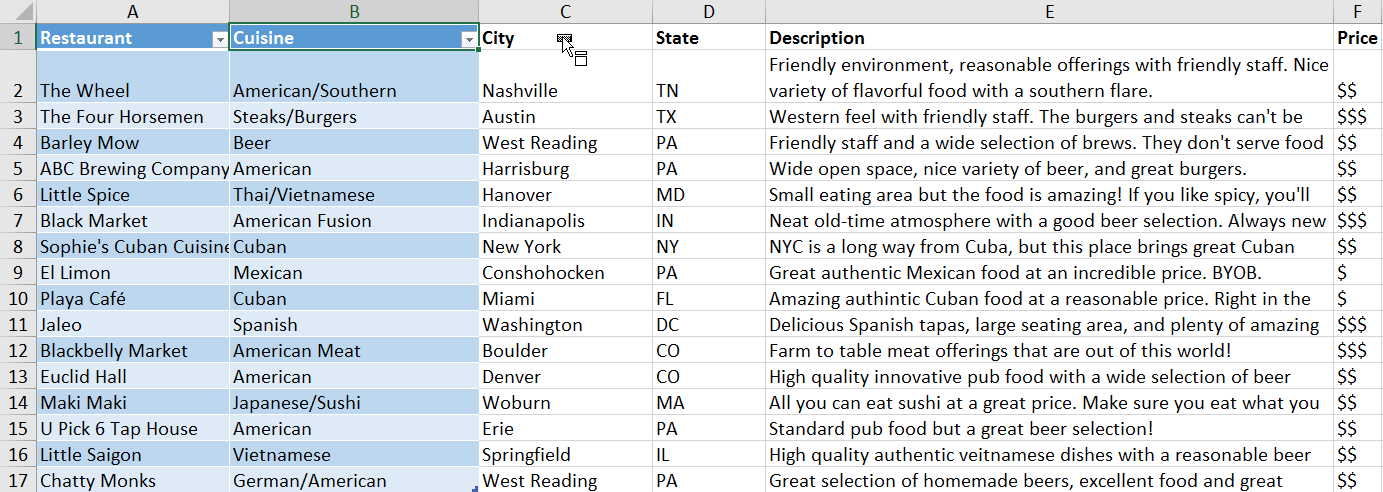
4. Export XML from Microsoft Excel
Before exporting the XML, feel free to sort your information as desired. It’s not imperative that the sorting be done at this step; it could have been done earlier in the process. Do understand, though, that the way the Excel data is sorted—as well as the order of the columns—will determine the order of the elements in the final XML file. In the Developer tab, click the Export button, and provide a name and destination for the XML file. Then click OK. The resulting XML file is a very clean, organized file with the content tagged using the settings defined in Excel, ready for import into InDesign. 
5. Load tags into the InDesign document
Now that we have a clean XML file with the content that we want to use in our layout, it’s time to set up the InDesign document in preparation for XML import. Start by opening up the Tags panel in InDesign (Window > Utilities > Tags). Click on the panel menu, and choose Load Tags. Select the XML file that you exported from Excel, and click OK. This loads all of the tags contained in the XML file into the Tags panel. 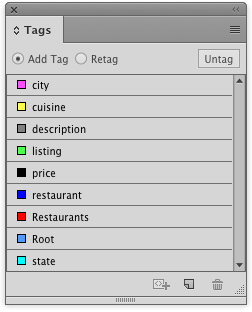
6. Set the root element
Next, open the Structure pane (View > Structure > Show Structure). You’ll see an item in there called Root. If you’re not familiar with what the root element is, it’s the element in the XML file that contains all other elements (the outermost element). Every XML document needs a root element; InDesign creates one automatically called Root.  To replace the generic Root element, click the Root element in the Structure pane, and then click on the name of the root element in the Tags pane that represents the root element of your XML data.
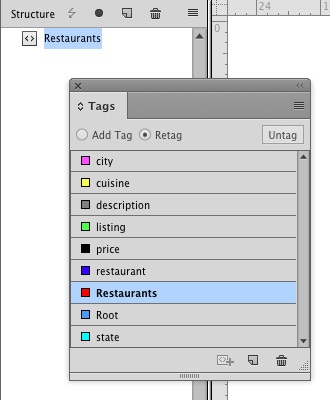
7. Tag a text frame with the root element
Drag the root element from the Structure pane on top of the text frame in your document to tag it with that root element. You may not see much of a change at first, so make sure to choose View > Structure > Show Tag Markers and View > Structure > Show Tagged Frames. As long as you’re not currently in preview mode, the selected frame should now be filled with a color and contain a colored stroke (border). Don’t worry, this doesn’t print in the final product. 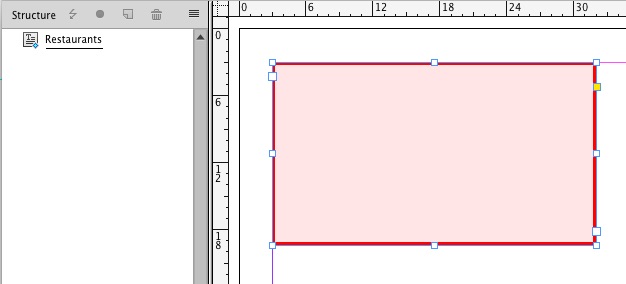
8. Add placeholder information
Next, enter placeholder information in the text frame for one of the records, and format it the way you’d like it to look. It’s not mandatory that you create paragraph and character styles for the text, but it helps if you want to tweak the formatting later on. The information you enter doesn’t have to be real data—you can make it up, but it should represent the elements of the content that you’ll be importing. 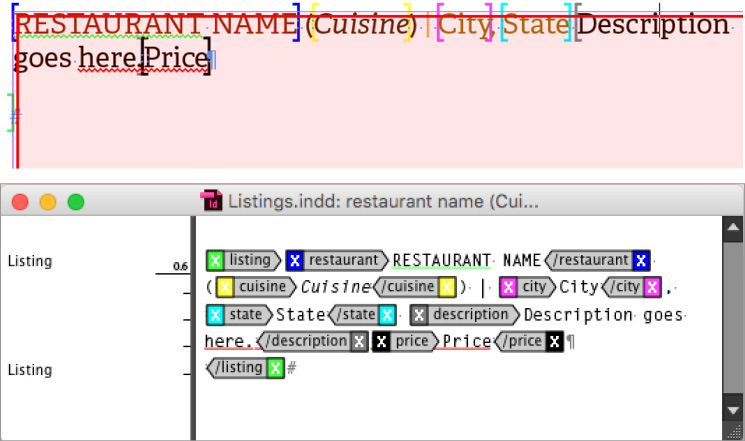
9. Tag the text
Now, tag the text within the frame. The way you tag the text should mimic how the XML file is structured. In my example, I have a <listing> tag that contains all of the data for each record, so I’ll begin by selecting all of my text, including the return at the end of the paragraph, and then clicking the <listing> tag in the Tags panel. You’ll notice brackets [ and ] appear around the tagged text. This is how InDesign lets you know how text in your document is tagged. Keep tagging the individual elements of the paragraph using the tags that represent the data that you typed. Leave any characters untagged that you are using to separate content in the paragraph, such as spaces, commas, returns, parentheses, and so forth. You want them to appear in each record that you import, so it’s important that those items remain untagged. The Story Editor in InDesign is really useful for tagging text and seeing how text is tagged. In the Structure pane, you’ll now be able to see the content that you tagged in the InDesign document. You may need to open the disclosure triangles to see all of the tagged content. Tip: Hold Option (Mac) or Alt (Windows) and click on the topmost disclosure triangle to expand all of the nested structure.
10. Import the XML
Click on an empty area within the Structure pane to make sure that none of the tagged content is highlighted; otherwise InDesign will try to import the XML data into that element, which is not what we want here. Choose File > Import XML, and navigate to the XML file that you created in step 3. Select the XML file, and make sure that the Show XML Import Options checkbox and the Merge Content option are selected. Click Open. The XML Import Options dialog box displays with a plethora of options that may seem daunting at first. You may be inclined to just leave the settings at their defaults and click OK, but if you do that, you may be disappointed with the results. I won’t go over each option in detail here, but the one option that is critical for our content is the one labeled Clone Repeating Text Elements. 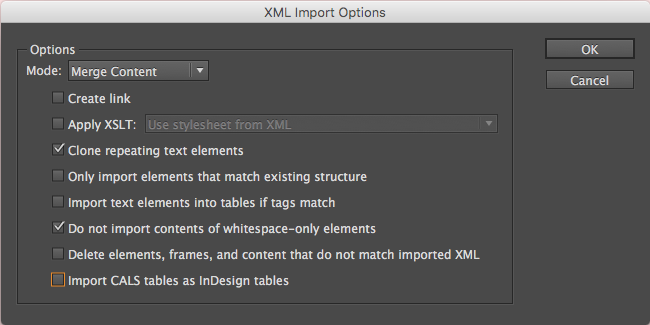 If you recall back in step 9 when we were tagging the content, I said to not tag the characters that you used to separate the information. I said that because the Clone Repeating Text Elements option will replicate all of those characters in each imported record, providing an incredibly powerful way to format your incoming XML data. The other option that you’ll likely want to choose is the Do Not Import Contents Of Whitespace-Only Elements. Although spaces are ignored in XML, that is not the case in InDesign. Enabling this option stops the importing of whitespace that was used to indent the XML structure for easy viewing in an XML or text editor. Click OK, and you’ll see your content imported into the text frame, consistently formatted the way that you defined it. If you see any formatting errors, simply undo and make an adjustment to the formatting, and then re-import the XML file. Depending on your setup and the appearance of the XML you’re importing, you may need to enable some of the other import options. In the figure below, you can see the content imported with the tagged frame and tag markers displayed, and then the content in preview mode showing how the final file will appear.
  There may be some minor adjustments required, such as line breaks, depending on the length of each record, but for the most part, the imported content is ready to go.
11. Wrapping Up
It’s quite possible to get clean XML out of Microsoft Excel, and doing so gives you an efficient way to import content into InDesign on a repeating basis. The idea behind this project is that each month, new restaurant listings are provided that need to appear in a publication with the same formatting. By using XML, you can create the next issue’s listings by choosing File > Import XML, and you’re done. If you’d like to learn more about using XML in InDesign, check out my Lynda.com course on Creating an InDesign Booklet Using XML, where I walk you through the process step-by-step and go over many of the options in detail. 
Commenting is easier and faster when you're logged in!
Recommended for you
Using InDesign and XML to Visualize the COVID-19 Data
The COVID-19 Pandemic is something that has touched us all in one way or another...

CreativePro Video: Automatically Format Text Using Excel
In this week’s CreativePro video, Bill Jelen demos how to format text using a fe...

InQuestion: September 2016
InQuestion is a regular column devoted to answering your questions about working...


