
Inside Photoshop: Adding Natural Textures to Graphics

Versions: 5, 5.5
Operating systems: Macintosh, Windows
In recent issues, we’ve shown you various ways to create texture for your graphics. Following in that same vein, this month we’ll show you one of the easiest ways to apply texture to your graphics–scanning. This technique has been put to a lot of use to create graphics that look more natural or environmentally friendly.
Incorporating a subtle texture can really transform simple graphics into something much more unique. For our cover image, we scanned rice paper and then created the basic snowflake shapes in Illustrator to use as templates to cut the paper image into various snowflakes. Besides paper, you can also use fabrics, cardboard or practically any other flat substance as a texture source.
To dress up your graphics, we’ll show you two different ways you can incorporate scanned textures into your work. We’ll take you through the same process we used to create the cover image using the example shown in Figure A. If you compare Figure A to Figure B, you can see that the simple cardboard texture added a nice style to the image that’s now lacking in Figure B. Once you see how easy this process is, you won’t be able to resist the urge to start working with textures yourself.

Figure A
A texture as plain as cardboard can add a surprising amount of style to an image.
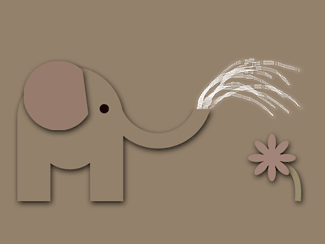
Figure B
The same graphics without texture aren’t nearly as interesting.
Getting Started
To create textures in this manner, you’ll need access to a scanner. When making your choice of textures, keep in mind that relatively flat objects work best because flatbed scanners don’t have a lot of depth of focus. They’re just designed to focus on one plane–the glass of the scanner itself.
Before scanning any object, consider the possible requirements and uses for your project. You want to be sure you scan at a resolution high enough for your output. Once you’ve acquired your image, resize or crop your image as necessary in Photoshop. Our example image of cardboard is 3 x 2 inches at 200 ppi.
Working in Illustrator
If you’re a whiz with scissors, you could cut out the shapes yourself before scanning, but doing so has some disadvantages. You’ll still have to select your shapes from their background if you want to use drop shadows or other effects on them. And, you won’t have the flexibility to modify or resize your shapes unless you create them in a vector application like Illustrator. For this example, we’ll use Illustrator 8 to create our objects, but you could easily use FreeHand, CorelDRAW or any other version of Illustrator. To begin, open a new document and select the Rectangle tool. Click on the document, and in the resulting Rectangle dialog box, set the height and width of the rectangle to be the same size as your image in Photoshop, in this case, three inches by two inches. This will help you draw your objects at the correct size so you can just paste them into the Photoshop document.
For creating shapes easily, you’ll find the Pathfinder palette to be your best assistant. To create the elephant, we just combined the few squares and circles shown in Figure C and then used the Unite button and the Minus Front button to join the shapes together. It only took a few minutes to assemble the basic components of the elephant and flower. No real drawing skill was required either. Making more complex shapes such as the snowflakes on the cover uses the same process but takes a bit longer.
Note:
- If you don’t want straight lines on your shapes, try out some of Illustrator’s Distort filters. Punk & Bloat works well, as does the Roughen filter.

Figure C
You can easily assemble graphics from simple shapes in Illustrator.
Paste into Photoshop
Once you’ve finished the different elements required for your image, open up Photoshop again. Now, all you have to do is select each graphic individually and then copy and paste it into the texture image in Photoshop. Each object automatically appears on its own layer. Once you’ve done that, you can save your document and close out of Illustrator.
Note:
- If you’re working with Illustrator 8 or 9, you can distribute your objects onto separate layers within Illustrator and then export the file as a layered Photoshop file as well. Be sure the Write Layers option is selected in the Export options dialog box.
Now that your graphics are in separate layers in Photoshop, you can use them to generate selections. First, name the layers to indicate their contents and then turn off their visibility to keep them out of your way. Next, select the Background because that’s the layer you want to copy texture information from. And, then c-click ([Ctrl]-click in Windows) on the elephant body layer to select that layer’s contents without activating the layer. The selection outline of the elephant body appears as shown in Figure D. It doesn’t matter that the layer it’s from isn’t currently visible. Now, press cC ([Ctrl]C in Windows) to copy the Background and then cV ([Ctrl]V in Windows) to paste the selection onto its own layer. You won’t see any change on the screen, since your pasted object matches the Background perfectly. To see your object, apply a layer effect to it, such as Drop Shadow. To do so, choose Layer > Effects > Drop Shadow. In the resulting dialog box, click the Apply button and then adjust the settings until you get the desired effect. Click OK when you’ve finished.
Repeat this process with the other elements of your image. If you copy your initial layer effect by choosing Layer > Effects > Copy Effect, you can then paste it to all your other layers by choosing Paste Effect from the same submenu. Once you’ve finished making all the necessary pieces, you can just throw away the Illustrator layers.

Figure D
Once you paste your shape, you won’t be able to see it until you change its color or apply a layer effect to it.
Changing Colors
If you want to work with multiple colors, you don’t necessarily need to scan a lot of different colors of paper since you can change colors in Photoshop quite easily. We made all of our elephant shapes from the same piece of cardboard. To change the color of the elephant’s ear and the flower, we used the Hue/Saturation command. To do this, select the layer that you want to alter and then choose Image > Adjust > Hue/Saturation. In the resulting dialog box, select the Preview check box and then adjust the Hue slider until you get the tint that you want. You can then use the Saturation and Lightness sliders to adjust the effect. Click OK once you’re satisfied with the new color.
This method does have some limitations. If your color is too different than the original, you may notice a loss of detail in the graphic. If this is the case, use the blending modes on the Layers palette to change the object’s color. To do so, create a new layer and fill it with the desired color. Move the color layer above the graphic you want to alter and then group the color layer to the original by [option]-clicking ([Alt]-clicking in Windows) on the line between the two layers. Next, set the color layer’s blending mode to Hue or Color.That’s all there is to it.
Using Texture Fill
Another way that you can apply scanned textures to your graphics is with the Texture Fill filter. This allows you to apply any grayscale Photoshop file to your image as a texture. To use it, you either need a scan of a texture that’s the same size as the image you’re working on, or you need to create an image tile so that the texture can be distributed seamlessly across the image. The first method is pretty straightforward, so we’ll show you how to create a texture to be tiled to fit any size image.
Tiling Images
To begin, make sure your image has enough resolution to make the texture the size you would want it to be. For example, if your texture image is only at 72 ppi and you want to apply it to a 300-ppi image, the resulting texture is going to be very small.
Once your image is scanned into Photoshop, convert it to grayscale by choosing Image > Mode > Grayscale. At this point, if you want to make any contrast adjustments to the texture, choose Image > Adjust > Brightness/Contrast. Now, select the Rectangular Marquee tool, and hold down the [shift] key to make a perfect square selection the size that you want your texture to be. Once you’ve done that, choose Image > Crop. Now, save the image as a Photoshop file. Our final texture is a 1-inch square at 200 ppi.
Offset Your Image
While the basic texture is ready, it isn’t inherently going to tile properly on its own. If you used the texture as is, you would see lines defining each tile edge, since the edges won’t match perfectly together.
So our next task, which is quite easy, is to make the edges correspond for tiling. To make the edges match, you need to use the Offset filter. To do so, choose Filter > Other > Offset. In the resulting dialog box shown in Figure E, set an offset value of 5 pixels for Horizontal and Vertical. In the Undefined Areas section, select the Wrap Around option. Your image slightly shifts down and to the right. Click OK. By applying the Offset filter, you’ve just made sure that the edges of your image will match up properly when they come in contact with other tiles.

Figure E
Offset your image so it will tile seamlessly.
Applying the Texture
When you’re ready to apply the texture to your graphics, choose Filter > Render > Texture Fill. In the resulting dialog box, select the texture you want to use and then click Apply. The texture completely covers up the image, but don’t worry. Now choose Filter > Fade Texture Fill. In the resulting dialog box, set a blending mode for the applied texture. In our case, we used Multiply. Then adjust the Opacity slider to fine-tune the effect. We set our opacity to 90%. In Figure F, you can see the result of applying the paper texture to Figure B. This method is flexible and works well for flattened images of any size.

Figure F
A tiled texture can work almost as well as the cutting method.
Cutting Up
As you can see, both of these methods make working with scanned textures easy. In no time at all, you can transform crisp computer graphics into something far more natural and unique. So if you have a scanner, there’s nothing to stop you from making all sorts of crazy images.

Copyright © 2000, Element K Content LLC. All rights reserved. Reproduction in whole or in part in any form or medium without express written permission of Element K Content LLC is prohibited. Element K is a service mark of Element K LLC.
This article was last modified on January 3, 2023
This article was first published on January 16, 2001
Commenting is easier and faster when you're logged in!

Recommended for you

Scanning Around With Gene: Part 2 of That '70s Type!
Part 1 of That ’70s Type! Setting type is like re-decorating your home: yo...

Inside the Publishing Revolution: How the LaserWriter and Photoshop Changed the World
Excerpted from “Inside the Publishing Revolution: The Adobe Story” (...
Photoshop Power Shortcuts on Adobe TV
After the conclusion of the Adobe MAX conference in May, I posted a news item ab...