


This article appears in Issue 95 of InDesign Magazine.

In a large production environment, such as a book publishing house or a magazine publisher, it’s important that content creators follow clear rules for document creation and management. Of course, working with templates can ensure that documents get off to a healthy start, but—let’s face it—a lot can happen between the first mouse click and the last. A content creator may stray from the beaten path to place low-res images, forget to stretch a tint block to bleed, or name the saved file something that doesn’t meet the production team’s naming conventions. We’ve all seen (or, gasp! saved) things named New_absolute_final_final_I_swear.indd.
Circular Software’s offerings—CircularFLO, MasterPlan, and GreenLight—are tailored to publishers, and all intended to aid efficient production. In this article, I’ll take you on a tour of GreenLight, which is suited for use in publication groups that need to standardize document creation and avoid costly mistakes. While it could be useful for an individual, or in small groups, in my opinion it’s really more appropriate for mid-size to large groups.
Introducing GreenLight
GreenLight is not a plug-in; it’s a separate desktop utility that communicates with InDesign CS6 or later, in order to examine documents and report on their status. It is a Mac-only application, requiring OS X 10.6 or newer. Sorry, PC users: there is no Windows version planned.
If you want to play along, download the seven-day trial. After that first week, of course, you’ll need to subscribe. You can subscribe on a month-to-month or yearly basis (you can get 12 months for the price of 10).
When you subscribe, you’ll initially choose a client name for identification, and will be assigned a unique client number. Each client company (that’s you) has a designated Admin User with the ability to create and modify an unlimited number of GreenLight checklists. Only users who are assigned as part of a client will have access to the client-wide checklists and output settings. In other words, other users can’t get access to your checklists.
A checklist is a collection of defined document checks—the Admin User combines the individual checks into checklists. If you need a new kind of check that’s not available, Circular Software may be able to create additional custom checks for you (depending on your license type).
The Admin User can add up to 12 users under the license. For more than 12 concurrent users, GreenLight offers a web-based admin system.
What GreenLight Does
A GreenLight “Check” is a set of parameters against which a document is compared. Checks might include document dimensions, whether bleed is met and contents fall within the approved live area, and the resolution of placed images. Of course, InDesign’s built-in Preflight function can do much of that already.
But GreenLight goes well beyond that. It can check to see if the document is named according to an in-house standard convention, that graphics are linked to a predefined location, and that images have the correct color profile. It can be set to squawk if, for example, the designer places an unwanted file type, such as GIF.
GreenLight starts with a wide array of general checks, but what sets it apart is the ability to customize, via Client Checks, to police a particular production environment, and even be tailored further to certain parts of a production cycle. For example, in a book production environment, GreenLight could be set up to recognize that documents named “Textbook_p21.indd” should have .125 inch bleed and not use spot colors, whereas a document named “Textbook_COV.indd” should use PANTONE 874 and have .1875 inch bleed.
How would your local client app know these things? When you sign up for GreenLight’s service, a set (or sets) of checks will be generated for you, based on your production needs. When you launch GreenLight, you’ll see the small GreenLight floating panel (Figure 1).

Figure 1: The GreenLight panel
Immediately, your client app connects to the GreenLight server, checking to see if there are any changes to the options available in your current checklist. To start the document check, you must first save the InDesign document. Then click on the GreenLight floating panel. When the check is complete, GreenLight adds a new layer in your InDesign document, and builds a table on the new layer, over on the Pasteboard; this is how GreenLight displays the results of the document check (Figure 2).
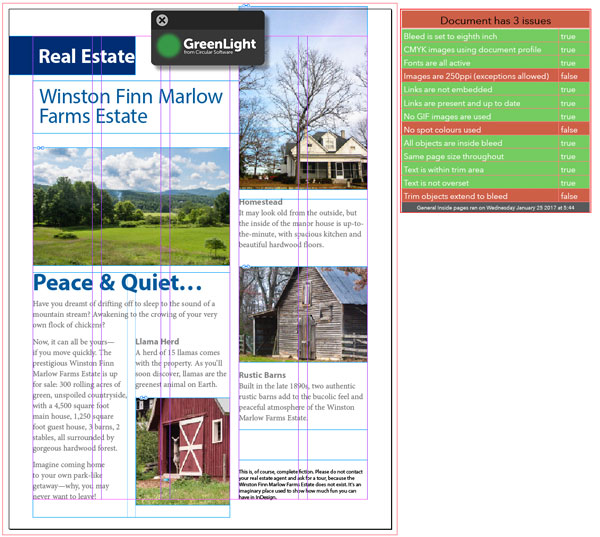
Figure 2: The GreenLight app creates a new layer in the document and creates the report table in that layer.The GreenLight report table is color-coded: a green row means the document is in compliance with that requirement. An orange row indicates a problem. “False” in the right column means that the document does not meet that stipulation.
As you run more GreenLight checks, the table dynamically updates with the current results.
If you want to know more about GreenLight’s findings, choose the Type tool and select a row in the report table, and then click the GreenLight app panel. A floating alert appears, describing the issue and giving you options. For example, if the error involves image resolution, you’re given the option to mark an image as being OK (an exception), confirming that the low resolution is not OK, or telling GreenLight to stop checking (Figure 3).

Figure 3: If you designate some objects as exceptions to the GreenLight check, you’ll see a record of this in the last row of the report table. Here, I’ve earmarked three images as “OK,” even though their resolution falls below the threshold. GreenLight won’t object to them in future checks, but includes mention of them in the gray bottom row.
Note: If you check for more information on a row that’s reporting on spot color content, you’ll notice that GreenLight itself generates two new spot colors—GreenLight and RedLight (Figure 4).

Figure 4: GreenLight adds two spot colors (GreenLight and RedLight). Don’t worry; this won’t affect output, because they’re used only by the report table on the pasteboard.
Just ignore those extraneous colors—they’re used only by the GreenLight table out in the pasteboard, and won’t have any impact on the output of the document.
Each report dialog provides an option to view more information. Click that button, and you’re taken to the Circular Software website, where you’ll see buttons listed for issues that have been flagged, labeled with the name of the problem in abbreviated form (Figure 5).

Figure 5: If GreenLight flags a problem, and you’d like more information, click on that row in the report label. GreenLight runs the check again, then displays an explanatory alert. Click the “More Info” button to see a definition of the problem.
Click on a button, and you’ll see a brief definition of the problem.
Exporting GreenLight-Stamped PDFs
As you know, it’s one thing to create a good InDesign document, and yet another to ensure that a PDF version of it exports correctly. Fortunately, GreenLight can help with that, too. In addition to providing preflight capabilities, GreenLight can control PDF creation according to preset parameters set up by the Admin User. Once a file is “all green,” a GreenLight user can quickly export to PDF through GreenLight using settings including job options and destination folder. The PDF will display a GreenLight logo outside the bleed edge of the page, confirming that the PDF was created from a file that passed muster.
Comparing GreenLight to the Alternatives
GreenLight isn’t the only game in town, of course. InDesign’s own built-in Preflight function comes at no additional cost, and of course it works on Windows, too. Naturally, it can only check InDesign documents, but it is somewhat customizable, offering checks for image resolution issues, overset text, font types, and compliance with bleed settings. Like GreenLight, it can police document dimensions and spot-color usage, but, unlike GreenLight, it can’t report image file types or react to document filenames being out of compliance with an organization’s rules. Markzware’s FlightCheck (Mac only) has long been an industry standard, and checks a wide variety of file types—including InDesign (v. 1.9–CC 2017), Acrobat, Illustrator, QuarkXPress—even ancient PageMaker. GreenLight works only with InDesign. However, FlightCheck lacks some of GreenLight’s proactive production controls, such as checks that respond to document file-naming conventions.
It’s not entirely fair to compare pricing between products with different feature sets, but note that FlightCheck’s subscription cost is $199/year (Perpetual: $399) and you can see GreenLight’s current pricing in Table 1.

Table 1: GreenLight Pricing (mind you, the £/$ exchange rate varies by the minute).
Is GreenLight a Go?
If you’re an individual, or part of a group that produces a wide array of documents, GreenLight is probably not an appropriate solution for you; InDesign’s built-in Preflight or Markzware’s FlightCheck should serve you well.
But organizations that must adhere to strict, templated production rules could definitely benefit from GreenLight’s ability to police document creation and content, ensuring that designers don’t stray from important in-house rules as they’re constructing textbooks, magazines, or other highly-standardized documents.
Claudia McCue is the author of Real World Print Production with Adobe Creative Suite Applications, and the presenter for a number of print-related Lynda.com courses. When not chained to the computer, she can be found riding her motorcycle on country roads; she swears it’s the cure for writer’s block.
Summary
GreenLight
£25–£2500 per month
Mac only, InDesign CS6–CC 2015
Rating: 4 out of 5 stars
Commenting is easier and faster when you're logged in!

Recommended for you

Bonus Features of Styles
Styles can do a whole lot more than just provide consistent formatting.
InReview: in5
Keith Gilbert reviews in5, a powerful plug-in for exporting digital documents fr...

How to Tell Which Files Use Type 1 PostScript Fonts
These techniques can help you detect which documents may cause problems when Ado...