This article appears in
Issue 89 of InDesign Magazine.
Q: I’m exporting my document to PDF and with each attempt I have one image that won’t export. How can I troubleshoot this and find out what’s wrong?A: The good news is that you’re probably not doing anything horribly wrong. The bad news is that you do indeed have some troubleshooting to do. More good news, though. It’s not complicated. You just have to know where to look. The best place to start is by enabling Overprint Preview. This is done using the View > Overprint Preview command. Enabling this should be your first troubleshooting step, because it requires no effort at all. Overprint Preview shows you how your document will print, including how transparency will be rendered and how inks will interact with each other. It also shows you if something isn’t going to print at all (Figure 1).
Figure 1: Turning on Overprint Preview can reveal the source of many output-related problems. In this case, it makes a photo disappear from the layout—a clue that the photo is set to be nonprinting.
If after enabling overprint preview you don’t see the image, it usually means that the image itself is set to not print. There are a couple of places to check for culprits here. The first place is the Attributes panel. Select the image, and open the Attributes panel (Window > Output > Attributes). From here you can see if the image is set to non-printing. If it is, simply uncheck that selection, and you should be good to go (Figure 2).
Figure 2: The Attributes panel shows that
this photo will not appear in print output.
There are some other possibilities, but they’re going to be a bit more obscure. Let’s take a look at those. If the image is on its own layer (or if the issue is that everything on a layer is disappearing on export), then open the Layers panel and look at the layer name. If it’s in italic, that indicates it’s set to non-printing. To fix this, right-click the layer, choose Layer Options For “<layer name>” from the contextual menu, and select Print Layer (Figure 3).
Figure 3: When a layer name appears in italics, that layer will not print. You can change this in the Layer Options dialog box.
Still stuck? The image is showing up in the overprint preview but still not exporting? Let’s look at that obscure possibility I hinted at earlier. I’ve seen it happen exactly once, but it’s still worth mentioning. The object may have been converted to a button. When exporting to PDF or printing, if the appearance of interactive items is not included, the object will not appear. Since a button is an interactive object, it must be included when exporting to PDF. In the General pane of the Export Adobe PDF dialog box, change Do Not Include to Include Appearance (Figure 4).
Figure 4: If an image has been converted to a button, it won’t print if you select Interactive Elements: Do Not Include in the PDF Export dialog box.
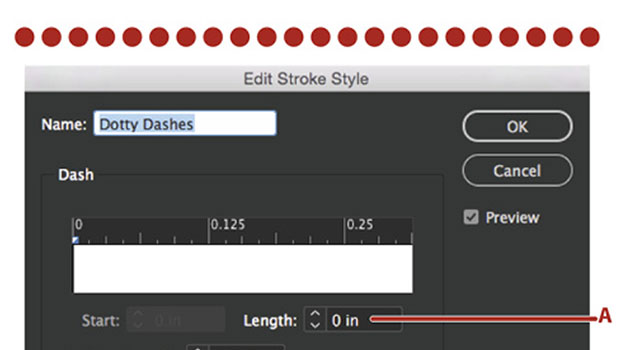
I know what you’re thinking—it’s nearly impossible to convert an object to a button accidentally—but still, I’ve seen it. With so many documents being created for more than one purpose, including interactive output, this may actually become more of an issue going forward. So, be careful when copying/pasting from interactive documents or from a library of assets. Finally, while not correctable directly from InDesign, there’s one last possibility that comes to mind. Is the troublesome object a placed AI or PDF file? Is it white? I’ve seen several instances of black artwork set to overprint being revised to white in Illustrator. If that artwork was set to overprint, that attribute remains part of the file. When you try to overprint white, it effectively disappears. If this is the case, you’ll need to open that file in Illustrator, remove the overprint attribute there, and resave. Q: I just updated a paragraph style in my document with a different font and now all the numbers in those paragraphs appear to be superscript. The Superscript formatting feature is definitely not enabled! Any ideas?A: You didn’t mention this, but I’m assuming you replaced a PostScript or TrueType font with an OpenType one. One of the beautiful features of OpenType is that a font can contain thousands of glyphs, and many of them are alternative choices within a single glyph. Additionally, and more importantly to the question at hand, many can create fractions on the fly as you type. With the paragraph that’s giving you trouble selected, open the Paragraph Styles panel; the applied style should be highlighted. Right-click the style, and choose Edit “<style name>.” Select the OpenType Features pane. I’ll bet (I could win a few dinners this way, I think) Fractions is selected (Figure 5).
Figure 5: Applying OpenType fractions as part of a paragraph style can lead to unexpected formatting of numbers within the paragraph.
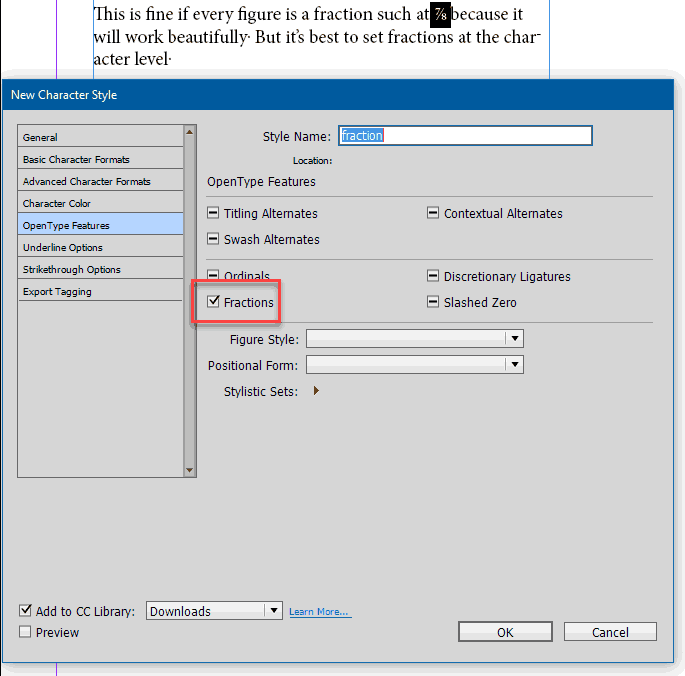
If that’s the case, then InDesign thinks all those numbers you’ve typed are numerators (the top part of the fraction). Type a slash, and the denominator is formed. The reason you never noticed this before is probably because your previously assigned font didn’t have this capability. While I think the OpenType Fractions option is a great feature, I’ve never seen a reason to enable it at the paragraph level. It should be used only at the character level. If you do use a lot of fractions, creating a character style is the way to go (Figure 6). Then you can apply that character style inside a paragraph style using a GREP style if you want! You can learn more about how to do that here.
Figure 6: Applying OpenType fractions as part of a character style gives you much more control over the formatting of numbers, without sacrificing any efficiency.
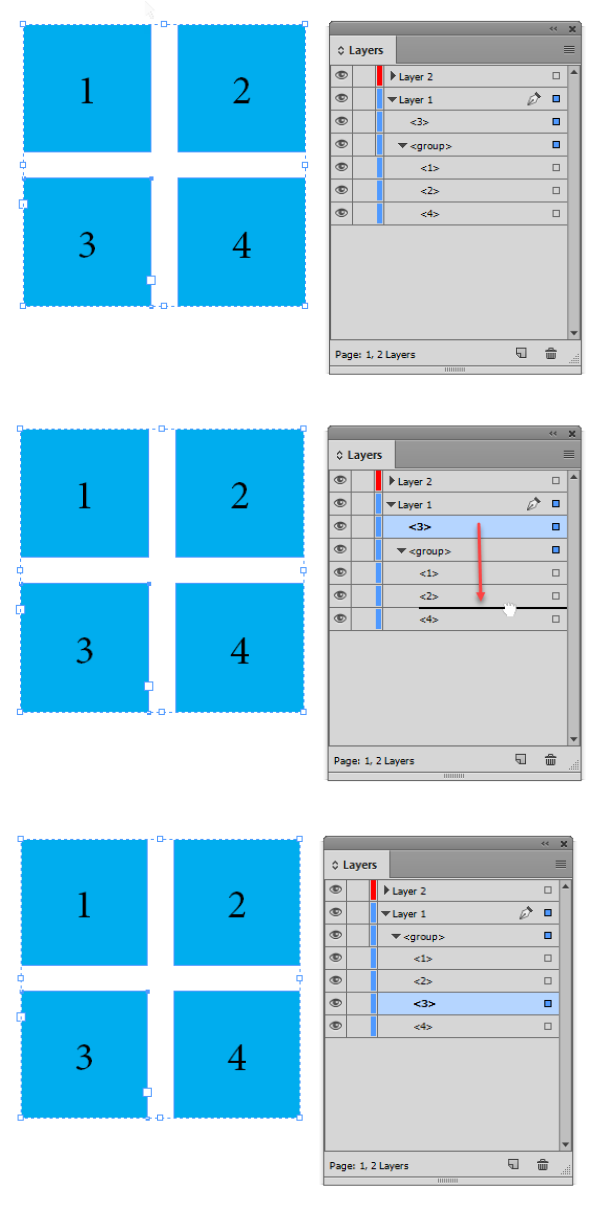
Q: I’ve grouped several objects, and now I find that I’ve left one out. Is there an easy way to add it to the group without ungrouping and starting again?A: Indeed there is. But you won’t find it by looking at the layout. The secret can be found in, of all places, the Layers panel. If it’s not already, open the Layers panel, find which layer the group is currently on, and click the triangle next to the layer name to reveal a list of all the objects on that layer. Next, locate the group (inside that list) you want to add an object to. Hint: Selecting the group on the page will also highlight its proxy in the Layers panel. Now you can click the triangle next to the group name inside the Layers panel to expand it and show a list of all the objects inside that group (Figure 7).
Figure 7: Click the disclosure triangle next to a group in the Layers panel to reveal the group’s contents.
Next, you need to locate the object you want to add to the group. Once again, the easiest way to do that is to select it on the page and then look inside the Layers panel to see where the corresponding “proxy box” appears. Once you’ve done that, click and hold on the new object—the actual tile inside the Layers panel, not the proxy square—and drag it into the group. You may have to drag slightly to the right as you do, and you’ll see the dark indicator line move as well (Figure 8).
Figure 8: You can drag and drop an item into a group in the Layers panel.
Q: I would like to have a colored background for my pages. I have edited the paper swatch and given it the color I would like. This looks exactly as I want it to in InDesign, but when I export my document to PDF or EPUB, the background remains white. What do I have to do to get my background to show the right color?A: You have fallen into a trap that has befallen many before you. But fear not; you aren’t really doing anything wrong as much as you’re misunderstanding what this very special swatch does. By default, the paper swatch is white because, well, most paper that is printed on is white. But for the occasions when you might want to print on a colored paper, changing the swatch definition will give you an onscreen preview of how your document will look when printed. That’s right, it’s a preview color only, and does not, as you’ve discovered, get passed on to any output at all (Figure 9).
Figure 9: You might think that changing the definition of the [Paper] swatch would affect the appearance of your output from InDesign. But you would be wrong.
If you want that color to print or display, you’ll need to do just a little bit of work. Here’s how to go about it. Go to the master page or spread that you’re working with. Create a new layer; make sure it’s the lowest level in the stack. Create a frame the size of the page (don’t forget to add the bleed if needed), and fill it with the color you want to use (Figure 10).
Figure 10: The right way to add a background page color to your output: use a filled rectangle on a master page that sits beneath everything else in the layout.
Now, before you head back to your document pages, lock the layer to make sure nothing else winds up there. That color will now print out or export to PDF or Fixed Layout EPUB, just as it appears on screen. Unfortunately, it won’t work for reflowable EPUB. For that format, you’d have to change the CSS file, and even that may not reliably work on all devices.
Sandee Cohen shows how to collect and display your best work in an interactive p...
×By signing in, you agree to our Terms of Use and acknowledge our Privacy Notice.
Manage your privacy
This site uses cookies, but not the kind you eat. We use cookies to remember log in details, provide secure log in, improve site functionality, and deliver personalized content. By continuing to browse the site, you accept cookies.
Functional
Always active
The technical storage or access is strictly necessary for the legitimate purpose of enabling the use of a specific service explicitly requested by the subscriber or user, or for the sole purpose of carrying out the transmission of a communication over an electronic communications network.
Preferences
The technical storage or access is necessary for the legitimate purpose of storing preferences that are not requested by the subscriber or user.
Statistics
The technical storage or access that is used exclusively for statistical purposes.The technical storage or access that is used exclusively for anonymous statistical purposes. Without a subpoena, voluntary compliance on the part of your Internet Service Provider, or additional records from a third party, information stored or retrieved for this purpose alone cannot usually be used to identify you.
Marketing
The technical storage or access is required to create user profiles to send advertising, or to track the user on a website or across several websites for similar marketing purposes.
We use technologies like cookies to store and/or access device information. We do this to improve browsing experience and to show (non-) personalized ads. Consenting to these technologies will allow us to process data such as browsing behavior or unique IDs on this site. Not consenting or withdrawing consent, may adversely affect certain features and functions.
Functional
Always active
The technical storage or access is strictly necessary for the legitimate purpose of enabling the use of a specific service explicitly requested by the subscriber or user, or for the sole purpose of carrying out the transmission of a communication over an electronic communications network.
Preferences
The technical storage or access is necessary for the legitimate purpose of storing preferences that are not requested by the subscriber or user.
Statistics
The technical storage or access that is used exclusively for statistical purposes.The technical storage or access that is used exclusively for anonymous statistical purposes. Without a subpoena, voluntary compliance on the part of your Internet Service Provider, or additional records from a third party, information stored or retrieved for this purpose alone cannot usually be used to identify you.
Marketing
The technical storage or access is required to create user profiles to send advertising, or to track the user on a website or across several websites for similar marketing purposes.


![Figure 9: You might think that changing the definition of the [Paper] swatch would affect the appearance of your output from InDesign. But you would be wrong.](https://creativepro.com/wp-content/uploads/2016/09/inquestion-september-2016-fig-9.png)