
InQuestion: Numbering Headings and Synchronizing Text Frames
Erica Gamet recounts the best Q&A from the InDesignSecrets Facebook group.


This article appears in Issue 137 of InDesign Magazine.
Our online communities on Facebook and LinkedIn bring together people who are passionate about using InDesign. When someone has an issue with the program, the community is ready to jump in and offer solutions.
In this Q&A column, we’ll look at a few ways to solve problems our community members have brought up. Note that the questions and discussions may have been edited for brevity and clarity.
Lists That Don’t Look Like Lists
Gilad Peled asked:
Q: I’m designing a simple song book. How can I use the master so the songs will be automatically numbered? (Figure 1)

Figure 1. The original concept for numbering in a song book
A: Although Gilad was originally thinking master pages were the way to go, the actual solution—while still automated—involves automatic numbering via paragraph styles.
If you’ve got a file like this, you may have a part of the process already complete. You most likely have assigned a paragraph style to the song name or whatever content you have in your example. For clarity, I’m going to stick with the songbook example for this one. If you have a paragraph style applied to the title, you can right-click the style name in the Paragraph Styles panel, choose Edit, and head to the Bullets and Numbering section of the Paragraph Style Options dialog box (Figure 2).
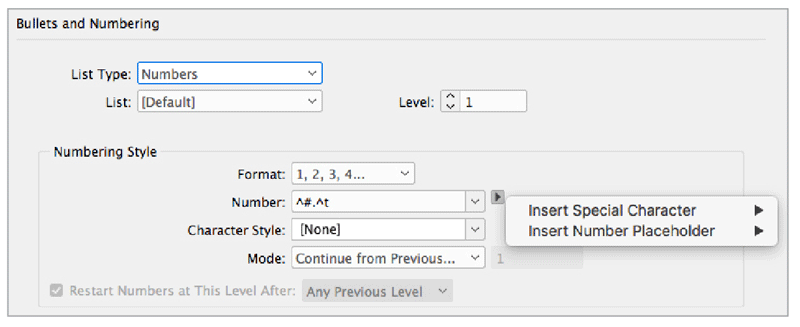
Figure 2. Bullets and Numbering settings in the Paragraph Style Options dialog box
Choose Numbers from the List Type, and from the Format menu, choose a numbering style such as numerals, uppercase, or lowercase letters. In the Number field,
include the current level number, followed by a period and a tab. You can click the tiny arrow to the right to insert the code for the number and tab. You could just as easily choose the automatic number and then type space, dash, space for a different look. Click OK.
This will all work great if there are no other numbered list items in your story or if all of the songs are in one story. If you do have other lists, you’ll probably need to set up list levels and indicate how those levels interact with each other… and that’s a whole article in itself. We’re going to keep it pretty simple in this document. But what if you did want to have the songs in separate, non-linked frames?
This is where creating a custom list comes in. You can go back into your Song Title style, and in the Bullets and Numbering options, choose New List from the List menu. Give your new list a name and be sure to choose Continue List Across Stories (Figure 3). Optionally, you can choose to have the numbering continue across documents in an InDesign book. Now if the songs are in separate text frames, they will still be numbered in order. (If the numbering is wrong, see how to fix it in the next solution.)

Figure 3. Make sure numbering will continue across separate stories.
Use a custom list in captions
You can apply this same procedure to things like figure captions, as well. These are almost always set in separate, unthreaded text frames. To get started, create a new caption paragraph style (or edit an existing one). For the numbering style, choose A, B, C, D for the format, then create a new list style called Figures.
In the Number set up, type the word Figure and a space, use the menu to choose Insert Number Placeholder > Current Level, and then add a colon and a space (Figure 4). You can create a new character style on the fly or pick an existing one to apply to the text and the generated number (or letter) itself by. As you create new caption frames with the caption style applied, InDesign inserts the letters automatically.
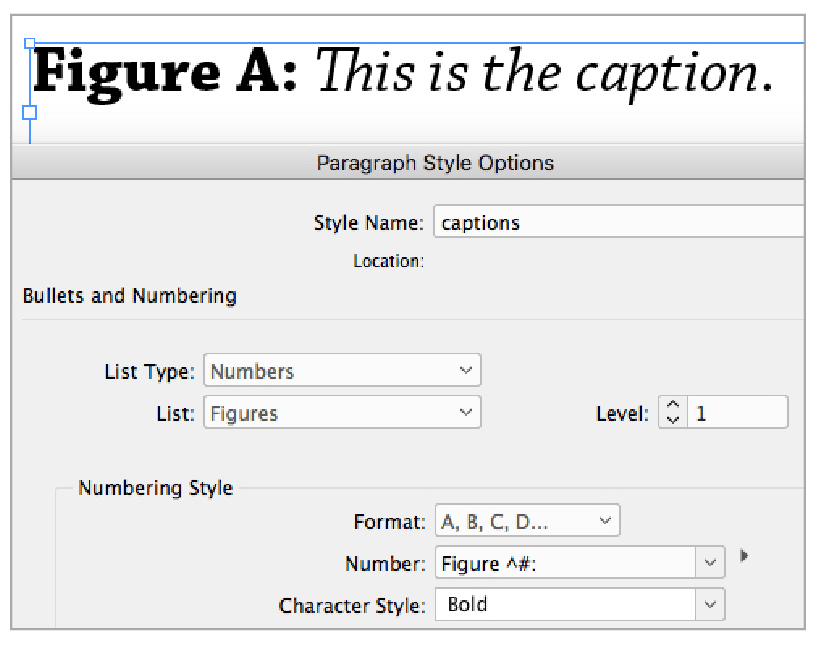
Figure 4. Options for creating captions with automatic figure numbers
Note: Because the frames are not connected, the order in which you create the frames determines the sequence. If you randomly create them or move the caption frames around, they might not be in the order you want. You can fix the order, with a simple trick. Once you’ve got the frames where you want them to be on the page, you can cut each frame in order from first to last, and then use Edit > Paste in Place. The numbering will be wrong as you’re working, but it will be perfect once you’ve done this to every caption text frame.
Restart a numbering sequence
Consider one last example that often needs numbering: steps in a recipe. If you have a flowed story with multiple recipes and use a custom list to apply the numbering, you’ll notice that the numbers continue from one recipe to the next (Figure 5). To fix this, you could manually apply a separate paragraph style to just the first item in each recipe or apply a local override to restart the numbering. A better practice, however, is to automate the restarts with a subtle trick.
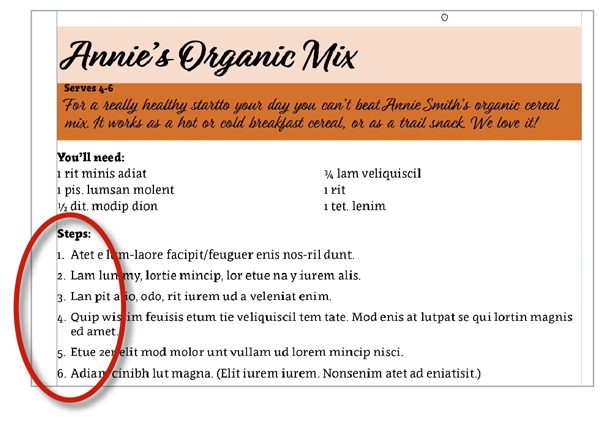
Figure 5. Recipe with numbers restarting for each entry
The trick depends on your having another repeating style, which you probably do and may have applied to the recipe name already. Let’s append that style by going into the setting for its bullets and numbering: Assign it a new custom list called Recipe and make sure it’s set to Level 1. Because you don’t want numbers in the recipe name, you need to make sure the Number field is completely empty. Under Mode, tell it to start at 1, and click OK.
Set up or edit the style for the recipe steps, and choose the same Recipes list and assign this as Level 2. Set the mode to Continue From Previous Number and check the box to Restart Numbers at This Level After Any Previous Level. Now each step starts its numbering at 1, and even if you add steps to the beginning, InDesign will update the numbering automatically. To see this method in action, check out Mike Rankin’s video on the InDesignSecrets YouTube channel.
Synchronizing Text Frames
Aimee Thron Grubbs asks:
Q: Is there a way to synchronize text frames? I am working on an ad that has a date line in several places and it would be nice and more efficient to just change it in one spot and have the rest of them update automatically.
A: Community members offered several solutions, including some that used cross-references and others involving data merge. I’ll cover a couple of ways here, but the solution that will work for you will depend on your meaning of “date line” (Expiration date? Date of publication? Something more elaborate?) and also how the date is situated in the document and the individual text frame.
Use a text variable
A text variable is one of the easiest solutions for adding a consistent text blurb. There are even a few variables dealing specifically with dates. Those dates, however, refer to when a file was created, modified, or output, which might not be what you’re looking for. The good news is that you can create a variable that contains whatever text you need. Let’s use one to apply a copyright blurb throughout a document.
First, define the variable by choosing Type > Text Variables > Define and clicking the New button. In the New Text Variable dialog box, give the variable a name and select Custom Text from the menu just below that. In the Text field, enter your custom text. Click the disclosure triangle to the right for any special characters, such as the copyright symbol (Figure 6). Click OK, and then Done to exit the dialog box. To place the newly minted copyright text, insert your type cursor, go back to the Type menu, choose Text Variables > Insert Variable, and select the copyright variable.
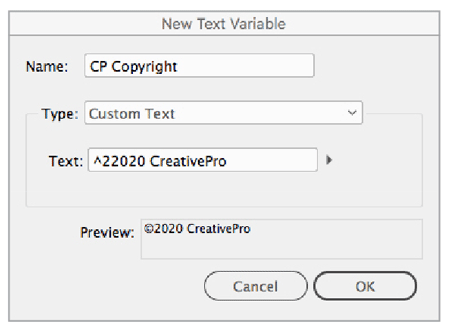
Figure 6. Setting up the text variable
But, wait—it can’t be that simple, can it? Yes, it can! But simple comes with a few caveats in this case. Namely, when you use a variable InDesign treats the text as a single character. If you reduce the width of the text frame to less than the width of the text, the text gets squished and the letters start to overlap (Figure 7). In addition, this text can’t wrap to the next line; instead, InDesign would just continue to mush the characters together to make the entire variable fit. Also, because the variable is treated as a single character, you can’t apply mixed formatting to the text.
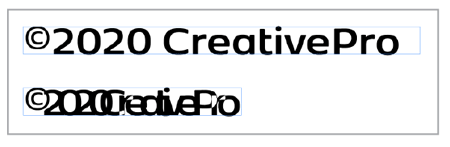
Figure 7. The same variable in different width frames
Link to a text document
While using a custom variable works great for a short-and-simple copyright notice, your common text may be more involved and require an out- of-the-box solution. Or rather, a solution from outside of InDesign. Most of us have placed a Word file—or other text file—in InDesign at some point. But by default, we aren’t actually placing the file as a link with a connection back to the original, like we might with a Photoshop file. However, as you’ll see in the next couple of methods, text can be treated as a link that stays connected to the source file.
To place a Word file in this way, head to Preferences in the InDesign (Mac) or Edit (Window) menu and in the File Handling area turn on Create Links When Placing Text and Spreadsheet Files (down in the Links settings). Now you’re ready to place the file as you normally would (File > Place). The only difference is, once you’ve placed the text, you’ll see the document listed in the Links panel (Figure 8).
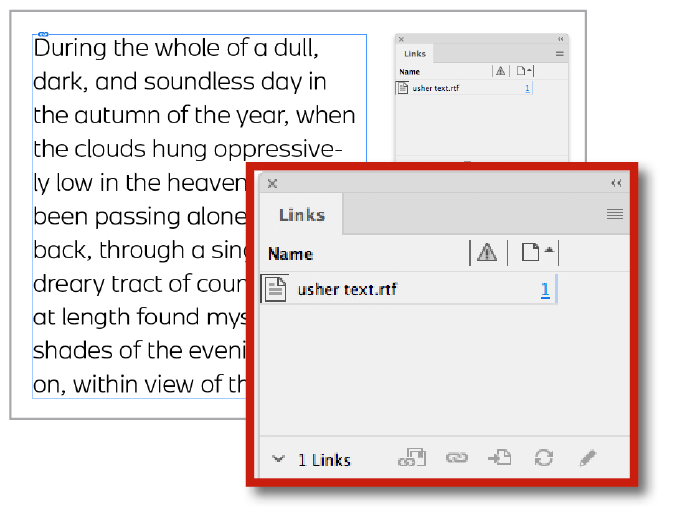
Figure 8. A linked text file on the page and in the Links panel
When it comes time to make any changes to the text, you’ll want to make those edits in the Word file. As with other linked items, right-click the item in InDesign, choose Edit Original or Edit With, and choose the appropriate application. When the original file opens, make your edits and save. The placed text automatically updates in InDesign. If you’ve applied manual styling in InDesign you’ll get a warning that you’ll lose that styling. If you’re using styles in InDesign, you’ll just have to re-apply them (or use a more robust solution like WordsFlow, as mentioned in this month’s feature article).
Use a Creative Cloud Library
If you work with a team—or need to use a certain piece of text frequently across all sorts of documents—using Creative Cloud Libraries can be the way to go.
Start by creating the parent text, then open the CC Library panel (Window > CC Libraries) and choose the desired library. You can either drag the frame directly into the library panel, or click the + at the bottom of the panel and choose Text (Figure 9).
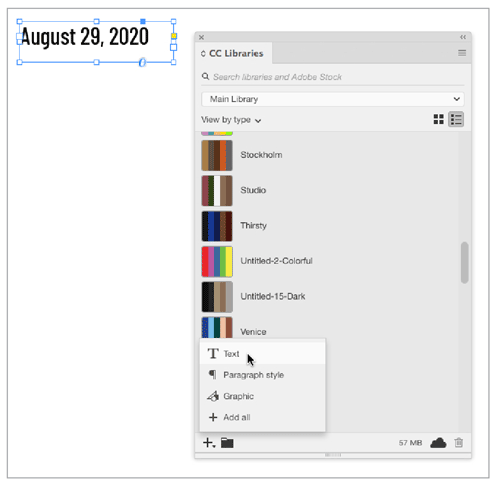
Figure 9. Save the frame to the library as text.
Navigate to the page where you want to place the linked text frame then select the item in the library and right-click it. Choose Place Linked (Figure 10) and place the text frame as you would any other text frame (Figure 11). You can also simply drag the frame onto the page or Option/Alt-drag to place it as an unlinked item.
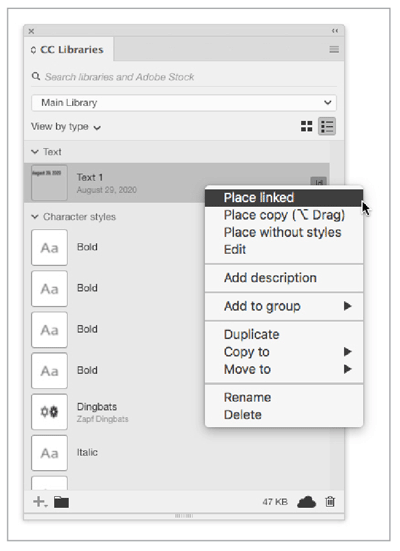
Figure 10. Place the text frame as a linked item.
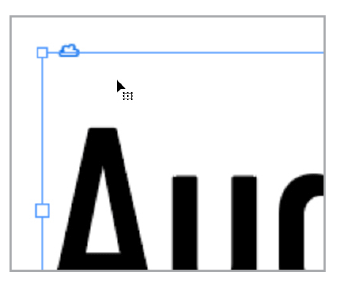
Figure 11. Badge showing the item is linked to a CC Library
Just be aware that if you make changes to the styling of the child text you’ll lose that styling when you update the link. On the other hand, if you assign a paragraph style to the child text, you’ll be able to quickly re-apply any lost styling. If you want to update the parent text itself, just double-click it in the library. This will open a temporary file that you can edit and save and all linked items are automatically updated.
Use the Content Collector tools
One suggestion from the Facebook group was to use the set of tools that were built for just this type of situation. A lot people aren’t even aware of them and they’re not the easiest to get the hang of, frankly. The Content Collector tools let you sample an item and place instances of it throughout your document. You can find them below the selection arrows in your toolbox; look for the tiny ball pits with an arrow pointing in (the Content Collector) or out (the Content Placer) of them (Figure 12). These tools are more powerful than Copy and Paste because they provide the ability to automatically update content.
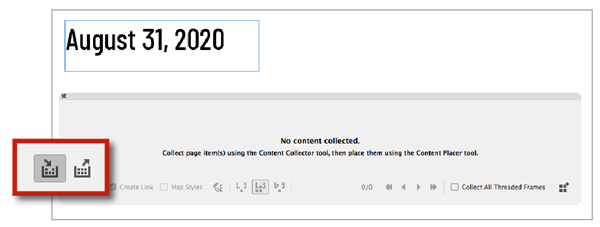
Figure 12. The Content Collector tools and the Content Conveyor
For our example, let’s put the date in its own frame and use these tools to place duplicates of this frame throughout the document. You can assign styles to the text, which will also allow you to have different formatting for each instance of the text. Select the Content Collector tool to open the Content Conveyor. Click the text frame with the date, and its thumbnail will appear in the Conveyor. Now switch to the Content Placer tool by clicking the icon in the Conveyor. Make sure that Create Link is turned on, so the frames will be associated with each other for updating. Turn on Map Styles, and then click the button to the right to map the current style to another style in the document if needed (Figure 13). This allows you to have different styles applied to each instance of the text. The best part is that editing the original text won’t cause you to lose styling in the linked text.
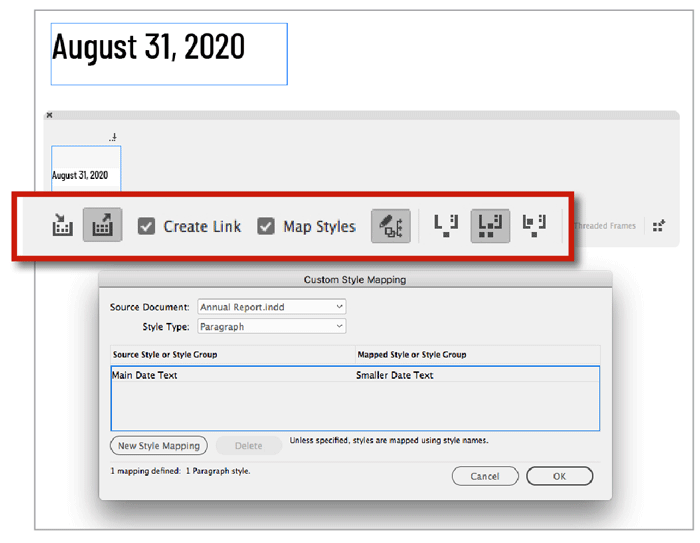
Figure 13. The options for using the Content Placer, including mapping styles
The next set of icons deals with how the items are placed and whether or not the item remains in the Conveyor. I tend to choose Place Multiple and Keep in Conveyor. Now you can click anywhere in your document to place another instance of the date text. Each time you click to place, you’re actually creating a link to the original, and each instance will appear in the Links panel as linked text. The linked frames will display a link icon in the upper left of the frame (Figure 14).

Figure 14. Outdated text links after editing the original date text
Now when the date information changes, you can simply make the edits in the original frame. (Hint: It won’t be listed in the Links panel or have the link icon in the layout.) The linked frames won’t automatically update, so you’ll have to force the change. You can either double-click the warning icon on each frame, or for maximum efficiency, use the Links panel. Select all the instances (or the folder if you have multiple links grouped by folder) and choose Update All Instances from the Links panel menu.
Consider the workflow
As you can see, there are often many ways to do a task. With anything it’s best to know what the workflow will be, how many edits you anticipate, and if it’s worth the time to set up automation. In our date example, if you need to change only a small handful of places, automation might actually be the longer route to take, but in other cases it could be just the ticket.
Commenting is easier and faster when you're logged in!

Recommended for you

Stealing Great Design
See how to embrace your influences and borrow from them to make something totall...

InReview: DocsFlow 3
This cloud-based editorial plug-in offers improved interoperability between Goog...

InDesign Magazine Issue 92: InDesign in the Middle East
We’re happy to announce that InDesign Magazine Issue 92 (December, 2016) is now...