InDesign’s Three Kinds of Frames: Text, Graphic, and Unassigned
There's a lot of confusion about InDesign's frames out there. Let's set it straight.

For years, InDesign experts (myself included) promoted the idea that InDesign just has “frames” — not text boxes or picture boxes, like QuarkXPress, but just frames that can be anything. The problem is that it isn’t true. Rather, it’s just a simplification, and if you really want to understand how InDesign works (and use it efficiently), you need to understand the truth.
InDesign has three kinds of frames: text frames, graphic frames, and unassigned frames.
- Graphic Frames: When you use one of the Frame tools (those are the ones with an “X” in the middle of them), InDesign creates a graphic frame. The X means exactly the same thing in both InDesign and XPress: A graphic goes here. When you use File > Place, select an image, and click (or drag) on an empty part of your page, InDesign creates a graphic frame and places the image in it.
- Text Frames: The only way to create an empty text frame is to drag with the Type tool. (You can also convert another kind of frame, which I’ll discuss in a moment.) You can also create a text frame by using File > Place and importing a text story.
- Unassigned Frames: This is the least understood of InDesign’s frames. All the path and shape drawing tools — including the Rectangle tool (that’s the rectangle with no “X” in it) and the Pen tool — draw unassigned frames. These are frames that, by default, are not meant to include text or graphics. They have no content. You might use these for drawing a shape on your page, a background color, or part of a logo, just as though you were drawing in Illustrator.
Converting Frame Content
The misunderstanding that led to the idea that InDesign just has “frames” is that InDesign is extremely good at converting from one kind of frame to another. For example, normally you can draw out a frame with the Rectangle tool and then click inside it with the Type tool, which converts it from Unassigned to a text frame. Then, while it’s still selected, you can use File > Place and choose an image, and the text story is thrown away and replaced with the picture –as InDesign has converted the frame on the fly to a graphic frame.
I inserted the word “normally” above because of a Preference. A lot of people hate the fact that a click of the Type tool can convert a graphic or unassigned frame to a text frame. So Adobe added an option in the Type pane of the Preferences dialog box: Type Tool Converts Frames to Text Frames. If you disable that preference for a document, the Type tool no longer converts frames.
There is nothing wrong with creating an unassigned frame with the Rectangle tool (for example) and then later converting it to a text frame with the Type tool. For many people, that is their standard operating procedure. But if you’re going to draw a text frame, why not just use the Type tool to draw a frame that is already a text frame?
The Object Style Problem
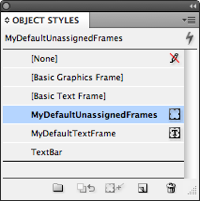
When you create a new frame, InDesign may assign it an object style. There are, after all, two default object styles in the Object Styles panel: Basic Graphics Frame and Basic Text Frame. But one of these is not what it seems.
When you make a new text frame with the Type tool, or by placing a text story and clicking or dragging with the Place cursor, InDesign always assigns the default text frame object style. That is probably the Basic Text Frame style. Makes sense, right?
However, if you place a graphic, or draw a graphic frame with the Rectangle Frame tool (or one of the other ones that gives you an “X” in the frame) you would expect to get the Basic Graphics Frame object style, right? But you do not. It is misnamed. The Basic Graphic Frame object style is applied to new unassigned frames, not graphic frames! Yes, this is insane. But you need to know that this is the way it works. New graphic frames, on the other hand, do not get assigned an object style. (None is selected in the panel.)
There is, however, a hack that lets you apply an object style to a placed graphic. I’m really, really hoping that in a future version of InDesign, we will have three default object styles: text, graphic, and unassigned — which would get applied automatically when you create a new frame of each of these types.
Setting a New Default Object Style
I should say one last thing about the default object styles: I rarely use the defaults. (I don’t like using anything called “Basic”.) Instead, I make my own object styles for unassigned and text frames. To make my new styles the defaults, I drag the little icons in the panel down to them:

How about you? How do you use object styles? InDesign frames? Do you like to convert them, or leave them alone?
This article was last modified on December 20, 2021
This article was first published on January 13, 2011
Commenting is easier and faster when you're logged in!
Recommended for you

Keeping Long Text Fields on One Line When Using Data Merge
Using InDesign’s Data Merge features can be tricky at times. Fortunately,...

Why Does the Last Line Not Fit on My InDesign Page?
When the last line in a text frame gets pushed to the next page, it can raise qu...

The Case of the Text on Top of the Frame Contest Answer and Winner
Solve this InDesign mystery for a chance at winning a great prize.


