If your email is not recognized and you believe it should be, please contact us.
Members Only
InDesign Tips of the Trade
A classic collection of tips and tricks for InDesign users
is_members_only_template: false is_members_only: true downloadable_content: access_level: no membership
This article appears in
Issue 7 of InDesign Magazine.
I love InDesign tips and tricks. Whenever I learn a new technique that makes my work easier, I get all warm and fuzzy inside, and I want to share the joy with everyone. That’s why I’m especially excited about presenting some of the coolest tips and tricks from some of the hottest InDesign trainers and authors in the world. I was pleased to learn new things reading through these tips, and I’m sure you will, too. To help you find tips more quickly, we’ve divided them into sections: type, graphics, tools, documents, colors, and at the end, a grab bag with a little something for everyone. —David Blatner
Working with Type
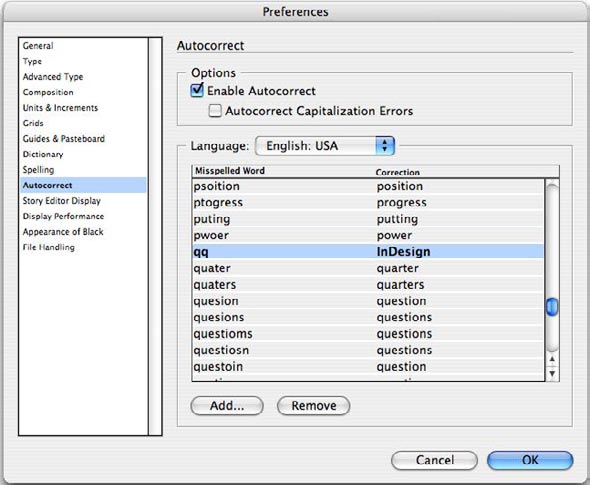
No More Rasterized Text: Drop shadows and other transparency can be very effective, but not when small text such as a caption rasterizes in the flattening process at print time. For worry-free designs, create at least two layers in your document: One at the top level for all of your text, and one at the bottom level for all of your images. Text that appears above a transparency effect in the stacking order will never rasterize.—Mordy GoldingWhat’s That Override? To see local overrides, hold the mouse over the plus sign of the name of a paragraph or character style name in the Paragraph Styles and Character Styles panels. —Jamie McKeeFast Word Replacement: Create your own shorthand dictionary for words you type all the time (or that tend to slow you down) by using InDesign’s Autocorrect feature. The secret is to create a string of text that would not otherwise occur; this is a placeholder for your desired text (Figure 1). For instance, if you routinely butcher the capitalization of the word “InDesign,” set up the text “qq” to stand in for “InDesign” by opening
the Autocorrect panel in Preferences, choosing Add, and entering the Misspelled Word (qq) and the Correction (InDesign). Now when you type the word “qq,” Autocorrect swaps the correct text for the placeholder. Autocorrect ignores the string of text if it occurs within a word.—Erica Gamet
Figure 1. Autocorrect is for more than text errors. Use it cleverly, and you’ll be spared a lot of tedious typing.
Speedy One-Word Spell Check: InDesign’s Dynamic Spelling feature—it flags misspelled words as you type—is useful and convenient for on-the-fly corrections, but it can be distracting, especially when you’re trying to concentrate on something other than spelling. For the best of both worlds, assign a keyboard shortcut to Dynamic Spelling with Edit > Keyboard Shortcuts. Keep the feature turned off (it’s off by default), but when you’re curious if a certain word is spelled correctly, use the keyboard shortcut to briefly toggle it on. If the word is misspelled, it’ll sprout a (non-printing) red underline. Right-click on the word to choose the correct spelling or add it to the dictionary from the contextual menu. If the word is spelled correctly, nothing changes—no underline appears. Press the shortcut again to toggle Dynamic Spelling off and continue with your work. —Anne-Marie ConcepciónLinking Multiple Text Frames: You can easily link three or more text frames using the Option/Alt key. To link existing text frames, click in the overflow box of the first frame, then Option/Alt-click in each subsequent text frame. To create and link text frames on-the-fly, create the first frame, click in its overflow box, then Option-click and drag to create each subsequent frame. —Erica GametThread Backwards: Just about everyone knows that you can click on the out-port of a text object to click on or draw another text frame that creates or continues a text thread. But you can also click on the in-port of a text frame—even if it’s the first frame in the thread— to start the thread in a different frame. This is especially useful when you place a story, then realize you want the headline in its own frame so you can give it a drop shadow. —Mordy GoldingEdit Text Frames: You can edit text frames just like graphics frames and transform them into almost any shape. Use the Selection or the Direct Selection tool to select the text box, and then use the Pen tool to add anchor points. You can manipulate these anchor points just as you would any vector path. —John FeldBreak Words: To manually break a word at the end of a line, use a discretionary hyphen. Put your cursor where you want to break the word, then choose Type > Insert Special Character > Hyphens and Dashes > Discretionary Hyphen or Command/Ctrl-Shift + Hyphen. If type should reflow so the word is no longer at a line ending, the discretionary hyphen disappears. To hyphenate a word that never breaks on that hyphen, use a non-breaking hyphen: Type > Insert Special Character > Hyphens and Dashes > Nonbreaking Hyphen. To prevent a word or string of text from breaking, select the text and choose No Break from the Character or Control panel menu. —Erica GametBetter Text Wrap: When you assign a text wrap to an imported graphic, be sure to first select the graphic with the Selection (black arrow) tool. This applies the text wrap to the frame, not the frame’s contents, which makes it easier to delete the graphic or replace it with a new graphic without deleting the text wrap. —Keith GilbertReveal Custom Kerning: One person’s idea of appropriate kerning can be a compacted visual disaster for another person. My limit for the loosest and tightest kern is 30 (thousandths of an em). That means if some copy is kerned into -20 I will never go over +10 elsewhere in the document. To see where kerning has taken place outside of paragraph and character styles, go to Preferences > Composition, select the Custom Tracking/ Kerning option, and click OK. In normal view mode (not in preview mode), InDesign now highlights in green text with custom tracking and kerning (Figure 2). —Matt Davis
Figure 2. InDesign visually marks custom tracking and kerning.
Use Tabs in Table Cells: When using InDesign’s table features, the tab key jumps from cell to cell within the table. But what if you need to enter a tab character within a cell? One way to do this is to choose Type > Insert Special Character > Other > Tab. But it’s faster to just press Option/Alt + Tab. —Keith GilbertCopy Text Formatting: Do you need to copy text formatting from one location to another? To do it quickly, select the Eyedropper tool, click on text you want to sample, and then use the Eyedropper to click or drag over text you want to modify. This technique even copies text attributes from one document to another. To set which qualities the Eyedropper tool will copy, double-click the Eyedropper tool and enable or disable the individual attributes (Figure 3). —Erica Gamet
Figure 3. You can copy several text-formatting attributes at once with the Eyedropper.
Select a Table’s Text or Cell: To select a cell within a table, click the cell with the Text tool and press the Esc key. This will select the cell. To place the text cursor in the cell, press the Esc key again.—John FeldCreate Custom Placeholder Text: You can change the default placeholder text (what you get when you choose Type > Fill with Placeholder Text) by creating a text file containing any text you want, naming the file placeholder.txt, and placing this file in the InDesign application folder. —Eliot HarperType-size Shortcuts: To change type size and leading incrementally, start by setting increment size (Preferences > Units & Increments). In your document, use Shift + Command/Ctrl + < to decrease the point size of selected type by one increment, and Shift + Command/Ctrl + > to increase the point size. Add the Option/Alt key to these combinations to multiply the increment by five. You can change leading via Option/Alt-Up and Option/Alt-Down arrow key combinations. Add the Ctrl/Command key to these combinations to multiply the increment by five. —Erica GametShadow One Word: Wouldn’t it be nice to have a shadow behind just one word in text? You can: Just copy the word into its own text frame, choose Object > Fitting > Fit Frame to Content (or press Command/Ctrl + Option/Alt + C), and apply a drop shadow to the frame. Copy the frame to the Clipboard, then highlight the word in the main text and paste. The text of the word will be replaced with the shadowed inline frame (Figure 4). —Claudia McCue
Figure 4. You can have a shadow behind just one word on a line.
Find Missing Fonts: Here’s one that Scott Citron taught me: If you search for a missing font using the Find Font dialog box and can’t locate the troublemaker on a page, cancel out of the Find Font box and bring up the Story Editor. Your cursor will be where the missing font is. —Jamie McKeeReset Your Kerning and Tracking: The easiest way to reset the kerning and tracking for a range of selected text is to press Command/Ctrl + Option (Mac) or Alt + Q (Windows). I run all my copy with Optical Kerning on by default, as it does most of the work before I begin to edit. —Matt DavisFind Font Errors: If you suspect that errors in printing may be related to font problems, turn everything into outlines and print again. If the problem goes away, you have a font issue to deal with. Start by uninstalling the font from your font manager if you have one; otherwise just delete and replace the font. Don’t leave any font as an outline, as it prevents editing and makes for a much larger file. —John FeldOne-click Underlines: To summon line-styling options for custom underlines and strikethroughs, hold down the Option/Alt key while selecting the Underline or Strikethrough icon in the Control panel. —Erica GametParagraph Styles = Diagnostic Tool: When you edit a file created by someone else, you may not know the full range of styling applied to text. To find out, place the cursor in the text and create a New Paragraph Style. The dialog box immediately displays every attribute applied to the object. —Tracey LawrenceSelect the Return: You can triple-click or press Ctrl + Shift + \ or Command + Shift + \ to select a line. Both of these combinations also select the Return. —John FeldFast Word Lists for Custom Dictionaries: In InDesign’s Edit > Spelling > Dictionary dialog box, click on Import to add word lists saved as TXT files to your User dictionary (or to any new, custom dictionary you’ve added via Preferences > Dictionary. It’s a great way to make sure your organization’s proper names and industry-specific terms are always spelled correctly, and it’s far faster than choosing “Add to Dictionary” one by one as InDesign flags them. Compiling such a word list text file isn’t too hard. You can use any file (such as a staff directory or product listing) that’s been exported or saved as Text Only, as long as every word or number is separated by the same delimiter: a Tab, a Paragraph Return, a comma, even just spaces. That’s easy enough to do in Word’s Find/Replace. InDesign removes all duplicated words in the file during the import process. Now when InDesign checks spelling, it uses both its own dictionary and the one you’ve created, and it doesn’t have a problem if some of the same words appear in both. —Anne-Marie Concepción
Working with Graphics
Better Fake Duotones: While colorized grayscale TIFF and PSD images are fine for monotone effects, fake duotones (with the image one color and its frame another) tend to look dull (Figure 5A). For more control over the outcome, try this:
Place the grayscale TIFF or PSD file.
Duplicate the frame in place (Edit > Paste In Place).
Select just the top frame and drag the swatch onto the image to colorize it (Figure 5B).
Set the topmost frame to Multiply.
Fiddle with opacity settings to modify your duotone (Figure 5C).
While you don’t have the fine control afforded by Photoshop, you can modify duotone effects on the fly within InDesign. —Claudia McCue
Figure 5A. This colorized grayscale image is dull.
Figure 5B. The duotone in process.
Figure 5C. This false duotone looks a little more tasty.
Maintain Vectors from Illustrator: Paths and shapes from Illustrator can be placed and edited directly in InDesign. Simply copy the item or items from the source document and paste into your InDesign document. The paths are now fully editable within InDesign. To copy paths from Illustrator , be sure that AICB is checked and the Preserve Paths button is selected in Illustrator’s File Handling & Clipboard preferences.—Erica GametPreview Image Moves: When moving a cropped image inside a frame, hold down the mouse button for about a second before you move the object. You’ll get a ghosted preview of the whole image in the frame. —Jamie McKeeView Image Scaling with a Shortcut: Assign keyboard shortcuts to Select Container and Select Contents (Edit > Keyboard Shortcuts > Product Area: Object Menu). Now when you have an image frame selected with the Selection tool, you can quickly see the image’s true scaling amount in the Control panel’s Scale fields by using the shortcut for Select Contents. Press the shortcut for Select Container to get back to where you started. —Anne-Marie ConcepciónSame Image, Multiple Frames: For an interesting effect, you can make one image look as if it’s inside multiple frames:
Place the image in a circular frame.
Use Edit > Step and Repeat to create a row of frames.
Using the Direct Selection tool, shift-click to select each image.
Using the Alignment controls in the Control panel, align first the top edges and then the left edges of the images within the frames. (Yes, you can align images just like you can align frames!)
Poof! It looks like you’re looking through portholes (Figure 6).
Figure 6. After a little magic, this row of frames will reveal different segments of one image. You can try this trick with other frame shapes, as well.
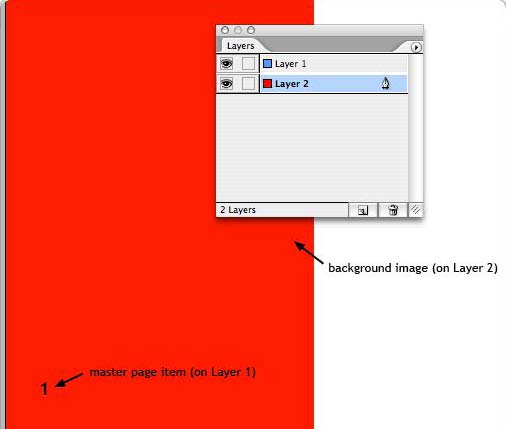
Here’s another method: Place the image in just one of the frames and choose Object > Arrange > Bring to Front. Now choose all the frames (the image frame and the empty frames) and choose Object > Pathfinder > Add. The image in the topmost frame appears in all the frames. —Claudia McCueUse Layers on Parent Pages: When you want parent page items (such as automatic page numbers) to sit on top of document page objects (such as a background image), create a new layer and put your parent page items on it (Figure 7). As long as this new layer is on top of the layer that contains the background image in the Layers panel, the parent page items will be, too.—Erica Gamet
Figure 7. Parent page items can sit on top of document page items if you put them on a top layer.
Working with Tools
Quick Duplications: You probably already know you can hold down the Option (Mac) or Alt (Windows) key to drag-and-duplicate objects. The Option/Alt key can perform the same duplication function during other operations, too. For example, you can hold down the Option/Alt key as you choose Flip Horizontal from the Control panel menu. InDesign will duplicate and then flip the selected frame (Figure 8). Or place the cursor in the X field of the Control panel and change the value. Then press Option/Alt-Enter and InDesign moves a duplicate of the object to the new location. —Claudia McCue
Figure 8. To simultaneously duplicate and flip an image, hold down the Option/Alt key as you choose Flip Horizontal from the Control panel menu.
One-Click Selection in Panels: If you’re manually clicking or dragging inside of fields in panels to select the fields’ contents, you’re doing it the hard way. Just click the label or icon to the left of the field—its contents are automatically selected, ready for you to replace it with new values. Remember that you can press the Up and Down arrow keys on your keyboard to increment a field’s current setting. —Anne-Marie ConcepciónSort Menus Alphabetically: To sort menus in the menu bar in alphabetical order, select the required menu while holding Ctrl+Shift+Alt (Windows) or Shift+Option+Command (Mac). This shortcut sorts the menu and sub-menus in alphabetical order; it’s also useful for sorting fonts in the Type > Font menu. —Eliot HarperControl Panel Shortcut to Dialog Boxes: To adjust settings on the fly without having to dig through panel menus, Option/Alt-click on many of the field labels and icons in the Control panel to open the dialog box that relates to that field. For example, if you Option/Alt + click on the Bulleted List icon (when the panel is in Paragraph Formatting mode), the Bullets and Numbering dialog box appears. Option/Alt + clicking on the icon to the left of the Character, Paragraph, or Object Style menu opens the relevant Style Options dialog box, and so on. —Anne-Marie ConcepciónNavigate the Control Panel: When you use the Control panel, you don’t need to open as many panels. You can choose to dock the Control panel at the top or bottom of your screen, or you can drag its left edge to tear it off and create a floating panel. To jump easily to the first field in the Control panel, press Command/Ctrl + 6. From the first field, use Shift + Tab to highlight the Reference Point box. Use the arrow keys to highlight a specific Reference Point and press the Enter key to select. —Erica GametDon’t Forget the Info Panel: The Info panel, which shows the size and location of a selected frame, can be a very useful tool. Select an image and the Info panel displays size, active and effective resolution, color space, and ICC profiles (Figure 9). Select a text frame with the Text tool and the Info panel displays a count of characters, words, lines, and paragraphs. (It also shows this information for linked text frames.) Select the frame with a Selection tool instead, and the Info panel shows the current fill and stroke colors. When nothing is selected, the Info panel displays information about the document itself. —John Feld
Figure 9. The Info panel contains a lot of useful details about the items in your InDesign file.
Go to Page: You don’t see a Go to Page command in the Layout menu, where all the other page navigation commands are, but it’s there. Press Command/Ctrl + J, type in the page number, and press Return/Enter. (The keyboard shortcut actually selects the current page number field in the lower-left corner of the document window, but that’s easy to miss.) You can even type a parent page letter to jump to that parent page (type “A” and then Enter to display “A-Parent”). —Anne-Marie ConcepciónMove Precisely: Sometimes the most precise way to move objects on a page is to use your keyboard’s arrow keys. Press arrow keys to move items in 1-pt increments. (That’s the default; you can change the this preference in the Units & Increments panel of the Preferences dialog box.) Add the Shift key to move items in 10-pt increments (or 10 times the current increment value). Press Command (Mac) or Ctrl (Windows) and the Shift key to move items in .1-pt increments (or one-tenth the increment value). —Keith GilbertSort Script Names: If scripts in your scripts folder start with two characters followed by a close parentheses— for example, 00)—the scripts panel will ignore those characters when displaying the name of the script. This allows you to sort your scripts on the hard drive using those characters. —Eliot HarperTurn the Tools Panel: You can rotate and elongate the Tools panel so it fits your screen size and working style. For example, a longer, narrower Tools panel is good when your screen is small. If you rotate the panel, it can reside at the bottom right of the screen, where there’s usually little action (Figure 10). Change the orientation in the Interface section of the Preferences dialog box or by double-clicking on the tab of the Tools panel. —John Feld
Figure 10. Clear space on the left-hand side of your display by elongating and rotating the Tools panel.
Set Application-Wide Defaults: Make preferences program-wide (rather than affecting a single document only) by setting them with no document open, then quit InDesign. —Jamie McKee
Working with Documents
Thread Frames Fast: Situation: Big story in a frame, no existing empty text frames to thread it to, can’t autoflow for whatever reason. Solution: The fastest way to manually thread a story, starting with just a single overset text frame, is to click on the overset icon with the Selection Tool to load the overset text in the cursor; then hold down the Option key (Mac) or Alt key (Windows) and drag out successive text frames. Every frame you Option/Alt-drag is automatically threaded to the previous one. —Anne-Marie ConcepciónChange Proxy Views: By default, the print dialog box’s page proxy (in the lower left-hand corner) displays a normal view, which shows the document page size and printable area. You can change the page proxy view to a page information view by clicking on it. Now it displays general dimension and scaling settings. Click on the proxy a second time to display a cut sheet preview that shows the page offset, gap, imaging direction, and other cut-sheet information. This view is useful for PPDs that support custom paper sizes (typically for roll-fed media output devices). —Eliot HarperAlign Guides to Objects: Of course, you can align objects to ruler guides. But you can also align ruler guides to objects (Figure 11). Just select the object and aim for one of the object’s handles as you drag the guideline. The guideline will snap to the handle. —Claudia McCue
Figure 11. Did you know you can align ruler guides to objects?
Show Options when Placing: When you place content into your layout, click the Show Import Options checkbox to intercept a file and perform certain functions, such as stripping formatting from a Word file. You can access the Import Options dialog by holding the Shift key when you click on the Place button in the Place dialog box. —Mordy GoldingZoom-sensitive Ruler guides: Hold down the Option key (Mac) or Alt key (Windows) while dragging out a ruler guide to make it visible only at the current zoom level and larger. If you zoom out, the guide will disappear. When you zoom back to the previous magnification or above, the ruler guide will reappear. —Keith GilbertNavigate Footnotes from the Keyboard: You can assign a keyboard shortcut to Type > Insert Footnote. Not only is it faster to add a footnote this way, but the same keyboard shortcut gets assigned to Type > Go to Footnote Reference, allowing you quickly jump back to the main text flow with the same shortcut when you’re done writing the footnote. (Go to Footnote Reference appears in the Type menu only when the cursor is inside footnote text.) —Anne-Marie ConcepciónLibraries: Templates in a Panel: Libraries are really handy. You can drag and drop commonly used items and groups of items into libraries and then drag out items whenever you need them. (If you’ve never used libraries, go to File > New > Library to create one). But did you know InDesign remembers the coordinates of the items you add to your libraries? Original libraries: To use the objects with their original coordinates, select Place Items from the Library’s panel menu. CC Libraries: Drag out an object and hold Option/Alt while clicking. As long as page size is the same, all items will appear exactly where they’re supposed to. And any Styles used in the original will come along for the ride! —Tracey LawrenceSwitch Measurements Quickly: To use a unit of measure other than the one displayed (for example, centimeters instead of inches), type in the amount and the proper abbreviation for your desired unit of measurement and InDesign converts it for you. For example, if you set your measurement preferences to inches but want a three-millimeter drop shadow offset, enter 3 mm in the Drop Shadow dialog box (Figure 12). You can also quickly switch to another unit of measure for the rulers by Control-clicking (Mac) or right-clicking (Windows) on either ruler and choosing the new unit of measure. —Erica Gamet
Figure 12. To change a unit of measurement on the fly, type the desired unit into a field.
Page Guides vs. Spread Guides: To create a horizontal ruler guide that crosses all pages of a spread, drag the guide onto the page while your cursor is on the pasteboard area to the left or the right of the spread. Or press Command/Ctrl while dragging a guide to make it a spread guide. —Keith GilbertAdd Ruler Guides Fast: To quickly add a ruler guide, double-click on a ruler to create a guide out from that point. For instance, for a vertical guide at 3 inches, double-click at 3 inches on the horizontal ruler. Add the Shift key to snap to the nearest ruler tick mark. —Erica GametHide Options from InCopy users: InCopy sports virtually all the text formatting features that InDesign does, including the Character and Paragraph panels and their menus. If you don’t want editors to be able to, say, horizontally scale a sentence to 72 percent to fit just one more line of copy (not that any of your editors would do such a thing, of course), you can hide the text scaling field from them. In InCopy, choose the Customize option at the bottom of either the Character and Paragraph panel menus. Turn off the checkboxes next to the options you don’t want them to access from the panel, and click OK. These settings are maintained in Workspaces, so you could include them in a custom Workspace for formatting-happy InCopy users and set it as an application default. Two caveats: First, you can’t lock these settings, so InCopy users could discover the Customize option in their panels and re-enable the formatting fields. Second, even if you disable Font, Style, and Size in the Character panel, they’re still available from the Type menu; and all the keyboard shortcuts for any of the commands you’ve hidden still work. —Anne-Marie ConcepciónExpand Your Views: To see more than one view of the same document, select Window > Arrange > New Window (Figure 13). To see those windows (and any other open document windows) side by side, select Window > Arrange > Tile. When working with multiple views of the same document, you can see changes made in one window throughout all views. There’s no need to close them in the order you created them. —Erica Gamet
Figure 13. View the same document in more than one window at the same time.
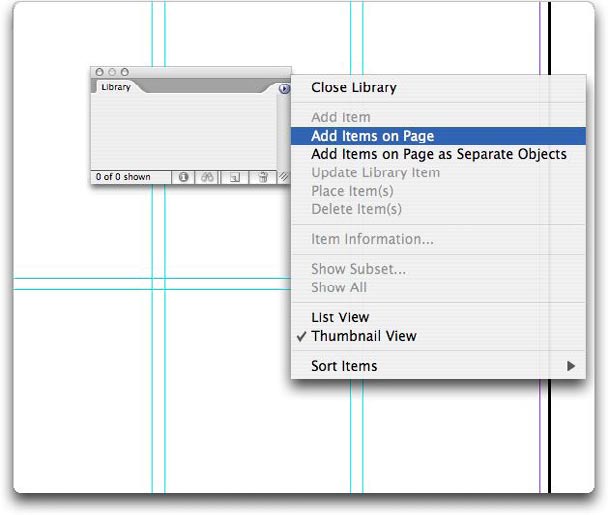
Build Guide Libraries: You can save a page’s guides by selecting them and choosing Add Item from the Library’s panel menu or by clicking the New Item button at the bottom of the panel (Figure 14). Then, when you want to use the same set of guides on another page, simply select it in the Library and choose Place Item(s) in the panel menu. This places the same guides, in the same positions, on the new page. You can’t add to or place guides from a Library using drag and drop. —Erica Gamet
Figure 14. To place the same guides in the same position on multiple pages, just create the guides on one page, then add them to your Library.
Drag and Drop Pages: Many of the functions of the menu in the Pages panel are more easily accomplished with drag and drop. For example, to create a Parent Page from an existing document page, simply drag a document page icon above the line that separates parent pages from document pages. To base one parent page on another existing master page, drag one parent page icon onto another. —Keith GilbertEasy Variations: Designers often need to create several variations on a common design—perhaps to try different concepts or to create a series of ads. Instead of creating a separate file for each variation, try this: Create the first page normally. Next, in the Pages panel, drag the page onto the Create new page icon at the bottom. This will create an exact duplicate of the page. Then make changes to this second page. Repeat the process as many times as needed. —Keith GilbertMake Layout View InCopy’s Default: The Story View, with all stories expanded, is the default view every time you open an InDesign file (layout or assignment) from within InCopy. A project with lots of workflow stories can appear overwhelming in this view. You can change the default view to Layout, which is much easier to navigate, if you do so from the View menu (View > Layout) with no documents open. To save it as an application default, quit InCopy before opening any new files, then start it again. —Anne-Marie ConcepciónFix Flaky Files: If your InDesign file is behaving erratically, it may be damaged. One easy troubleshooting technique is to choose File > Export and export the file in the InDesign Markup Language format. This will create an INDD file. When you open the INDD file, InDesign rebuilds the file from the ground up—hopefully, without the problems of the original. —Keith GilbertQuicker PDF Export of Books: You can open the PDF Export dialog box directly from the Book panel by holding down the Option (Mac) or Alt (Windows) key while selecting the Print icon.—John FeldQuick Single-Spread Documents: Do you want a two-page spread all by itself in its own file? Simply create a new two-page document and check the Facing Pages option as you create the file. Then turn to page 1, and choose Layout > Numbering & Section Options and start the page numbering at 2. Click OK to leave the dialog box, and you’re done. Because it’s an even number (page 2), InDesign moves it to the left side of the spread. —Keith Gilbert
Working with Colors
Make Tints: You can easily create a named, tinted color from any color in your Swatches panel in InDesign (including CMYK builds). Open the panel (Window > Color > Swatches), choose the color you want to start with, type a percentage in the Tint field, then immediately click the New Swatch icon at the bottom of the panel. The new color is named the same as the original with the percentage indicated to the right of the name. Changes to the original color are reflected in the tint based on that color. —Erica GametApply Swatches to Frames and Tables: You can apply a swatch to any frame or stroke by dragging a swatch from the Swatches panel and dropping it in a frame or on a stroke. Try this method for tables, too; you can apply a swatch to any table cell or cell border. —Eliot HarperChange Color Modes Quickly: To change the color mode (RGB, CMYK, LAB, HSB) in the Color panel, Shift-click on the color spectrum bar (the color picker). If you see an out of gamut warning (the yellow triangle with exclamation point), click on the symbol to force the color to the nearest in-gamut color. —Erica GametSwitch Swatches: The New Swatch button on the Swatches panel duplicates any selected swatch. To duplicate the swatch and open the New Color Swatch dialog, hold down Option/Alt while clicking it. To create a spot color version of a swatch, select the swatch and hold down Command/Ctrl while clicking the new swatch icon. You can also switch among RGB, CMYK, HSB, and Lab modes inside the Color Swatch dialog box by holding down Shift while clicking on the color proxy. —Eliot HarperObtain Exact Color Values: The eyedropper tool lets you view the exact color used in a PSD, TIF, PNG, or JPG file. However, it provides only an approximate color match for vector artwork (AI, PDF, EPS). Furthermore, it doesn’t sample spot colors from vector artwork. To see the exact CMYK or spot color that will be used to output any image or artwork on your page, activate the Separations Preview panel (Shift-F6). Choose Separations from the View popup menu and move your cursor over your artwork. The exact ink percentages are displayed next to the inks in the Separations Preview panel. —Keith GilbertApply Only Color Attributes with the Eyedropper: If you load the attributes of an object with the Eyedropper tool while holding down the Shift key, the Eyedropper loads only the color of the object (ignoring all other object attributes). If you load attributes of an object with the Eyedropper and hold down Shift while applying the attributes to another object, InDesign applies only the color to the object —EliotHarperSample Images with the Eyedropper: Use the Eyedropper tool to sample colors from placed images. With the Eyedropper tool selected, move over the desired color in the placed image. Click to sample the color, then click the New Swatch icon in the Swatches panel, or Add to Swatches from the Color panel to store the color as a swatch. The eyedropper samples the color in the same color mode as the placed graphic. For example, sampling an RGB image creates an RGB swatch. Now you can apply that new color to an item by clicking on it with the full Eyedropper. When you want to sample a new color, be sure to use Option/Alt + click to get the empty Eyedropper. —Erica GametUse Illustrator Swatch Libraries: Adobe Illustrator has some intriguing process color swatch libraries, like Earthtones and Celebration, which would be just as useful if they were available in InDesign. Why aren’t they? I don’t know. But you can add them yourself. Illustrator’s swatch libraries are regular Illustrator documents in Adobe Illustrator > Presets > Swatches, but InDesign’s Swatches panel can only access them if they’re saved as Illustrator v8 files. So, open the library in Illustrator from its File > Open menu, and use either Export or Save As (depending on the version of Illustrator you’re using) to save the document in the Illustrator 8 Legacy format. Now, in InDesign, choose New Color Swatch from the Swatches panel menu, and choose Other Library from the Color Mode dropdown menu. Select the file you created to load the swatches in the dialog box, and add the colors to your Swatches panel as usual. Note that in Illustrator, you can also save a selection of swatches in the Adobe Swatch Exchange (ASE) format, which is readable by other Adobe apps. Use the Load Swatches command in InDesign’s Swatches panel menu to add them all at once. —Anne-Marie Concepción
A Little Bit of Everything
Delete Preference Files: You can delete InDesign’s preference files when launching InDesign. To display this option dialog, launch InDesign, then immediately select Ctrl+Alt+Shift (Windows) or Ctrl+Option+Command+Shift (macOS). —Eliot HarperStroke Frame and Table Corners Here’s how to make a stroke that appears only at the corners of a frame (Figure 15):
Create a new dashed stroke style by choosing Stroke Styles from the Stroke panel menu. Call it something like Corners.
Apply the stroke to a text or graphic frame and give it an adequate stroke width.
Return to the stroke style to edit Corners.
For Pattern Length, insert a value that’s much larger than your frame.
For Corners, choose Adjust Gaps (which will keep the length of the dash fixed).
Choose Preview for real time fine-tuning.
Move the little ruler arrow until you achieve the desired result (or enter a value for Length).
You can then apply that stroke to any frame (of any size) and the corners will be identical for all objects. For surprising effects, try it on tables, too. —Rufus Deuchler
Figure 15. The brackets at the corners of this text frame are thanks to stroked styles.
Look Back at History: If you hold down the Command/Ctrl key while you choose About InDesign from the InDesign menu (Mac) or Help menu (Win), you’ll see the Component Information dialog box. It tells you exactly what version of InDesign you’re running and which plug-ins are installed. The Document History section of the dialog tells you when the document was first created and by what version of InDesign, when it was last saved, whether the file was ever converted from Quark or PageMaker, and other information. All of it may be useful for diagnosing a troublesome document. —Keith GilbertJumpstart the Bridge: Bridge is wonderful, but it takes a very long time to load. To make Bridge ready when you need it, add it to your Startup items. On the Mac, open your System Preferences and click on Accounts. (You must have administrative privileges to do this.) Under your account, click on the Startup Items tab. Click the plus sign and find Adobe Bridge in your applications. You can also ask it to Hide. Bridge will now open, load, and hide when your computer is starting up. —Tracey LawrenceCurve Any Lines: Rectangles aren’t the only frames eligible for Corner Effects (Object > Corner Effects). Try Corner Effects on polygons, stars, and even stroked paths. —Claudia McCue
This tip was sent to Tip of the Week email subscribers on July 10, 2014. Sign up...
×By signing in, you agree to our Terms of Use and acknowledge our Privacy Notice.
Manage your privacy
This site uses cookies, but not the kind you eat. We use cookies to remember log in details, provide secure log in, improve site functionality, and deliver personalized content. By continuing to browse the site, you accept cookies.
Functional
Always active
The technical storage or access is strictly necessary for the legitimate purpose of enabling the use of a specific service explicitly requested by the subscriber or user, or for the sole purpose of carrying out the transmission of a communication over an electronic communications network.
Preferences
The technical storage or access is necessary for the legitimate purpose of storing preferences that are not requested by the subscriber or user.
Statistics
The technical storage or access that is used exclusively for statistical purposes.The technical storage or access that is used exclusively for anonymous statistical purposes. Without a subpoena, voluntary compliance on the part of your Internet Service Provider, or additional records from a third party, information stored or retrieved for this purpose alone cannot usually be used to identify you.
Marketing
The technical storage or access is required to create user profiles to send advertising, or to track the user on a website or across several websites for similar marketing purposes.
We use technologies like cookies to store and/or access device information. We do this to improve browsing experience and to show (non-) personalized ads. Consenting to these technologies will allow us to process data such as browsing behavior or unique IDs on this site. Not consenting or withdrawing consent, may adversely affect certain features and functions.
Functional
Always active
The technical storage or access is strictly necessary for the legitimate purpose of enabling the use of a specific service explicitly requested by the subscriber or user, or for the sole purpose of carrying out the transmission of a communication over an electronic communications network.
Preferences
The technical storage or access is necessary for the legitimate purpose of storing preferences that are not requested by the subscriber or user.
Statistics
The technical storage or access that is used exclusively for statistical purposes.The technical storage or access that is used exclusively for anonymous statistical purposes. Without a subpoena, voluntary compliance on the part of your Internet Service Provider, or additional records from a third party, information stored or retrieved for this purpose alone cannot usually be used to identify you.
Marketing
The technical storage or access is required to create user profiles to send advertising, or to track the user on a website or across several websites for similar marketing purposes.