InDesign’s Super Strokes
Jeff Witchel shows how to unlock the power of custom stroke styles.

This article appears in Issue 98 of InDesign Magazine.
If your inner designer has ever wanted to spice up an otherwise fairly staid project—or if you hanker for the extravagant creative possibilities for line styling in Illustrator—you may sometimes wish you had a little more creative leeway with stroke styling in InDesign. But, wait—you do! Hidden deep in the Stroke panel menu is your key to unlocking a little-known feature: custom InDesign stroke styles. I think you’re going to like these. But before we jump into the details of creating cool stroke effects, let’s walk through the fundamentals of working with stroke styles.
Stroke Style Basics
To get started with stroke styles, choose Stroke Styles from the options menu of the Stroke panel (Figure 1), and then, in the dialog box that opens:

Figure 1: The Stroke Styles command is on the options menu of the Stroke panel.
1. Click the New button (Figure 2).

Figure 2: To create a new stroke style, click the New button (A).
2. You’ll see there are three kinds of custom stroke styles that you can create and apply—Dash, Dotted, and Stripe. Choose one of these three categories from the Type pop-up menu (Figure 3).

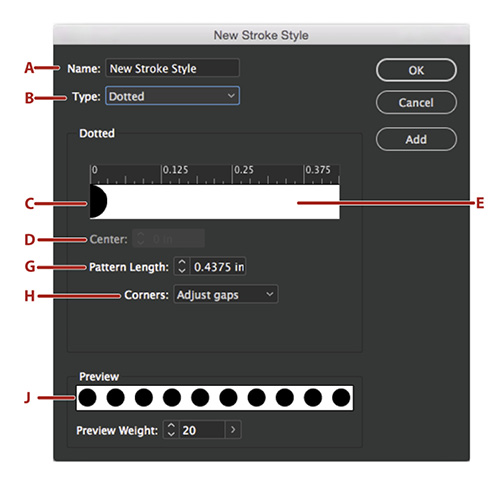
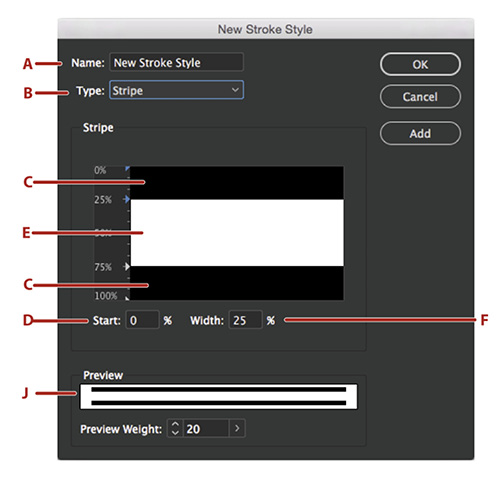
Figure 3: The dialog boxes for new dashed, dotted and striped strokes. A: Name your stroke style. B: Choose from among three types of strokes in the Type pop-up menu. C: A representation of a dash, dot, or stripe. D: The starting position of a
selected dash or stripe, or the center of a dot. E: A gap on either side of a dash, dot, or stripe. F: The length of a selected dash or the width of a stripe. G: The length of a repeated pattern. H: A pop-up menu that determines how dashes or dots are spaced to meet in all corners. I: The Cap pop-up menu for selecting the look of the beginnings and ends of your dashes. J: A preview of the dashes, dots, or stripes in the weight you specify.
3. Name your stroke style.
4. For dashed and dotted strokes, you can specify a length of the repeating pattern.
5. To set up a stroke pattern, you can do any of the following:
- Click on the ruler to add a new dash, dot, or stripe.
- Adjust the width of a dash by clicking and dragging its ruler marker.
- Alter the thickness of a stripe by clicking and dragging its ruler markers. You can also click on a stripe to select it and specify a value for both its Start position and its Width. Both values represent a percentage of the total weight of the stroke.
- Delete a dash, dot, or stripe by clicking and dragging it out of the ruler area. Note, however, that a custom stroke style must have at least one dash, dot, or stripe. There’s also a maximum of five dashes or dots in a pattern.
6. To move a dash, dot, or stripe, click and drag it to a new position. For dots, you can also enter an exact value for the new position of its center in the field provided.
7. Use the Corner options to determine how dashes and dots will be adjusted to work as desired in corners.
8. Select a Cap style to determine the shape of dashes (butt, round, or projecting).
9. If you’d like to preview your stroke in different weights, use the Preview Weight section to specify a stroke weight.
10. To save your stroke style, click Add, which will save your style and allow you to continue creating additional styles; or click Done, to save the style and exit the dialog box.
To use your custom stroke style, select an object, specify a stroke Weight in the Stroke panel, and select your custom style from the Type pop-up menu.
Using Stroke Styles in Other Layouts
Stroke styles are available, at first, only in the document in which you create them. But don’t fret—it’s easy to port them to other layouts or computers. One way to copy a stroke style to another document is to simply apply the style to an object, and then copy and paste that object into the other document. Another option is to save the object in a Creative Cloud library. Then the custom stroke style will be added to any document where you place the object from the library.
A third method is to save the style as an independent stroke style file (.inst). To do that, follow these steps:
1. Choose Stroke Styles from the Stroke panel menu.
2. In the Stroke Styles dialog box (Figure 4), select the custom style(s) you wish to use. (You can choose more than one by Command/Ctrl- or Shift-clicking custom stroke styles in the list.)

Figure 4: The main Stroke Styles dialog box. A: Click OK to save new stroke style and close the dialog box. B: Click Cancel to close the dialog box without saving changes. C: Create a new stroke style. D: Edit an existing (selected) stroke style. Default styles (in brackets) can’t be edited. F: Select one of your custom styles to delete it. G: Load stroke styles created in other document that have been saved as .inst files. H: Save selected strokes styles as .inst files.
3. Click the Save button.
4. Name the file, and then click Save.
Then, to load your custom stroke styles into another document, just head back to the Stroke Styles dialog box, click Load, and choose the .inst file you created.
Now that you’ve got an idea of the basic structure of these powerful design elements—and the assurance that you can take them with you—it’s time to turn up the fun and deliver the custom secrets I promised you. I’m dedicating a section to each of the basic stroke styles from which you can begin.
Dashes of Fun
Dashes, slashes, hyphens, lines… they’re everywhere! Which means many people may hardly notice them. Time to shake that up.
A hash of a dash
In the Type pop-up menu of the Stroke panel, you’ll find three varieties of hash styles—Straight Hash, Left Slant Hash, and Right Slant Hash. But what can you do if none of these defaults provide exactly what you need? Maybe the hashes are too thick or too thin, or too spaced out or spaced too tightly.
That’s where custom stroke styles come in. You can create your own hashes by setting custom narrow dashes.
To create custom hashes, do the following:
1. From the Stroke panel menu, choose Stroke Styles.
2. In the Stroke Styles dialog box, click New.
3. Name your stroke style, and choose Dash for the Type of stroke.
4. You can make the width of a dash much narrower by clicking and dragging its ruler marker to the left.
5. Enter a Pattern Length to adjust the spacing between your hashes.
6. Select an option for Corners to determine how hashes meet in corners.
7. See your hash in different heights by changing the Preview Weight.
8. Click Add or OK to save your custom hash, and OK again to close the dialog box.
You can now apply your custom hash by selecting the stroke style at the bottom of the Type pop-up menu in the Stroke panel. Increase the Weight of the stroke to make the hashes taller.
Tip: To make custom-slanted hashes, apply your hash style to a vertical or horizontal path, and use the Shear tool (O) to slant the hashes (Figure 5).
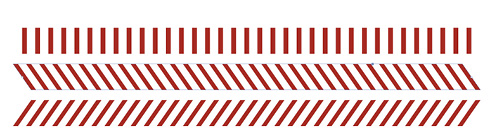
Figure 5: Hashes are very narrow dashes. They can be slanted using the Shear tool (O) or the Control panel. However, note that these are technically different than the slanted hashes that come built-in to InDesign.
A quick dash for the corners
It’s also simple to add a corner-brackets stroke to a text frame containing a pull quote. Just use a dash with (really!) wide gaps (Figure 6).
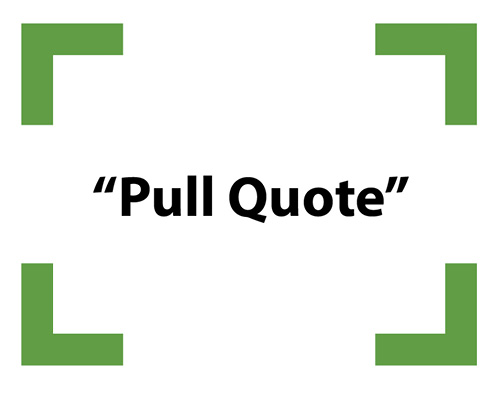
Figure 6: Corner brackets are dashes with a pattern length greater than or equal to the sides of the object to which the stroke is applied.
Let’s say your text frame is 4 inches wide by 3 inches tall. To create a custom corner bracket, do the following after selecting Stroke Styles under the options menu of the panel and clicking New in the dialog box:
1. Name your stroke style, and choose Dash for the Type of stroke.
2. Make the Pattern Length as long or longer than the objects to which you plan on applying the stroke style. So for a text frame 4 inches wide by 3 inches tall, make the Pattern Length 4 inches or more.
3. Start with a dash length of 1.5 inches. The longer the length of the dash, the farther the brackets will extend from each corner.
4. If you’d like the bracket to be the same length coming out of the corners on all sides (you probably do), choose Adjust Gaps from the Corner pop-up menu.
5. You can preview a heavier bracket by increasing the Preview Weight. Then click Add or OK to save your custom corner bracket, and OK again to close the dialog box.
To apply your custom corner brackets to an object, choose your stroke style near the bottom of the Type pop-up menu in the Stroke panel.
Of course, if you want to change the length of the brackets, you can always edit the stroke style again.
Create a dotty dash
When is a dash not a dash? When you add round caps!
If you want to create rounded rectangle dashes or even dashes that look like dots, after selecting Stroke Styles under the options menu of the panel and clicking New in the dialog box that opens, try the following (Figure 7):
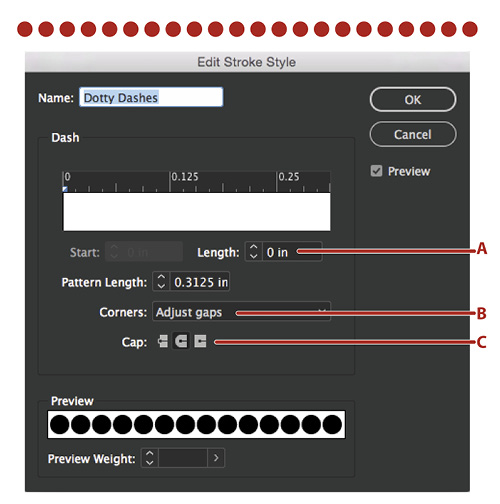
Figure 7: A zero-length dash with a round cap is a dot.
1. Name your stroke style, and choose Dash for the Type of stroke.
2. To create rounded rectangle dashes, add a Round Cap in the Cap section of the dialog box. To create dots, make the length of the dash 0 (zero), and do the following:
- Make the Pattern Length longer, to spread your dots farther apart.
- For Corners, choose either None or Gaps, so the dots won’t get stretched.
3. Click Add or OK to save your dotted dash, and OK again to close the dialog box.
Now you can apply your dotted dashes or rounded rectangle dashes under the Type pop-up menu of the Stroke panel.
Hot Dots
You may wonder why, in the previous section, I had you create dots out of dashes when there’s a perfectly good Dot style of dash as well. It’s because there are things you can do with dashed-dots that can’t be done with a Dot style.
Scallop your object with dots
Can you draw an object with scalloped edges in InDesign? Technically, no, but here’s a great workaround (Figure 8).
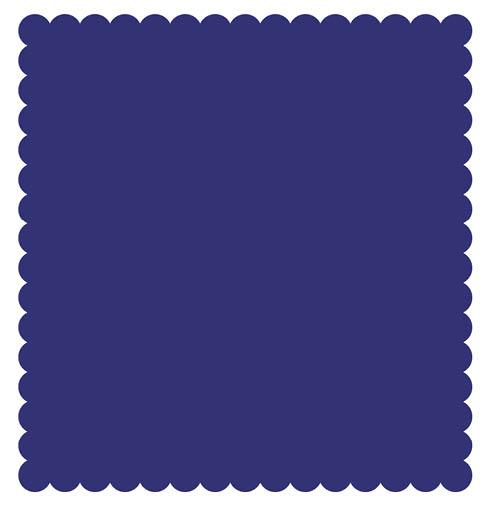
Figure 8: Dots with no space between them produce a scalloped effect.
To create a scalloped edge, after selecting Stroke Styles under the options menu of the panel and clicking New in the dialog box that opens, try the following:
1. Name your stroke style, and choose Dotted for the Type of stroke.
2. Adjust the Pattern Length until the dots are touching and at a Preview Weight that’s close to the stroke weight you’d like to use.
3. Click Add or OK to save your scalloped edge, and OK again to close the dialog box.
Now you can apply your scalloped stroke under the Type pop-up menu of the Stroke panel.
Disappearing dots
Here’s a cool gradient effect that you can apply to your own custom dots or even the default dots found under the Type pop-up menu of the Stroke panel.
To create a disappearing dot effect (Figure 9):

Figure 9: With a reversed gradient in a stroke, adding a Gap Color with the same gradient produces a fading effect in the center of the path.
1. Apply a dotted stroke to a path.
2. Create a gradient in the Swatches panel, and apply it to your stroke.
3. Back in the Gradient panel, reverse the gradient in the Dots.
4. Apply the same gradient to the Gap.
The gradient applied to the stroke is now applied in the opposite direction in the gap, making the dots fade into the gaps in the center of the path.
Strictly Stripes
Many people find stripes irresistible. How great, then, that you can give them what they want, but not necessarily in a way they’d ever imagined! The possibilities for custom stripe design are endless.
A single stripe with a big gap
Have you ever wished you could apply a fine line stroke outside of a much thicker white stroke on the frame of an image? Most folks will end up using two frames stacked on top of each other to accomplish this task. But a much better solution is to create a custom stroke style with a single thin stripe and a second very thick white stripe in the same stroke (Figure 10).
Figure 10: A stroke style with a very thin black stripe and a very wide gap filled with Paper (white) in the Stroke panel’s Gap Color pop-up menu.
Try it for yourself. Select Stroke Styles under the options menu of the Stroke panel, click New in the dialog box that opens, and do the following:
1. Name your stroke style, and choose Stripe for the Type of stroke.
2. Click the bottom stripe in the window, and drag downward, away from the ruler area. This will delete that stripe, leaving just the top stripe.
3. Adjust the thickness of the remaining black stripe by clicking and dragging its ruler marker or entering a small Width of 10–15% (of the weight of the stroke).
4. Click Add or OK to save your single stripe style, and OK again to close the dialog box.
Now you can apply your “single stripe, big gap” stroke from the Type pop-up menu of the Stroke panel. If you’re using the stroke style over a colored background, go to the Stroke panel, and choose the Paper swatch (white) in the Gap Color pop-up menu.
Stripes unlimited
Just about every feature seems to have some limits. For instance, you can have up to five dashes or dots in a custom stroke style. But with stripes, I’m not sure what the maximum is. I’ve managed to squeeze up to 25 very thin stripes into the area under the ruler and never got an error message (Figure 11).

Figure 11: You can have far more stripes in a stroke style than you will probably ever need. This stroke has 25 stripes.
However, setting up a 25-stripe stroke style was not easy. I wanted each stripe to be 2% of the total thickness of the stroke with a gap of 2%.
I started by trying to work manually, clicking and dragging the ruler markers for each stripe to change its thickness. This quickly proved to be impossible, because I couldn’t achieve the accuracy I wanted. The solution was to use the Start and Width fields, where I could enter exact Start positions and Width percentages.
To recreate this 25-stripe stroke style, you can choose Stroke Styles from the options menu of the Stroke panel, click New in the dialog box that opens, and do the following (Figure 12):
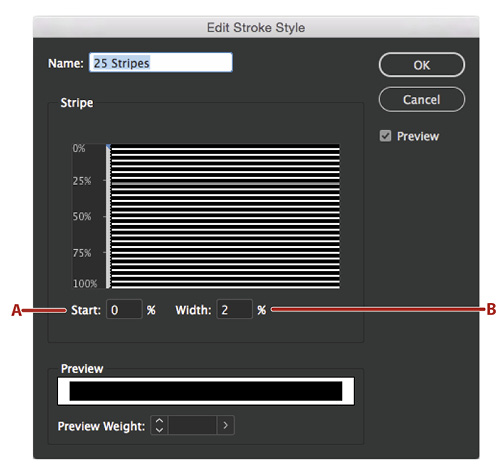
Figure 12: Creating a striped stroke with a large number of stripes is much easier if you use the Start field to position the stripes and Weight field to determine their thickness.
1. Name your stroke style, and choose Stripe for the Type of stroke.
2. Click on the bottom stripe, and drag it out of the ruler window to delete it.
3. Click on the remaining stripe to select it, and enter 2% in the Width field.
4. Now, click and drag in the gap area beneath the top stripe to create the next stripe. (It doesn’t really matter how wide, since you’re going to control it numerically.)
5. With the stripe still selected, enter 4% in the Start field, and 2% for the Width.
6. Click and drag in the gap area beneath the second stripe to create your next stripe.
7. With that stripe still selected, enter 8% in the Start field, and 2% in the Width field.
8. Repeat steps 6 and 7, increasing the Start percentage 4% more than the previous stripe, until you have 25 stripes or as many as you wish.
9. When all of your stripes are in place, click Add or OK to save your 25-stripe stroke style, and OK again to close the dialog box.
You can apply your 25-stripe stroke style by selecting a path and increasing the Weight of its stroke to at least 50 points (any narrower and you might not see the detail of the thin stripes). Then just select the 25-stripe style near the bottom of the Type pop-up menu. You can also add a gap color, if you’d like, in the Gap Color pop-up menu.
Click here to download a snippet file that includes the 25-stripe stroke style.
Outline a stroke with gaps
If you’ve ever had callout lines in a diagram disappear into an image they are crossing, you’ll love this custom stroke style. This stroke is outlined in white to separate it from everything underneath it (Figure 13).
Figure 13: A simple way to make callout lines stand out from a graphic
You can create this custom stroke by choosing Stroke Styles from the Stroke panel menu, clicking New in the dialog box that opens, and doing the following:
1. Name the stroke style, and choose Stripe for its Type.
2. Click the bottom stripe, and drag it out of the ruler window to delete it.
3. Click on the remaining top stripe to select it, and enter 15% in the Start field (to create a top gap) and 70% in the Width field.
4. Click Add or OK to save your stroke style, and OK again to close the dialog box.
You can apply your white outlined stroke by selecting a path and increasing the Weight of its stroke to about 5 points, and then choosing Paper (white) in the Gap Color pop-up menu.
Alternatively, you can create this kind of stroke by doing the reverse of what I just described—make two thin stripes top and bottom, with a big gap in between. Then, in the Swatches panel, apply Paper (white) to the stroke and Black in the Gap Color pop-up menu of the Stroke panel.
Stroke Styles to the Rescue
The next time you’re stuck trying to find the perfect stroke, take a look under the options menu of the Stroke panel, and look at Stroke Styles. Your stroke of genius may be waiting there.
Commenting is easier and faster when you're logged in!

Recommended for you

InQuestion: Placing an Image Into a Grid
Q: I’d like to place an image into my layout and have it look as though it’s bei...

100 Great InDesign Tips
We scoured every past issue of InDesign Magazine to bring you the best of the be...