

 This article appeared in Issue 131 of InDesign Magazine.
Your Trickiest InDesign Questions Answered
Our online communities on Facebook and LinkedIn bring together people who are passionate about using InDesign. When someone has an issue with the program, the community is ready to jump in and offer solutions.
In this Q&A column, I’ve once again distilled a few excellent questions and responses on several topics. Note that the discussions have been edited for brevity and clarity.
Sequential Numbers with Leading Zeros
Jez Parish asked:
Q: The client wants 1,000 labels that require a sequential number. This is digitally printed, not litho, so crash numbering is not available! If I make batches of 100 pages or 1,000…the page number would automatically populate. But how do I get the numbers to be 001, then 002, and so on up to 999?
A: Flexible numbering is one of those things that seems like it should be easy to accomplish in InDesign. Just push a button, and any style of numbering should instantly appear where you want it, right? Sadly, that’s not a feature, but you can customize your numbering in other ways. In all the following examples, we will assume we need 1,000 labels with four-digit identifiers containing leading zeros.
Use Data Merge
You can store the number data separately and merge that into your design in a couple different ways. You first need to create your list of numbers elsewhere, such as in Excel. In the first cell after the header row, enter simply 1. In the second cell, enter 2. Now Shift-select the two cells, and drag down through line 1001 in your spreadsheet. Next, you
need to add the leading zeros in front of the numbers. Select all of the numbers you just created, choose Format > Cells, and select the Custom section on the left. Enter four zeros (0000) in the Type field, and click OK. Save your Excel file as a CSV file, and head back to InDesign.
Make an InDesign document the size of your finished label, and then add a text frame to hold the number. Enter a sample four-digit number, and apply any text styling you want to it. Open the Data Merge panel (Window > Utilities > Data Merge). In the panel menu, choose Select Data Source and find the CSV you just created. When you select the file, the header row name should now appear in the panel. Select the sample number in the text frame, and then click the header row name in the panel. A proxy (which should be <<0001>>) will appear in the text frame (Figure 1).
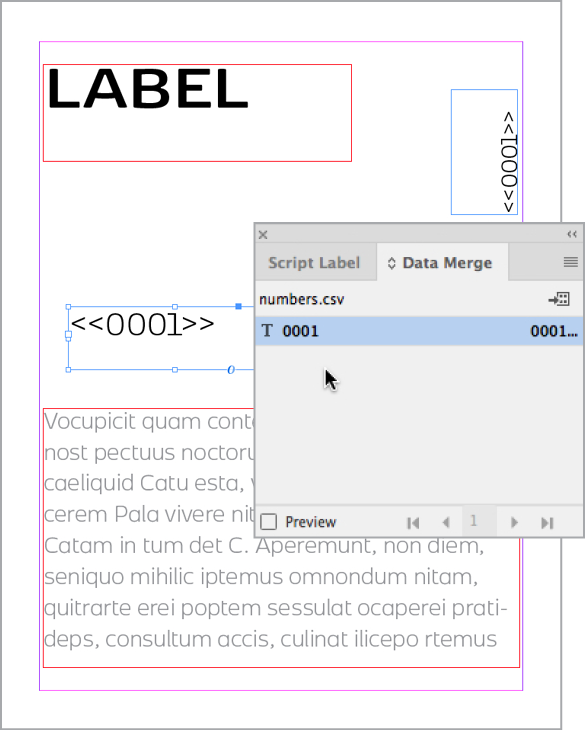
Figure 1. Use Data Merge with a list of numbers to number items on a page.
In the Data Merge panel menu, choose Create Merged Document. Leave all the default options, select Single Record from the drop-down menu, and click OK. You should now have a new 1,000-page document, with one label per page. InDesign also offers an option to merge only a few records, and I often try this first when I want to make sure my setup worked.
Another form of data merge involves merging the data using variable printing. Your print service provider would do this, often from the RIP software; you simply supply them with a file containing the numbers you need. Ask your service provider what their requirements are, and use the same method with Excel to get your numbers.
Use page numbers
This is actually the easiest way to get sequential numbering, as InDesign is doing the counting for you. You can even have multiple instances of the same number on a page.
If nothing unique needs to go on any page, you can work completely on the master page. Create the design of your label, and add the text frame for the label number. Again, use sample text to set up the formatting of the numbering. Select the text, and replace it with an automatic page number. Choose Type > Insert Special Character > Markers > Current Page Number. The proxy will show the master page prefix, but on the page it will show 1 on page 1. If you want the label number to appear in more than one place, duplicate the text frame (on the master page) and make whatever adjustments you need.
Go to page 1, and select Numbering & Section Options from the Pages panel menu. Under Page Numbering > Style, choose “0001, 0002, 0003…” (Figure 2).
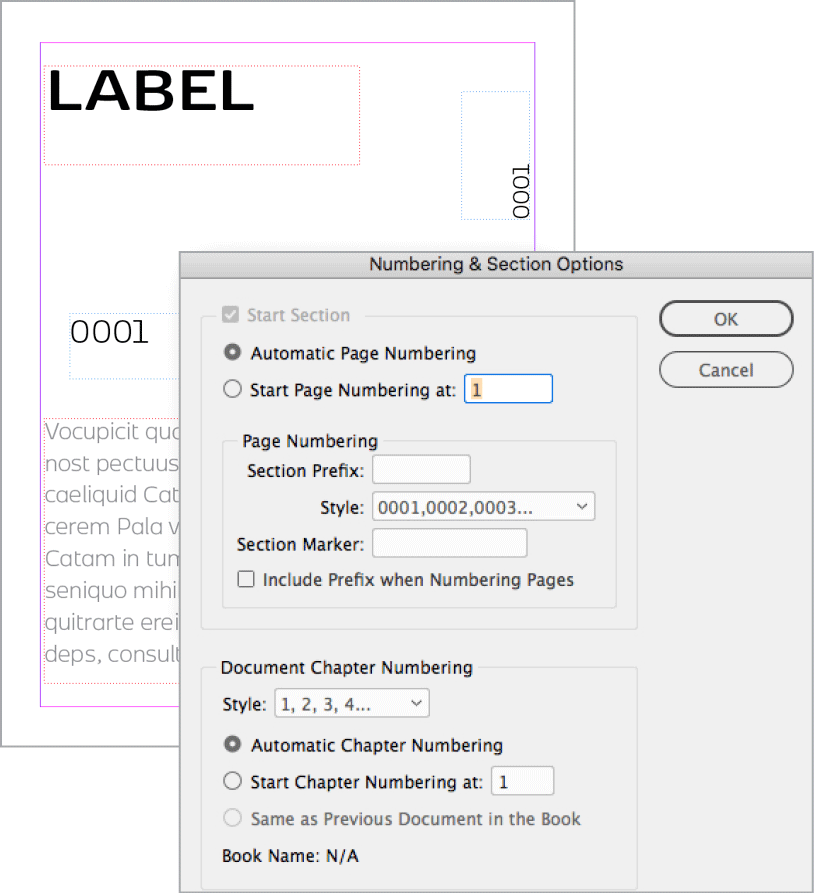
Figure 2. Use Automatic Page Numbering to number items.
In the Pages panel, choose Add Pages, enter 999 in the Pages field, and assign the master that the page numbers are on.
Use a script
Lastly, you could always use a script that does the work for you. The Numbering Script by Jared Katz enables you to not only add sequential numbers to your labels (or tickets and more), but can also set up multiples that allow for cutting, stacking, and duplicating if you’re printing NCR forms.
Install the script, and set up your artwork. Figure 3 illustrates a 4-up layout. The text frames that will hold the numbers must be on the master page, be primary text frames, and be all linked together.

Figure 3. The Numbering Script requires threaded text frames.
On the first document page, choose Override All Master Page Items from the Pages panel menu and select the first text frame in the text flow. Run the script. In the dialog box that opens, set the Start and End values to 1 and 1,000, set How Many Up to 4, and indicate that the number appears twice per ticket (or label, in our sample). The last option in the dialog box, EXTRA Zeroes Before Number, is the number of digits to include (even though the label is a bit misleading). Enter “0000,” and click OK. With 4 tickets per page in our example, we’d need to print 250 pages total, then cut and stack the pages. So the numbers on the first page are the first ones in each stack: 1, 251, 501, and 751 (Figure 4). The script link includes sample files and instructions.

Figure 4. The numbering allows for cutting and stacking of printed labels.
Rounded Inside Corners
Sandra Brokensha asked:
Q: I wondered if anyone knew of a way to make the inside borders of a stroke or object rounded, without it rounding the outer edges also? I can do it by using two frames—one square edged all the way around then layering another smaller, rounded-edge one on top of it—but can’t seem to find a way to do it with just one. I want to emboss the stroke, so I obviously don’t get the effect I’d like using two. I’d also like to avoid using a different program to create it.
A: My initial reaction to this question was to do the job in Illustrator. But InDesign is actually quite a good tool for creating effects, with many of the same tools that Illustrator offers. Here are a couple of ways to create the look that Sandra wants.
Use two frames
Figure 5 shows the effect created with two frames.
Figure 5. Two frames can create the effect of a single frame with rounding on just the inner corners.
For this method, create a rectangle, then choose Edit > Step and Repeat and use 0 for both the Vertical and Horizontal offsets. With the Selection tool, Shift-Option/Alt-drag the top frame to a smaller size. Change the color of that new interior shape if needed, and move it onto a new layer if you want. Lastly, round the corners on the inside shape with the Control panel or by choosing Object > Corner Options.
One of Sandra’s concerns was not being able to get the proper embossed effect with the separate shapes. However, you can easily add an embossed look by selecting the square-cornered rectangle and removing its fill while also giving it a very thick stroke (Figure 6).

Figure 6. Create an embossed look using two frames with a stroke applied to the bottom frame and effects applied to each.
Next, apply an Outer Bevel effect (Object > Effects) and adjust the settings to your liking. Combine that with an Inner Bevel effect applied to the round-cornered shape to finish the look.
Use the Pathfinder
You can take the two-frames method a step further to create a single object. With this variation, you need to add another object only if you want an interior fill color.
Working with those same two frames, set your corner options as before. Next, select the two frames, and choose Object > Pathfinder (also accessible via the Window menu). Then choose Subtract. This will use the smaller, rounded shape to punch out a hole through the larger rectangle. You now have a compound shape that you can add embossing effects to (Figure 7).

Figure 7. Using the Pathfinder creates a compound shape, which lets you see items below.
The biggest drawback to this approach is that, while you do have one object, the corner radius is not adjustable. Any transformation applied to the compound shape will distort those corners, so if you need different sizes, you’ll have to create separate compound shapes in each case.
Use Paste Into
My go-to option would be to create two shapes with no stroke and a solid fill. Select the inner shape, and then cut or copy it to the clipboard. Select the outer shape, and choose Edit > Paste Into (Figure 8).

Figure 8. Pasting one item inside another keeps both items editable.
Use the Direct Selection tool to select the pasted shape, and then add an Outer Bevel (Object > Effects > Bevel and Emboss). Set the Direction to Down to give it depth. You can even add a bevel effect to the enclosing rectangle.
The biggest advantage to this method is that you have one object that can be positioned and transformed all at once, but the internal shape element is still independently editable. Double-click it to select it. Then you can adjust the corner radius, fill color, and so on. When you resize the rounded corner shape, the corner radius won’t get distorted, as it can with the other methods.
Space Between Styles
Angela C. Taormina asked:
Q: I remember seeing a discussion about how to set up subhead styles so you don’t need to make “A head,” “B head,” and “B after A” for when the space above needs to be different. I never figured out how to do this, but I’m always looking to up my game, so I throw myself out to the wisdom of The Group!
A: Over the years we have seen some improvements to methods for getting the perfect spacing with paragraph styles, but I still feel like automating styles often takes longer than it should in InDesign. Although no one method is perfect, you do have options, so find the best fit for your workflow.
Make a new style
My first recommendation is almost always, “Make a new style!” For Angela’s example, I would create a “Header A” paragraph style and then a “Header B” style, which would usually appear after another style, maybe body text. With these styles, however, that special case where Header B comes right after Header A would leave too much space between the header paragraphs. I would make a new “Header B after A” paragraph style that specifies less space before the subhead (Figure 9).

Figure 9. When the headers come before body text, extra space before is needed. When one header follows another, a third style with different spacing is needed.
Use Span Columns
You also can use the Span Columns feature to change the space before a header (see this article for details). This workaround was suggested in the Facebook group, and it tends to work best when you need to offset multiple paragraphs from the text above (think of bulleted lists). It essentially treats a set of paragraphs with the same style applied as a group and lets you assign space before the first line only. Because the main purpose is to have the text span across all columns in your frame, this method works on single-column frames only, of course. Also, Facebook group members noted that using multiple instances of the workaround might slow InDesign down and it also causes issues if you’re exporting your document to EPUB.
Use the Space Between Paragraphs feature
Although this method wouldn’t help much in the one-paragraph Heading A/Heading B example, it does come in super handy if you are creating a multi-line list. The Space Between Paragraphs Using Same Style feature offsets text of the same style, but it seems to go at the task a little backwards at first glance. This setting’s default is Ignore, which means it will honor whatever values you set in the Space Before and/or Space After fields. If you want to keep a .25-inch buffer before your bulleted list but not between list items, however, set the value in the Space Between Paragraphs field to 0 (Figure 10).

Figure 10. The Space Between Paragraphs Using Same Style lets you specify space before or after a list, without adding extra space between list items.
Use a script
If all this manual formatting sounds tedious—or you encounter this issue often—maybe a script would work best. Though you’ll still have to set up the actual styles, the Change Consecutive Paragraphs Pro script from ID-Extras ($79) lets you dictate patterns for styling. Use the script to tell InDesign, “If Header A is followed by Header B, then apply my “B after A Header.” So, it’s basically aliasing one style to another based on the style rules you set up (Figure 11).

Figure 11. Use a script to dictate when to switch to a custom space.
Commenting is easier and faster when you're logged in!
Leave a Reply

Recommended for you

Illustrator Downloadable: Summer Citrus Pattern Set
Downloadables are an exclusive benefit for CreativePro members! (Not a member ye...
InDesign Downloadable: Tables SuperGuide
Downloadables are an exclusive benefit for CreativePro members! (Not a member ye...

How to Be a Better Designer: Learn About Type
It’s all about the type. Or, as James Carville might have said, it’s the typogra...
I have two basic questions:
1 How do I indent text by five spaces for every paragraph by default?
2 How do I set the default typface in every document to my selected font?
Hi Maurice-
You can set defaults like those when you have no documents open.
If you’re not already a member of our Facebook group, I’d strongly suggest joining, since there are tons of folks (literally over 15,000) able to lend a hand all the time. https://www.facebook.com/groups/2083332661901219/
Excellent! It’s pretty cool and works well. Enjoy!
Oh my goodness. That numbering script came at the perfect time to solve a major problem for me!