

Editor’s note: The following article was a sneak peek of an article to published in InDesign Magazine.
If you are a member, please log in above to read the full article. If you are not yet a monthly or annual member of InDesignSecrets, please consider signing up today and helping to support the world’s largest independent InDesign resource!
Article Excerpt
The first update to InDesign in 2015 has arrived. And despite what your calendar says, this is officially being called “InDesign CC 2014.2”. Apparently we’ll have to wait until later this year for the official “InDesign CC 2015” to arrive.
But in the meantime, this release brings us one big feature called CC Libraries, and a few minor (but welcome) changes. There’s also a new welcome screen and another way to open files from later versions of InDesign.
A New and Different Library Panel
InDesign CC 2014.2 brings with it a new kind of library panel, called the CC Library. You’ll use a CC Library when you want to share assets between different Creative Cloud applications. A CC Library also gives you access to assets downloaded as part of your subscription from the Creative Cloud Market.
The types of assets that can be shared in a CC Library include colors and color themes, “text styles” (not complete paragraph or character styles), Photoshop layer styles, Illustrator- and Photoshop-style brushes, and graphics.
Libraries are stored both in your Creative Cloud Files area (online in the Adobe Creative Cloud), as well as locally on your computer.
JDI (Just Do It) Features
JDI is an acronym for “just do it!” which is borrowed from Adobe Photoshop engineers. In other words, a JDI is a feature that is small but frequently requested, and relatively easy to add to the application. There are three JDI features in this release.
Creating a New Table
InDesign CC 2014.2 simplifies the process of creating tables. Now, with no insertion point in a text frame, you can choose Table > Create Table. The Create Table dialog box appears, allowing you to define the table structure. When you click OK, you get a Table cursor with which you can click or drag to create a table.
Ungroup Remembers Layers
In InDesign CC 2014.2, there is a new option on the Layers panel menu: Ungroup Remembers Layers. With this option is selected (and it is by default), when previously grouped objects from different layers are ungrouped, they are returned to their previous layer.
Print Current Page
Now, in the General panel of the Print dialog box, there is a Current Page option. Choose it to print only your currently selected page(s). The selected pages are listed in this format: Current Page: <Layout Name>:<Number of Page>.

Welcome Screen
InDesign CC 2014.2 now sports a Welcome Screen like those in Illustrator and Photoshop. (Note: The new Welcome Screen currently appears only in the English language version of InDesign. Non-English users will see the previous InDesign What’s New dialog box. I assume that over time this feature will become localized to other languages, too.)
The purpose of the screen is to make Adobe’s learning content more accessible to both beginning and advanced users. There is also a Create category. This shows a list of recent files opened, and links to create print, web, and digital publishing documents as well as a new book, library, or folio.
At the bottom of the Welcome Screen are browser links to InDesign Help, InDesign Adobe Forums, the Creative Cloud Add-ons page, and graphic inspiration from a Behance page.
Simple Save Back for InDesign CS6 or CC
Technically, this last feature—called Simple Save Back—isn’t part of the 2014.2 release, but we should talk about it anyway. On January 28, 2015, there were new releases of InDesign CS6 and CC for Creative Cloud subscribers that added this feature, but probably very few people noticed it.
For InDesign CS6 users, the Simple Save Back feature provides the convenience of converting files created in InDesign CC or later. Users of InDesign CC (the version released in 2013), can use it to convert InDesign CC 2014 or later files.
Note: This service is only available for CC subscribers! If you have the non-CC version of InDesign CS6, or any earlier versions of InDesign, it will not work. Also, you must have an active Internet connection. And you can only convert individual INDD files.
It’s Just the Beginning
The good news is that we now have some new useful features to play with. And even better, we can do this without having to work with a new file version of InDesign. That is, the INDD file format is not changing, so even if your colleagues still have CC 2014 or CC 2014.1, they’ll be able to open your files without any trouble or conversion.
I like to think of this release as a down-payment, or a promise that Adobe is continuing to improve InDesign incrementally. These features aren’t huge or groundbreaking, but they help us by reducing friction and making InDesign work the way it ought to. If all goes as planned, we’ll be talking about bigger and brighter features for InDesign 2015, later this year.
Liked this excerpt? Become a member of InDesignSecrets to read the full article. Plus you’ll receive InDesign Magazine and more membership benefits!
[/s2If]
[s2If current_user_can(access_s2member_level1)]
The first update to InDesign in 2015 has arrived. And despite what your calendar says, this is officially being called “InDesign CC 2014.2”. Apparently we’ll have to wait until later this year for the official “InDesign CC 2015” to arrive.
But in the meantime, this release brings us one big feature called CC Libraries, and a few minor (but welcome) changes. There’s also a new welcome screen and another way to open files from later versions of InDesign.
A New and Different Library Panel
Most InDesign users are familiar with creating and using an InDesign library panel. We create them to hold commonly used InDesign assets—logos, boilerplate text, text frames containing styles or swatches, and so on.
Now InDesign CC 2014.2 brings with it a new kind of library panel, called the CC Library. This panel is also found in the current versions of Illustrator CC 2014 and Photoshop CC 2014, where it’s simply called the Library panel. (It would be helpful if all the Adobe teams could have agreed on a single name for this feature.)
To avoid confusion, I’ll call the new feature CC Library and the “traditional” library an InDesign library. The traditional InDesign library is still fully supported, and is designed to work in an InDesign-centric workflow, where assets stay in InDesign.
What’s a CC Library?
You’ll use a CC Library when you want to share assets between different Creative Cloud applications—at this point, Adobe Illustrator CC 2014, Adobe Photoshop CC 2014, the new version of InDesign, and CC mobile apps such as Adobe Brush CC, Adobe Color CC, and Adobe Shape CC. A CC Library also gives you access to assets downloaded as part of your subscription from the Creative Cloud Market.
The types of assets that can be shared in a CC Library include colors and color themes, “text styles” (more on what that means in a moment), Photoshop layer styles, Illustrator- and Photoshop-style brushes, and graphics. When you add InDesign objects (text or graphic frames, lines, or any other InDesign objects), they are saved in two formats—as InDesign snippet files (IDMS) and as PDF files. If you reuse an InDesign-created asset in another InDesign file, you get the snippet. That is, InDesign re-creates the InDesign object(s). That’s the way traditional InDesign libraries work, too. But because Illustrator and Photoshop don’t understand snippets, if you place the asset into an Illustrator or Photoshop file, those programs use the PDF version—so it looks the same.
Libraries are stored both in your Creative Cloud Files area (online in the Adobe Creative Cloud), as well as locally on your computer. That way, you have access to the libraries and their contents even when you don’t have an Internet connection. When you add an asset to a library, it is automatically synced to Creative Cloud, and almost immediately it appears in each application that supports CC Libraries.
CC Text Styles
It’s important to realize that what CC Libraries call a “text style” is not what InDesign calls a “style.” That is, it’s not a paragraph style or character style; it’s just a collection of character attributes (for example, font name, font size, character color, leading). When you apply a text style from a CC Library to some text in InDesign, you’ll get most of the text formatting. However, you can apply the same “text style” to text in Illustrator and Photoshop and you won’t necessarily get all the same formatting—those programs may ignore attributes they can’t handle.
Also, when you apply a “text style” from a CC Library to text in your document, it is not linked to the text, like normal paragraph and character styles in InDesign. It’s just not that kind of style.
Despite these limitations, CC Libraries can be useful if you are sharing design assets for a brand or marketing campaign that requires work to be done in multiple applications. If you want to retain proper InDesign paragraph or character styles, use an InDesign library.
Using a CC Library in InDesign
It’s very easy to use a CC Library in InDesign. It is a panel, so if you do not see it in your current workspace, then you can open it by choosing Window > CC Libraries (Figure 1).
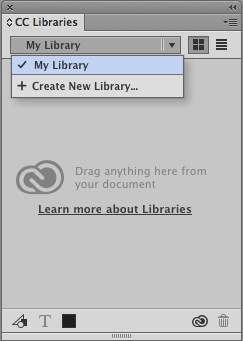
Figure 1: The CC Library panel is empty until you add assets to a library.
The CC Library panel can contain more than one CC Library, and each library can store up to 1000 assets. When you begin using the panel, you automatically have one called My Library. However, you can create a new library by clicking the Create New Library button or by choosing Create New Library from the panel menu. I strongly suggest giving each library a meaningful name, such as the name of a project you’re sharing with other users.
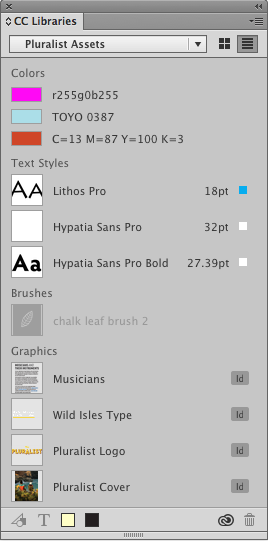
To view a library, choose its name from the menu at the top of the CC Library panel. All the library’s assets are displayed (Figure 2). Graphic assets created in another program like Illustrator or Photoshop display a label indicating the creator.
Figure 2: Library for the Pluralist project. Assets are grouped by type, but those that InDesign can’t use are grayed out.
Adding InDesign Assets
How you add an asset to the library depends on its type:
- To add an InDesign object, drag it over the CC Library panel, or select it on your page and click the Add Graphic icon at the bottom of the panel. The asset appears in the Graphics section of the panel.
- To add a color, either click on an object or select text. Then click the Add Fill Color button or the Add Stroke Color button at the bottom of the panel. The color(s) are added to the Colors section. If you’ve named a color swatch, its name is retained.
- To add a text style, either select a text frame or select text within the frame. Click the Add Text Style button; the style is added to the Text Styles section.
You can also migrate assets from an InDesign library. In the (traditional) library panel, click the Migrate Library Item to CC Libraries button, or choose the command from the Library panel menu (Figure 3).

Figure 3: When migrating assets from an InDesign library to a CC library, you can either create a new CC library, or use an existing one.
After adding item(s) to a CC Library, you’ll see an active Syncing icon at the bottom of the panel while items are being copied to Creative Cloud. When finished, the CC icon is displayed, indicating all libraries are up to date.
Editing, Managing, and Placing Assets
Once an InDesign graphic asset has been added to a CC Library, it can still be edited. Either double-click the asset in the library panel, or right-click the asset and then choose Edit. The file opens as a temporary file. When you’re finished editing, the preview and content for the asset both update.
You can manage assets in the CC Library panel by right-clicking an asset. You can choose to rename or delete an asset, or move or copy it to a different library.
To place a graphic asset in InDesign, simply drag it into a document (Figure 4). The InDesign place cursor will appear, loaded with the graphic. You can place multiple graphics this way, just as if you had selected them locally.
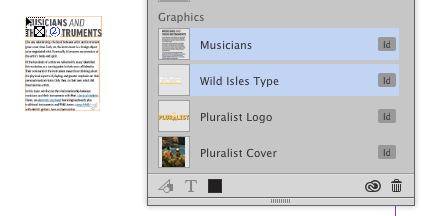
Figure 4: Simply drag graphic assets from a library to the InDesign page; the familiar place cursor appears.
To apply a color, select the object you want colored, and then select the Fill or Stroke attribute in the Tools or Swatches panel. Then click on the Colors asset. You can’t apply a Color Theme, but you can click a color within a Color Theme to apply it. (Asset types that InDesign doesn’t understand are grayed out.)
To apply a text style from a CC Library, first select either a text frame or text within a frame, and then click the text style in the library.
What’s Missing from Libraries
This is just version 1.0 of this feature, so there are many things missing which we hope will soon be rectified. For example, there’s no way to filter or search through a CC Library. You can’t add a description to an asset like you can in an InDesign library. As already mentioned, not all type attributes can be carried to another application. Likewise, while InDesign retains the color space (for example, spot colors) of the original object, Illustrator or Photoshop may not. Be sure to check that if it’s critical to your project.
We hope that in future versions of CC Library, InDesign will also be able to link to objects or colors or even text styles in the library, so that if you edit them in the library they would also update in your InDesign documents.
JDI (Just Do It) Features
JDI is an acronym for “just do it!” which is borrowed from Adobe Photoshop engineers. In other words, a JDI is a feature that is small but frequently requested, and relatively easy to add to the application. There are three JDI features in this release.
Creating a New Table
In previous versions of InDesign, creating a table required several steps. With a document open, you needed to create a text frame to contain the table. You also needed to make sure your insertion point was in the text frame where you wanted the table to appear. Then, you had to choose Table > Create Table.
InDesign CC 2014.2 simplifies that workflow. Now, with no insertion point in a text frame, you can choose Table > Create Table. The Create Table dialog box appears, allowing you to define the table structure. (If you have an insertion point, the command is Insert Table.) When you click OK, you get a Table cursor.
You now have two options: You can drag out the table dimensions (Figure 5). This automatically creates a text frame and fits the table to the text frame. Or, you can click on the page. This creates a table the width of the page or column guides, and extends it to bottom page guide. In either case, InDesign makes a text frame and places a table in it, ready for editing. It saves only a few seconds, but it’s a welcome improvement.
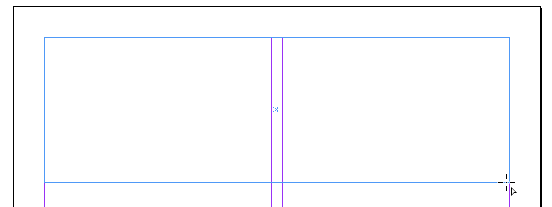
Figure 5: When you drag out the table dimensions, a text frame is created and the table fills the frame.
Ungroup Remembers Layers
In earlier versions of InDesign, when a user selected multiple items from different layers and grouped them (Object > Group), the group was created on the topmost layer.
If you subsequently ungrouped this group (Object > Ungroup), the previous layer stacking was forgotten. All the ungrouped objects remained on the group’s layer. You had to manually move them to their previous layers.
In InDesign CC 2014.2, there is a new option on the Layers panel menu: Ungroup Remembers Layers. With this option is selected (and it is by default), when previously grouped objects from different layers are ungrouped, they are returned to their previous layer. Note that this option is also an application-wide preference: like the Paste Remembers Layers command, once set, it applies to all documents.
Print Current Page
We have all wished, at one time or another, that InDesign could simply print the current page, or to print whichever pages were currently selected in the Pages panel. Fortunately, now, in the General panel of the Print dialog box, there is a Current Page option. Choose it to print only your currently selected page.
Alternatively, start in the Pages panel, and select the page thumbnails of pages you want to print. Select a single page, multiple pages (they don’t have to be contiguous), a spread, or a master page (Figure 6). Then, either right-click one of the pages and choose Print Page or Print Spread, or choose Print Page or Print Spread from the Pages panel menu.
In the Print dialog box, the selected pages are listed in this format: Current Page: <Layout Name>:<Number of Page>. If there is more than one page, the print range might appear like this: “Letter V:1, Letter V:2, Letter V: 5.”. It’s horribly confusing to read, but it works, and it’s really helpful.
Figure 6: When three pages are selected in the Pages panel, the Print dialog box now reflects the selection.
Welcome Screen
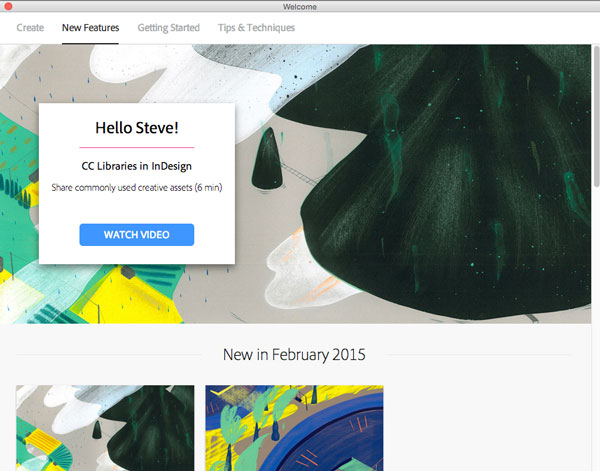
InDesign CC 2014.2 now sports a Welcome Screen (Figure 7) like those in Illustrator and Photoshop. (Note: The new Welcome Screen currently appears only in the English language version of InDesign. Non-English users will see the previous InDesign What’s New dialog box. I assume that over time this feature will become localized to other languages, too.)
Figure 7: A new Welcome Screen greets English language users of InDesign CC 2014.2.
The purpose of the screen is to make Adobe’s learning content more accessible to both beginning and advanced users. The content includes both hands-on tutorials (marked “Try it”) and videos (marked “Watch”) showing content in three categories—New Features, Getting Started (for beginners), and Tips & Techniques (for more advanced users).
There is also a Create category. This shows a list of recent files opened, and links to create print, web, and digital publishing documents as well as a new book, library, or folio. (This is similar to the old Welcome Screen feature that was removed in CC 2013.) It also has links to open the CC Library panel and to create a new library.
At the bottom of the Welcome Screen are browser links to InDesign Help, InDesign Adobe Forums, the Creative Cloud Add-ons page, and graphic inspiration from a Behance page.
If you want to turn off the Welcome Page, scroll to the bottom, and check Don’t Show Welcome Screen Again. (If you change your mind, you can choose Help > Welcome.)
Simple Save Back for InDesign CS6 or CC
Technically, this last feature—called Simple Save Back—isn’t part of the 2014.2 release, but we should talk about it anyway. On January 28, 2015, there were new releases of InDesign CS6 and CC for Creative Cloud subscribers that added this feature, but probably very few people noticed it.
For InDesign CS6 users, the Simple Save Back feature provides the convenience of converting files created in InDesign CC or later. Users of InDesign CC (the version released in 2013), can use it to convert InDesign CC 2014 or later files.
Previously, if you were using InDesign CS6 or an earlier version of InDesign CC and you opened a later version, you would encounter a dialog box suggesting the file needed to be saved back by the higher version. This would require opening the file in the later version of InDesign and saving or exporting the file as an IDML file, and then reopening it in the older version.
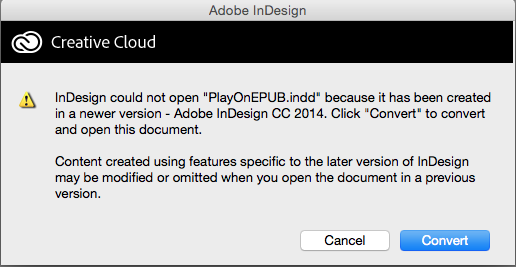
But now you’re given the opportunity to use a Creative Cloud service to do the conversion immediately. You’ll see a different dialog box (Figure 8).
Figure 8: CC subscribers will see a new option to use a conversion service to open documents saved in later versions of CC.
You’ll see a progress bar while the file is being converted. Then you’ll see a dialog box asking to save the new InDesign CS6 version of the file. It doesn’t override the later version of the file.
However note these big, fat caveats: This service is only available for CC subscribers! If you have the non-CC version of InDesign CS6, or any earlier versions of InDesign, it will not work. Also, you must have an active Internet connection. And you can only convert individual INDD files. Since the InDesign book format changes with each new InDesign version, you cannot open an INDB (book file) created in a later version, nor can you open a later- versioned INDD file within a Book panel.
The Simple Save Back cloud service is free with your CC subscription. You just need to have downloaded the latest update(s) to InDesign CS6 and InDesign CC through the Creative Cloud app. For example, InDesign CS6 has been updated to version 8.1, and InDesign CC has been updated to version 9.3 in order to work with this feature.
It’s Just the Beginning
The good news is that we now have some new useful features to play with. And even better, we can do this without having to work with a new file version of InDesign. (That is, the INDD file format is not changing, so even if your colleagues still have CC 2014 or CC 2014.1, they’ll be able to open your files without any trouble or conversion.
I like to think of this release as a down-payment, or a promise that Adobe is continuing to improve InDesign incrementally. These features aren’t huge or groundbreaking, but they help us by reducing friction and making InDesign work the way it ought to. If all goes as planned, we’ll be talking about bigger and brighter features for InDesign 2015, later this year.
This article was last modified on July 25, 2019
This article was first published on February 12, 2015
Commenting is easier and faster when you're logged in!

Recommended for you

Beware the Placed InDesign Stitching Bug
Soon after InDesign CS3 was announced, I posted about the wonderful new ability...
Aligning tables away or towards the spine
What to do when a document needs a table to be aligned away from the spine, but...