
Improving Scripts
Scripts can give you nearly magical powers in InDesign, but that doesn’t mean you can’t make them even better with a few tweaks.
This article appears in Issue 98 of InDesign Magazine.
One of my favorite things about InDesign is the ability to “script your way out of trouble” by using or creating a script that will perform a task (or a series of them) that InDesign won’t allow you to do manually. Put simply, scripts add functionality and flexibility to InDesign.
InDesign’s scripting panel supports three scripting languages: AppleScript (for MacOS), Visual Basic (for Windows), and a type of JavaScript known as ExtendScript (for cross-platform use). For the purposes of this article, I will be discussing ExtendScript, since it is the only one of the three that is cross-platform, and there’s much more support available for it online.
There are hundreds of InDesign scripts available on the Web—often for free! Unfortunately, while they may work great, they often don’t do exactly what you want. In this article, I’ll outline some ways to make simple but valuable improvements to existing scripts you find, as well as suggestions for how to manage and run scripts more efficiently.
By the way, the Dutch scripter Theunis de Jong (known on the Adobe forums as Jongware) wrote a great article for InDesignSecrets that I definitely suggest you read as well, if you’re interested in learning how to script. This article won’t go into the same level of technical detail, as I’m focusing just on making small edits to existing scripts.
Where Do I Edit a Script?
When you select a script in the Scripts panel, you can right-click it to see an option (Figure 1) to either edit the script or reveal its location in the Finder (Mac) or Explorer (Windows).

Figure 1: Right-click on a script in the Scripts panel to access some useful options.
If you select “Edit Script,” InDesign launches the script editor—called ExtendScript ToolKit (ESTK), provided by Adobe (if you have ESTK installed). Otherwise, you can select the other option and reveal the script’s location, and then open the file with almost any text editing software. You want to be sure to use a plain text editor, not a word processor, which may add fancy stuff like curly quotes—that will mess up the script. Notepad works great on Windows; on the Mac, try TextEdit, TextWrangler, or BBEdit.
Many online resources that post scripts instruct users to cut and paste script code into your “favorite text editing software.” In that case, you can paste the script code into a new text file in one of those applications and save it with a .js or .jsx extension.
What Does This Script Do?
In InDesign’s Scripts panel, scripts are listed by their names only. But some filenames are still somewhat cryptic and you may forget what the script does.
One thing you can do is to add a tooltip that appears when you mouse over a script in the Scripts panel. To do this, edit the script by adding the following text as the first line of the script:
//DESCRIPTION: description goes here The word “description” must be written in uppercase, exactly as it appears above, and followed by a colon. Replace the red text after the colon with whatever you want your tooltip to be (Figure 2).
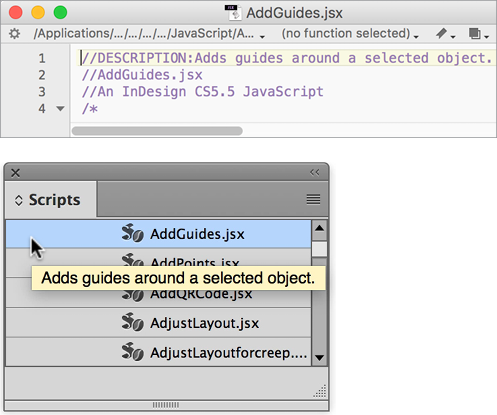
Figure 2: The description you add in a script becomes the tooltip text that you see when you pause your cursor over the script in the Scripts panel.
Tip: If your tooltip doesn’t display when you mouse over the script, you may have tooltips turned off in Preferences (they’re turned on by default). To check, open the Preferences dialog box and go to the Interface tab. The tooltips portion should look like Figure 3.

Figure 3: If you don’t see a tooltip, check Cursor and Gesture Options in Interface preferences.
There is another way to add comments, other than the tooltip: you can also add descriptions to portions of the script itself with double slashes. In this case, the only way to see the comment is to edit the script itself (inside ESTK or a text editor).
For example, take the following line:
var myDoc = app.activeDocument; //the indesign file currently open
Note the two slashes within the sentence. This code tells InDesign that the text after the slashes to the end of the line is an instruction (a comment) for a human. This can help folks looking at the script code tell which lines of code serve a particular purpose. Two slashes denote a human-readable comment on a single line; or, you can set many lines of code to be comments by beginning with /* and ending with */.
Finding and Running Scripts
If you use only one or two scripts, it’s pretty easy to locate and double-click to run them from the Scripts panel. But the Scripts panel isn’t the most efficient way to run scripts! And as you start using scripts more often, you should know these other tricks.
Keyboard shortcuts
Scripts can be triggered by keyboard shortcuts. To add a keyboard shortcut to a script, go to InDesign’s Edit menu, and choose Keyboard Shortcuts (Figure 4). You can find all your installed scripts by choosing Scripts from the Product Area pop-up menu.

Figure 4: This image shows a “togglecase” script that I use all the time, but only because I can run it with a keyboard shortcut. Without the shortcut, it would be quicker to change the type manually rather than navigate through the Scripts panel.
Keyboard shortcuts work well with scripts that you use often, since sheer repetition will help you remember the shortcut. Conversely, don’t bother adding shortcuts to scripts you run only once in a while, since it will probably take more effort to remember the shortcut than to just double-click the script in the panel.
Quick Apply
You can run a script with the Quick Apply command—if you first change a little setting hidden inside the Quick Apply window. Start by pressing the shortcut for Quick Apply (Command+Return on the Mac or Ctrl+Enter on Windows), and then, from the drop-down menu, choose Include Scripts (Figure 5).
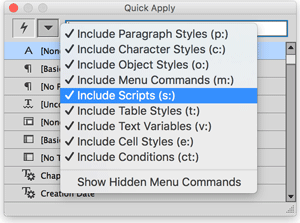
Figure 5: To run scripts with Quick Apply, select Include Scripts from the drop-down menu.
Note that if you have a lot of scripts, this can affect the performance of the Quick Apply function. But it’s a great way to trigger scripts that you use occasionally: you just press the shortcut for Quick Apply, then a few letters of the script name, and then Enter. Also, you may be able to run the script you want even faster by typing s: before the script name to show only scripts in Quick Apply (Figure 6).

Figure 6: Filter the Quick Apply results to show just scripts by typing s: before the script name.
Add as a menu item
You can also put a script into an InDesign menu and run it from there. This can save you from having to dig around the Scripts panel and instead let you just navigate to a known location. However, this is not for the faint of heart—certainly it’s not as easy as adding a description to a JavaScript. But if you want to learn how, Marc Autret does a great job of explaining how that works here.
Categorize scripts in subfolders
By default, all of the scripts that come with InDesign are in one of two folders (Application and User). However, within those two folders you can organize them into whatever folder structure you like. For example, table-related scripts can be filed in a folder called Table.
To make a new folder within the Scripts panel, right-click on any script, and choose Reveal In Finder (Mac) or Reveal In Explorer (Windows). Once you’re in the Finder or Explorer, simply add a new folder with the name you want inside the Scripts Panel folder. Then drag some scripts into that folder. Now, when you switch back to InDesign, the Scripts panel will show your new subfolder (Figure 7). As cool as this is, however, resist the temptation to overcomplicate things by creating a complex hierarchy of nested script folders. Keep things simple, and you’ll be happier in the long run.

Figure 7: As your script collection grows, it makes sense to start organizing scripts into folders.
Peter Kahrel’s RunScript
If you have a lot of scripts, you should get the RunScript script from Peter Kahrel’s site (it’s also sometimes called Script Launcher). This is a script that makes it easier to navigate all your scripts by using a text filter. Run his script (or better yet, create a keyboard shortcut to run it, as outlined above), and then use the filter function to find the script you’re looking for. Note that this script will launch only scripts that are loose within the JavaScript folder, so if you’ve used the earlier suggestion of filing scripts in subfolders, you will not be able to launch those scripts with RunScript.
Naming conventions
If a script has a long or strange name, ditch it in favor of something that makes more sense to you. You may want to give it a name that accurately describes what it does, or what it relates to. For example, if a script relates to removing empty table rows, consider naming the script something obvious, like tables-rows-remove_empty_rows.jsx
Renaming a script in this fashion won’t change how the script works, as long as you’re careful to keep the file extension as it was. Naming scripts in this manner also works well with Peter Kahrel’s RunScript, as it can use regular expressions to narrow a search of hundreds of scripts to just a few.
Improving on a Script
There are thousands of scripts out there! Some have well-designed user interfaces that keep the last-used settings, while others are one-line scripts built for a specific purpose. Many of the scripts that ship with Adobe InDesign don’t have descriptions added, nor do they give you the ability to undo the script in one step. However, these improvements are not that hard to make.
Save, save, save!
Before attempting to make changes or improvements to a script, make sure to back up the original script just in case you encounter trouble. It’s not necessary to overwrite the original version of a script; making a copy is OK. Even storing prototype scripts in a temporary subfolder is a good way of distinguishing between the original and the amended versions.
Version control is important too, given that sometimes an update to a script may produce unintended effects. So it’s important to remember what changes were made to what version of the script. I often add notes near the beginning of my scripts indicating what I’ve done to each version of a script, mainly so I remember when an issue comes up months (or years) later.
It’s also a good idea to save your InDesign file before you run a script. If a script changes your document in a catastrophic fashion, at least you can still use Revert to return the file to its earlier state.
Add an undo
And speaking of undoing damage, I should mention that not all scripts are undoable. That is, some scripts may perform dozens (or thousands!) of changes to your document; but afterward, if you choose Edit > Undo, it may take you back only one change at a time. You’d have to press Undo dozens (or thousands!) of times to return to the original pre-script state.
Fortunately, some scripts include some special code that makes all the changes undo-able in a single Undo. If you find a script that is not fully undo-able, you may be able to “fix” it. Adding an undo is often relatively easy to do and is described in detail in this article.
Add error correction
Another easy-to-fix problem in scripts has to do with error correction—that is, what happens if the script encounters a problem. For example, perhaps a script will work only if a text frame is selected on your page. If you don’t have a text frame selected when you run the script, InDesign will probably give you a really ugly error message (or, worse, do nothing at all).
Adding error correction to a script can help make it clear to the user that certain conditions have to be met in order for the script to run successfully. The following is an example of error correction that requires a document to be open before a script can run properly. The error correction code is as follows:
if(app.documents.length !=0) { var myDoc = app.activeDocument;//the indesign file that is currently open } else { alert(“Please open a document and try again.”); //no file is open and this warning is presented
exit(0); }
In effect, this error correction says, “if the number of documents open is not equal to zero, then deal with the document in the tab window that is open, but otherwise throw an alert that says ‘Please open a document and try again.’”
This is a great example of error correction. A programmer may assume that no one would run a particular script without a document being open, but that is no guarantee that the user will necessarily know this.
We should also make a distinction between a JavaScript error message and an alert or prompt built into the script. The alert demonstrated as part of the error correction makes it clear to the user that a document has to be open for the script to run. That is a whole lot better than the standard JavaScript error message (Figure 8).
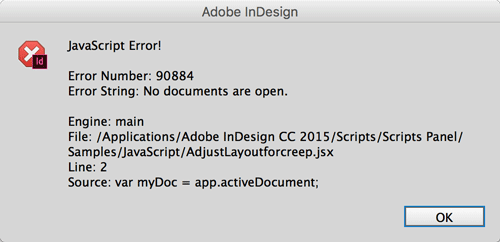
Figure 8: Without error correction, it can be hard to understand exactly why a script didn’t work.
Trouble with a Script You’ve Found?
Just because you found a script that seems to do what you want doesn’t mean that it will work the way you expect. Here are some common problems and solutions when working with scripts.
Wrong or incomplete code
In many instances, you’ll find script code posted in online forums as text, and not in a downloadable file format. Usually, these scripts can be copied and pasted into a text editor and saved as a .jsx file. As mentioned earlier in this article, use a plain text editor and not word processor like Microsoft Word to save code you copy from a forum into a file.
But even when you save the file from a text editor, issues may still arise when certain characters in a forum post don’t copy over properly into a text editor. A common problem occurs when straight quotes are turned into typographer’s quotes (which also happens with single quotes or apostrophes turning into typographer’s quotes), or where a double backslash is copied as a single backslash instead. Other common examples include:
< and >, which often come across as < and >
Ampersands, often copied as &
Two dashes, which may be converted into an em dash
Another problem that sometimes occurs: you may have copied and saved the script code perfectly, but you didn’t get the whole script! For example, perhaps it’s only a portion of a script that two scripters were discussing, instead of the complete script.
Can’t edit the script
Some JavaScript files are named with a .jsxbin file extension. These are JavaScript files that have been compiled using Adobe’s ExtendScript ToolKit, which makes it impossible for the script to be read by humans at all. This is usually done by the authors to protect the intellectual property of their scripts, allowing a script to be used without the ability to manipulate the code.
Compiling provides advantages for programmers, such as a “shelf-life” that can be added to a script for the purposes of demonstration or evaluation copies. A simple version of this would be an if-else statement that has a known date and time, and once that date has been passed, the script presents an alert to the user acknowledging that the script has expired, and then the script ends. Users can’t simply edit the script to change the end-date because the script has been compiled into the .jsxbin format. The only solution for making changes to this kind of script is to contact the original scripter.
The script worked in my last version of InDesign
While most scripts work from one version of InDesign to the next, a script may stop working after you update InDesign. One workaround worth trying is to move the affected JavaScript into a new folder within the JavaScript folder. The new folder must be titled Version X.0 Scripts (replace X with the earlier version number of the API required). For example, if the script worked in CS6, you could try putting it in a folder called “Version 8.0 Scripts” (because CS6 was technically InDesign version 8). There is no guarantee, but this can sometimes bring older scripts back to life.
Ask on the forums
The Adobe InDesign Scripting forum provides great advice between scripters when they are having issues with scripts not running or not behaving as expected. Every so often, someone directly asks the forum to make a script for them… for nothing in return. Please don’t do this. It’s the equivalent of ordering a meal at a restaurant and then not paying for it. If a scripter feels inclined to fulfill such a request, that’s up to them, but if you try using the forum in this way, your requests will often go unanswered.
Instead, consider mentioning how you’re willing to pay a scripter a fee for the work. (Remember, if a script saves you more than a few hours of work, then it’s worth paying the scripter something! If it’s not going to save you more than a couple hours of work, it’s probably not worth going through the trouble of having someone write a script.)
Similarly, if there are issues with a script, you can’t demand that someone “fix this” on the forum. If instead, you describe the specific issues with the script, as well as any methods you’ve used to try and fix it yourself, you’re much more likely to receive some helpful advice.
Resources to explore
Augmenting Automation
Even if you don’t ever intend to delve deeply into scripting, you can take simple steps to better organize your scripts, to locate and run them faster, to solve problems when you update to a new version, and tweak your scripts to make them work the way you want. The bottom line is: scripts can be great, but don’t be afraid to try and make them work even better for you!
Commenting is easier and faster when you're logged in!

Recommended for you

Book Excerpt: JavaScript for InDesign
Don’t wait for Adobe to create the features you want in InDesign—make them yours...

InReview: ID Util
ID Util is a powerful and free app for Mac users that allows you to preview and...
Bonus Features of Styles
Styles can do a whole lot more than just provide consistent formatting.