
Import PDF Comments
Maya P. Lim explores the environmental impact of print design work and sustainability.

This article appears in Issue 117 of InDesign Magazine.
One of the most important (and often dreaded) tasks of document production is that of incorporating your client’s or colleagues’ comments into your InDesign document. Typically, InDesign users rely upon PDF files to obtain feedback, and designers then manually enter the changes/comments from the draft PDF back into their InDesign documents one at a time. While there is already a third-party plug-in (DTP Tools Annotations) that automates this process, now InDesign has the ability to import PDF comments directly into your InDesign documents.
This feature has been high on the wish list of InDesign users for many years. However, as with many new technologies, the first iteration has significant limitations. In my opinion, it is only suitable for simple documents made from single InDesign files, requiring relatively simple text changes. This new feature is in no way a substitute for manually verifying all your imported comments against the source PDF. But that doesn’t mean it may not save you some time (and it’s only Version 1, after all).
Importing Comments
To get started, choose File > Import PDF Comments. Or, you can open the PDF Comments panel from the Window menu, and click the big Import PDF Comments button (Figure 1).
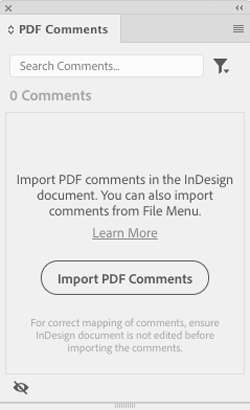
Figure 1. The new PDF Comments panel in InDesign CC 2019
Note that this feature works only with PDFs that have been generated from InDesign CC 2019 (or later). If your PDF is from an earlier version of InDesign, you’ll see an error message (Figure 2).

Figure 2. The typical error message you’ll see when first getting started with this new feature
As your workflow
moves into CC 2019 and you’re working with fewer PDFs made from earlier versions, you’ll see this error less frequently. In the meantime, you can give new life to your old PDFs with a little workaround. First, open your older InDesign file in CC 2019. Export a fresh PDF, and open it in Adobe Acrobat. Then, to transfer the PDF comments from the old PDF to the new PDF, choose Export All to Data File from the Comment options menu (Figure 3). This saves the comments in an FDF file.
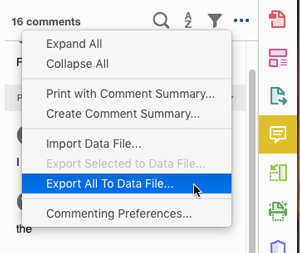
Figure 3. Exporting comments to an FDF in Adobe Acrobat
Then switch to the PDF you exported from InDesign CC 2019, and use the same menu to import the comments and save the file. Back in InDesign, use the PDF Comments panel to select the PDF, and the comments will appear (Figure 4).

Figure 4. Comments imported into the PDF Comments panel in InDesign
A Quick Tour of the User Interface
The user interface of the PDF Comments panel is so subtle that it warrants a bit of explanation. First, when you hover over a comment, the background turns a darker gray. And when you click on or hover over a comment, Accept and Trash buttons appear in the lower right (Figure 5). Also, not all comments offer an Accept button. Only those that can be auto-applied (Strikethrough, Replace Text, and Insert Text) will let you Accept.

Figure 5. Which comments are selected or hovered over is indicated subtly in the PDF Comments panel.
Another potential point of confusion is that the Resolve checkmark is always checked. It shows itself when you hover over or click on a comment. But even if the Resolve checkmark is showing, that does not necessarily mean that the comment has been resolved. Once you have resolved a comment, the checkmark and circle color will be inverted (turning from light gray to dark gray). See Figure 6.
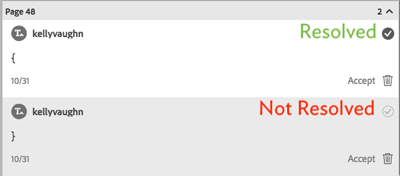
Figure 6. The Resolve checkmark is always checked and always gray! The density of the gray is what matters.
Applying Comments
Once your comments are imported and you’ve got a better handle on the subtle user interface, you can begin to work through the comments and apply them.
Clicking on any comment in the panel will jump your cursor to the corresponding spot in the document. Notice in Figure 7 how the text insertion point is in the middle of a word. That is just one example of why it is important to double-check every comment, rather than selecting Apply All Auto Edits from the panel’s options menu (Figure 8).
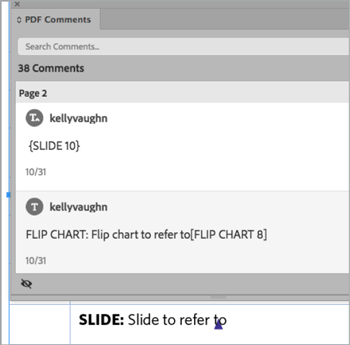
Figure 7. Check the location of the text insertion point.
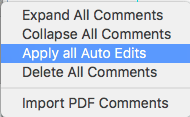
Figure 8. Apply All Auto Edits: This is dangerous!
Be Diligent About the Details
Note: It’s very important to double-check how the comments have been applied. Even if the comments were created perfectly in Acrobat, using all the best practices and proper use of the commenting tools, chances are that they will not all import exactly as expected. The more comments in your PDF, the higher the likelihood that you’ll have some unexpected results. If you use the Accept button to apply the edits, you may end up with extra empty paragraphs, anchored objects may get deleted, and extra spaces might get added. Be careful!
However, if you choose to, you can have InDesign apply the edit for you by clicking Accept (Figure 9).
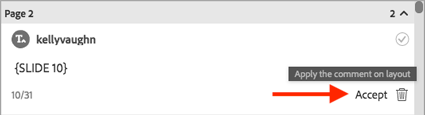
Figure 9. Click the Accept button to have InDesign automatically apply the comment to the layout.
If you use the Accept button, it’s very important to check each comment as you go, because once a comment has been accepted, there’s no indicator in the document showing where text has been changed.
Also, if your comment is one that can be accepted (Strikethrough, Replace Text, or Insert Text), be aware that marking it as Resolved ignores the change and will delete the indicator in the text. A better approach is to click Accept to apply the change in the layout (Figure 10). Doing this will also mark it as Resolved (checked). Clicking the Trash icon simply deletes the comment from the panel.

Figure 10. Comment has been accepted and applied to the text
When a comment has been Accepted, three things happen:
-
The edit is applied to the text.
-
The visual indicator in the text (either a blue triangle or a red strikethrough) is removed.
-
A question mark appears next to the Resolve checkmark. That question mark lets you know that the comment is no longer mapped to the page (Figure 11). If that “not mapped” message is confusing to you… well, you’re not alone.
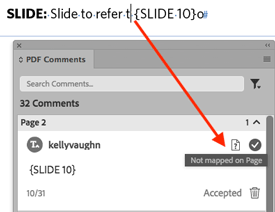
Figure 11. Comment no longer mapped on page
Working with comments that aren’t text edits
While the text-edit comments have visual indicators in the text itself, other comments appear as large yellow icons (Figure 12). Clicking one of these in the PDF Comments panel surrounds the icon on the page with a thick blue border (Figure 13).

Figure 12. Comments that are non-text edits

Figure 13. Blue selection border on a Text Box comment
It’s worthwhile to note that you can also select these types of comments just by clicking on them on the document page. When you do, they’ll be surrounded by the blue border, and also be highlighted in the PDF Comments panel. However, InDesign also selects the text frame containing the comment (just as if you clicked on the frame with the Selection tool). So be careful: if you try to delete the comment icon by clicking-and-pressing-delete, you’ll actually end up deleting the whole text or graphic frame!
Page Reflow Problems
It’s a fairly common occurrence that, in the course of adding PDF comments to your draft, a client adds (or deletes) enough content to result in text reflow (e.g. some of the text that used to be on page 2 is now on page 3). This can be a problem because reflow affects where the text sits on the page in relation to certain types of PDF comments. While the text-edit-type comments are mapped to the text, all other comments are not. So when the text reflows in InDesign, many comments will not move along with the text. They’ll stay in the same location on the page where they were in the PDF document. For this reason, some people recommend making changes from the back of the document to the front. This way, as you go, all comments remain next to the text to which they pertain.
You will still need to use Acrobat
Like all tools in InDesign, PDF Comment importing is not foolproof. The icons and indicators in InDesign’s PDF Comments panel are simplified compared with how they display in Acrobat. You may still need to refer to your PDF in Acrobat in order to see the full context of some of the comments as the editor intended. For example, in Figure 14, you can see a comment in Acrobat that clearly indicates what it’s referring to. But in InDesign, the Text Callout comment instead uses a square yellow icon, in which the arrow always points upward and to the right, so it is much less descriptive (Figure 15). The top left of the icon is situated where the point of the arrow is in Acrobat, as shown in Figure 14.
Figure 14. PDF comment displayed in Acrobat

Figure 15. Comments imported into InDesign sometimes look very different than they do in Acrobat.
Finding and Filtering Comments
If your document contains a large number of comments, it can be difficult to locate specific ones in the layout with just a cursory glance. Fortunately, there are two ways to easily locate comments in the PDF Comments panel.
Using Search Comments
The first method for finding a particular comment is by using the Search Comments field. You can use this search field to look for specific text within the comments themselves (not the text that is being changed by the comments; Figure 16.

Figure 16. Using the Search Comments feature to find instances of the word “green” in comments.
Filtering comments
You can also access the Filter function by clicking the funnel icon in the top right of the panel. From here, you can choose which types of comments you want to see, or by status, or even by reviewer. My personal favorite is the Unresolved status. The Filter function allows you to be sure that you’ve dealt with every comment in the document (Figure 17).
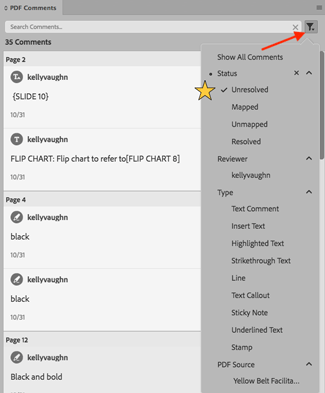
Figure 17. Filtering options in the PDF Comments panel. Note that your list will look slightly different, as it is populated based on the reviewers, the types of comments used, and the source PDF.
A Few Final Caveats
Here are a few additional considerations to keep in mind.
-
Importing comments is an all-or-nothing proposition. You cannot target a page range when importing comments from a PDF. So you’ll have a problem if you need to work with comments from a PDF of an entire book and you have separate InDesign files for each chapter. In that case, you could manually break apart the PDF into separate chapter files, which you could then import into InDesign.
-
If your workflow relies upon checking off the comments in your PDF, and then archiving that document as proof that the changes were implemented, be aware that marking a comment as Resolved in InDesign does not also mark the comments as checked in Acrobat.
-
If your InDesign document contains placed graphics that have live text (such as Illustrator documents), you will still need to manually incorporate those text changes.
A Comment-able Effort
In its current state, the PDF Comments panel feels like it was shoehorned as an add-on from the newly revamped Comments panel in Acrobat. I hope that in future updates to this feature, Adobe begins to incorporate feedback from professional InDesign users who spend a great deal of time dealing with PDF comments on documents of all sizes and complexities. In the meantime, if your editors are very diligent about proper use of the commenting tools (and you typically work with simple layouts), this new feature could likely save you some time when incorporating PDF comments into your InDesign documents.
Commenting is easier and faster when you're logged in!

Recommended for you

InReview: IDMarkz
Preview and convert InDesign files to other formats without a copy of InDesign

Ink Manager: Never Forget This Step Before Exporting a PDF
Talk to any printer and they’ll tell you: Designers are forever sending them PDF...
Tip of the Week: De-Runt Your Paragraphs With a GREP Style
This InDesign tip was sent to Tip of the Week email subscribers on June 20, 2019...