
Scripts for Wrangling Images in InDesign
Erica Gamet shares seven great scripts for working with images in InDesign.

This article appears in Issue 107 of InDesign Magazine.
We all have our wish lists of “InDesign Features That Don’t Exist But Should!” Some of those features may never become a reality, while others come about only because someone writes a script.
Scripts, as you probably know, are an awesome way to add functionality to InDesign. The scripts below will give you new abilities for importing images, manipulating them after the fact, updating them, and more.
Fit Your Frames
The Fit Graphic Frames to Content script by Luis Corullón allows you to easily manipulate images in a document by changing the frame fitting options. In one fell swoop, the script resizes all image frames to the size of the content itself (Figure 1).
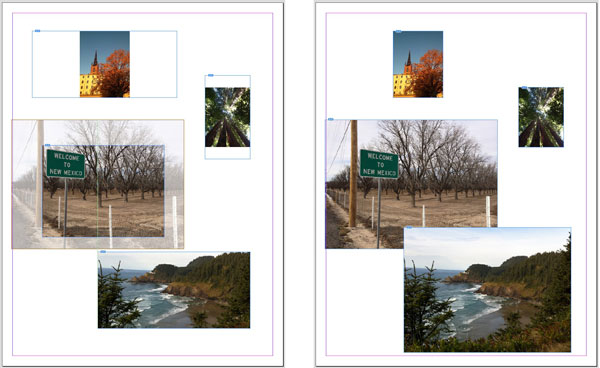
Figure 1. Before and after running the Fit Graphic Frames to Content script
This can come in handy in situations where the image and frame size have been manipulated several times over and a reset is needed. I could also see using this handy script after updating several links and needing to apply Fit Frame to Content wholesale throughout a document.
I’ve found that I sometimes need to adjust the overall frame position after running the script, depending on how the image was originally cropped. Keep in mind that the script changes every graphics frame in your entire document, including PDFs as well as raster and vector graphics.
Update Your Links
The Find Change Links script makes replacing document links as easy as proverbial pie. Use this little wonder when you need to update multiple links to files with any sort of naming consistency. For example, this script is perfect if you’ve placed low-res
links that have “_low.jpg” at the end of the filename and you need to replace them with “_high.jpg” versions. The trick to the script is that it uses the Find/Change dialog box in a very unusual way: as a way to find and change image links!
For this particular example, you would first head to the Find/Change dialog box, enter “_low.jpg” in the Find What field, and “_high.jpg” in the Change To field (Figure 2). Be sure to indicate any of the options to include master pages, locked or hidden items, and footnotes in the search, run the script, and then indicate the folder that contains the replacement images.

Figure 2. Search by filename similarities to replace a group of graphics.
If you’re the adventurous type, you can even use the GREP tab in the Find/Change dialog box to conduct your search. This comes in handy in those instances where the original files are not named consistently and you need to standardize the filenames. No matter how you search, you’ll be presented with a list of found files, and you can manually choose which images to replace, or replace them all at once (Figure 3).

Figure 3. Pick and choose which graphics get updated after using Find/Change.
Tag Those Links
The Name Document Links script by Kasyan Servetsky gives you an easy way to tag all of your document’s linked images with specific file information (filename, path, type, and/or status); the script applies this tag to all links in the document (Figure 4). The tag information sits on its own newly-created layer, and the text in the tag is formatted with a generated paragraph style that you can adjust.

Figure 4. Tagged image with filename and type indicated
Note that the labels are set to be non-printing by default. If you want them to show up in print or exported PDFs, select the Printable Labels option in the script’s dialog box. Another important thing to note is that rerunning the script will strip out any changes you make to the Link Info paragraph style, since it reapplies the tags from scratch.
Change Your Options
The Link Import Options Editor script allows you to reapply import options after you’ve imported an image. Normally, if you skip over import options (or choose the wrong ones) when first placing an image, graphic, or PDF, you’re out of luck, and the only recourse is to place the image(s) again. The beauty of this script is that it saves you that chore, offering you access to those import options at any time.
Simply run the script to (re)open the Import Options dialog box, where you can tweak the settings. For instance, while InDesign allows you to change the visible layers of a placed Photoshop file (by choosing Object > Object Layer Options), it won’t allow you to choose a color profile or rendering intent after importing. Likewise, the script also allows you to choose a different page from a multi-page PDF quickly and easily or to crop an Illustrator file to the artwork if you originally chose to crop to the media size (Figures 5 and 6).

Figure 5. Choosing which page of a PDF to display
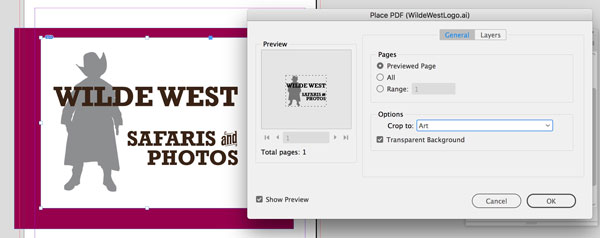
Figure 6. Changing the crop and transparency options for an imported graphic
Scale Your Graphics
In-Tools’ Scale Graphics script does just what it sounds like: scales all your graphics for you. The script even lets you define what you mean by “all.” The interface gives you the option of working with all graphics on a page, spread, or throughout the entire document (Figure 7).
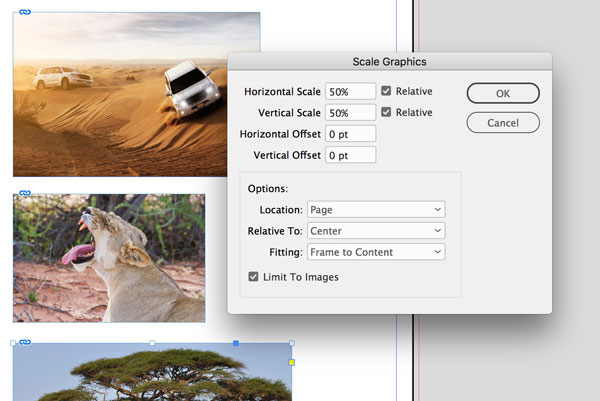
Figure 7. Options for scaling all selected graphics
Choose separate horizontal and vertical scaling amounts, and specify if that percentage is relative to the current size or the image’s original size (absolute value). Next, indicate any offset amount you’d like the images to have within the frame, keeping in mind that cropping might occur. The Relative To option is supposed to center the image first before scaling (or not, depending on which option you’ve chosen), but when I choose this option, it seems to have no effect. However, by setting the reference point in the Control panel first, the script does scale accordingly.
The Fitting options mimic those in InDesign’s Object > Fitting submenu, so you can, for instance, have the frames fit to the newly-scaled images. The Limit to Images option makes the script scale only raster images, which is great if you want to leave your logos and placed PDFs alone while scaling everything else.
Swap Those Images
The Swap Images script from an anonymous poster (based on a startup script by Gerald Singelmann) takes away the pain of manually swapping out two images in your document. Put more accurately, it will make two images on the same spread trade places, automating what can be a tedious manual process.
To swap images, simply select two image frames with the Selection tool, and run the script (Figure 8). Like the old Mac commercials used to say, “There is no Step 3.” The two frames remain untouched while the images within them are swapped. So your page design won’t be disturbed and you can continue on your layout journey.

Figure 8. Before and after running the Swap Images script
Link All Images
Most of the time, when adding images to a document, you should place them as linked graphics. But we don’t live in a perfect world, and documents often come into our hands with embedded images, or, worse, images that were pasted from who-knows-where. Peter Kahrel’s Dump Pasted Images script automates the process of creating standalone linked graphics from both of these image types. It performs this task in one operation, so there’s no need to select embedded graphics in the Links panel first.
When you run the script, you’ll be prompted to create an output folder for the soon-to-be-linked images. After creating that folder, the script will prompt you to assign a file type to any pasted images—which is super helpful, since those pasted images aren’t listed in the Links panel (Figure 9).

Figure 9. The Links panel shows one linked graphic and one embedded graphic. The third graphic has been pasted and doesn’t show up in the Links panel.
Choose from EPS, JPG, or PNG, and click OK. Any pasted images are created in the chosen file format, and any embedded images are re-created from info within the embedded file. The Create Links option (turned on by default) creates a linked image; leaving that option deselected saves the image to the chosen location while deleting it from the document itself (Figure 10).

Figure 10. After running the script, all images are linked graphics and show up in the Links panel.
Parting Shot
InDesign’s native image handling features are fairly robust, but occasionally we all run into situations where we need something more. Like many scripts, these nicely fill specific needs and pick up where InDesign leaves off. Chances are good that if there is something you do often when working with images in InDesign, many others have struggled with the same thing, and some kind developer has created a solution. The image handling scripts listed here barely scratch the surface of what’s available, but they represent the type of automation solutions that are possible with InDesign.
Commenting is easier and faster when you're logged in!

Recommended for you

This Week in InDesign Articles, Number 123
Last week was “pi approximation day” (22/7) so I’ve been thinking a lot about es...
InReview: iziExport
Plug-in gives you a head start in moving content from InDesign to WordPress.
