
Illustrator How-To: Going Negative with the Opacity Mask

Politicians aren’t the only people who can benefit by “going negative.” Now you can, too, thanks to Adobe Illustrator’s opacity mask. Tucked away in the Transparency palette, the Opacity Mask is a powerful media tool that lets you draw or paste artwork in the opacity mask of any selected object, group or layer in your illustration. As a result, the opacity artwork can then negatively affect the integrity of the artwork it masks. In simple terms that any politician would appreciate, it can perform a much-needed cover-up!
Using the opacity mask comes in handy if you want to erode or age the edges of artwork to give it a distressed or historical look. For this museum poster, Ari Weinstein applied the Scribble effect and an opacity mask to chip away the edges of the title lettering, turning a contemporary typeface into antiqued lettering (see Figure 1).
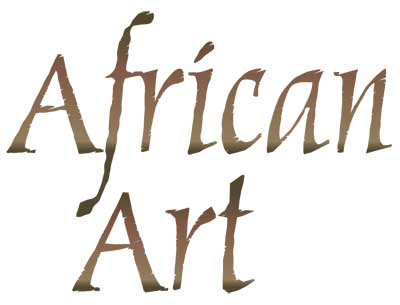
Figure 1: The final appearance of the title type.
A Little Background
Weinstein, a New York City designer, was approached to create a poster for the African Art exhibit that opened in late 2004 at the Bundy Museum in Binghamton, NY (see Figure 2). He began by recreating the African art object (a native mask) in Illustrator, importing a photograph onto a template (non-printing) layer and drawing on a layer above it with the Pen tool. Because his goal was to create an artistic, decorative representation of the mask, he kept the linework loose and used a multicolored gradient mesh for a stylized colorization.

Figure 2: Ari Weinstein’s poster for the Bundy Museum’s exhibit, African Art.
To complement the artwork’s primitive appearance, Weinstein experimented with hand-rendered lettering for the title. Not satisfied with the way his calligraphy played with both the artwork and the other type in the poster, Weinstein decided to use a font combined with a technique for antiquing the lettering.
Getting Rough with Type
Weinstein started the poster title by typing “African Art” using the font Marigold, designed by renowned typographer Hermann Zapf for AGFA Monotype. Before taking his type any further, Weinstein clicked on the Selection tool and then choose Edit > Copy. (You’ll need a copy of the type object for the opacity mask that you’ll make later in this process.)
Now Weinstein was ready to start styling his type. First, he made sure the type object was still selected and then opened the Appearance palette and chose Add New Fill from the palette menu. Weinstein clicked on the new Fill attribute in the palette and applied a gradient he built from brown colors sampled from the artwork to its left (see Figure 3).

Figure 3: The Appearance palette after adding the Fill.
One way to simulate a hand-rendered look is by applying the Roughen effect (see Figure 4). This will change the smooth, precise edges of an object to jagged or bumpy edges. To roughen your type object, make sure the Fill attribute is not selected (you can deselect it by clicking in an empty area of the Appearance palette) so that Roughen will be applied to the whole object. Then choose Effect > Distort & Transform > Roughen. In the Roughen dialog, adjust the Size, Detail, and Points controls. (Weinstein chose Size=0.5, Detail=6.5, and Points=Smooth for his title type.)
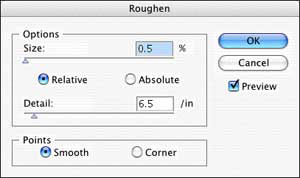
Figure 4: The Roughen dialog settings Weinstein used to distort the letter characters.
Going Negative
After he roughened the type, Weinstein then worked at chipping its edges. With the type object selected, he opened the Transparency palette, and, from the palette menu, chose Make Opacity Mask. Next, he clicked on the opacity mask thumbnail (the rightmost of the two thumbnails in the palette) and selected Invert Mask (see Figure 5). (Make sure you click the opacity mask thumbnail — Illustrator doesn’t automatically transport you into the negative space of the opacity mask after having created it!)

Figure 5: After making the opacity mask and clicking on the mask thumbnail in the Transparency palette (notice the thicker border around the thumbnail indicating that it is the current selection).
Lastly, Weinstein pasted the type he copied earlier (you’ll want to use Paste-in-Front instead of Paste so the copy will precisely overlays the original you copied).
Scribbling Your Way to Success
Changes made in the opacity mask will affect the transparency of the original type object — black artwork in the mask will punch holes in the original art. With the copy you just pasted still selected, choose Effect > Stylize > Scribble. In the Scribble dialog box, choose one of the readymade settings from the Settings menu, or customize the effect using the dialog’s controls. Weinstein started with the Sharp setting and then changed several of its values. With the dialog’s Preview enabled, he moved the Path Overlap slider to 0.04″ to thin some of the chips in the edges. He also changed the Angle from the default, 30°, to 15°, so the chips aligned better with the angles in the type characters.
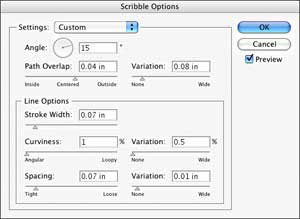
Figure 6: The Scribble dialog settings Weinstein used that chipped the edge of the type.
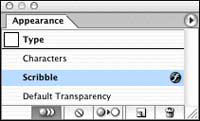
Figure 7: The Appearance palette showing the selected type object while it is “negative” space (the opacity mask).
Back to the Campaign Trail
Once you’ve finished with the Scribble effect, click the artwork thumbnail (the leftmost thumbnail) in the Transparency palette. If you forget to do this, you’ll be stuck in the “negative” world trying to make changes to art in the “positive” world — and wondering why nothing seems to happen.
If you need to edit the type — in order to change the text or modify its kerning, for example — you’ll have to do it in both the original type object and in the copy residing in the opacity mask.
For some edits you make to the type, like scaling or rotating, you only need to work with the type object. The opacity mask will be changed simultaneously with the type object.
Be sure to experiment with all settings in this technique. Different typefaces and font sizes will take to the technique differently.
This article was last modified on January 3, 2023
This article was first published on January 25, 2005
Commenting is easier and faster when you're logged in!

Recommended for you

What I Learned at CreativePro Week About Publish Online
One of my very favorite events is CreativePro Week, and this year’s conference,...

Easy SOQ Compliance
Learn the process for crafting winning proposals that conform to strict requirem...

Convert and Expand InDesign Artwork into Illustrator Paths
In an article on InDesignSecrets, I discussed making custom strokes for paths. B...