
Adobe has a checkered history of implementing 3D modeling. Its first foray into the medium was Adobe Dimensions (not to be confused with Adobe Dimension, singular) in 1996, a standalone app which provided basic extrude and revolve capabilities. Its unique approach was to create vector artwork in just a fraction of the time that other 3D applications could produce finished renders. The artwork could then be imported into Photoshop at any size and textured as required—if you had the requisite skills.
In 2003 Adobe dropped Dimensions and instead built a cut-down version of its 3D tools into Illustrator CS, providing basic modeling techniques. The functionality improved marginally over subsequent releases. Then, in 2010, they brought 3D tools to Photoshop CS5 (but only, at first, to the higher-priced Extended Edition). Adobe continued to enhance its 3D modeling environment in Photoshop, and in 2017 introduced Dimension, its 3D rendering environment that allowed models from Photoshop and elsewhere to be imported, textured, positioned, lit and rendered quickly and easily.
In 2021 Adobe announced that 3D would be dropped from Photoshop entirely in future versions. They also quietly dropped support for Dimension, instead releasing their Substance suite of 3D texturing and rendering tools. Substance has a steep learning curve, and consists of four separate applications; notably, and to much public consternation, it is not included in the Creative Cloud subscription, requiring a separate monthly purchase. Read the Open Letter to Adobe by Alan Gilbertson and Theresa Jackson for more details.
Now Adobe has brought us some interesting new 3D tools with Illustrator 2022. These are labeled as ‘Technology Preview’ – a euphemism for beta software that is still undergoing development. It is, nonetheless, available to all CC subscribers who have updated Illustrator. Here, we’ll look at its often impressive capabilities, as well as looking at its many shortcomings.
1. Extruding Artwork
Most kinds of artwork can be processed using the new 3D tools, which are found in the Effects > 3D and Materials menu. You can select multiple objects, including live text, and as long as you group it first it will be treated as a single piece of artwork. Choosing the Extrude button gives you this basic offset view of the extruded object.
You can rotate the object in 3D using the center dial, which allows you to rotate it freely by dragging the middle dot. You can also drag the outer circle, as well as the horizontal and vertical axes, to rotate it in each dimension. There are also numerical controls with sliders further down the 3D and Materials panel.
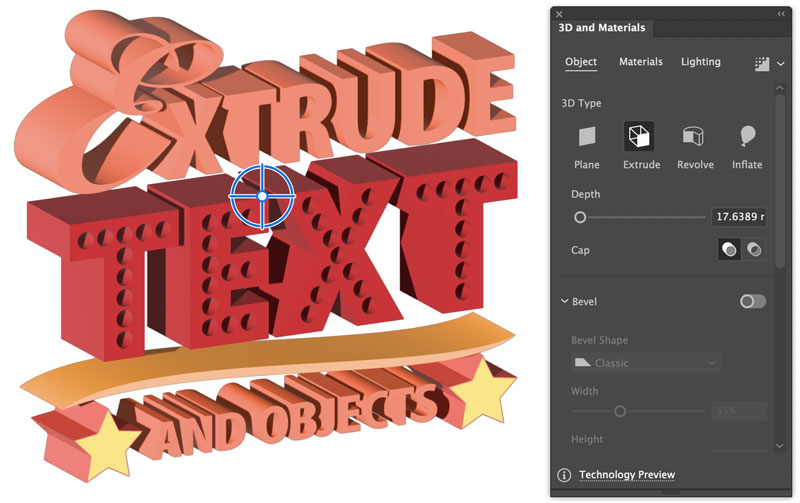
2. Adding a Bevel
A toggle switch turns on the Bevel controls. Here, you can set the width and height of the bevel, and choose the bevel shape from a range of presets – or you design your own bevel profile. You can also set the bevel to be recessed rather than raised, for a different effect.

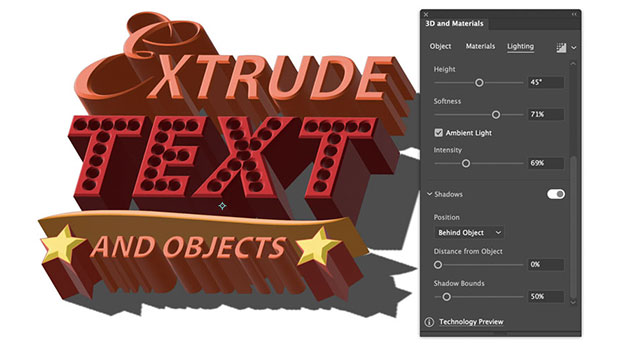
3. Lighting and Shadows
The Lighting tab allows you to set the height and rotation of the light source. This has to be done with somewhat unintuitive sliders, rather than a simple heads-up control on the artwork as is found in Photoshop; but since the lighting changes in real time as you drag the controls, it doesn’t take long to figure out how to make the adjustments.
Shadows can sometimes be clipped at the edges, if the light source is very low. The Shadow Bounds control allows you to extend the clipping so that the whole shadow is included.

4. Shadows Beneath
Shadows are added using a toggle switch, and by default they are displayed as if the object were lying flat on the ground plane. Changing the Position setting from Behind Object to Below Object allows you to light your objects as if they’re standing up.

5. Rendering Artwork
The view you get when manipulating objects is just a preview, and this is particularly noticeable in the shadows. The button top right of the 3D and Materials panel contains the Render controls, where you can turn on Ray Tracing to produce the final high-quality image. You can work with Ray Tracing permanently turned on, but it will make each change slow and cumbersome as it has to calculate each alteration. At present there is no way to adjust the opacity of the shadows.

6. Exporting Artwork
You can export artwork as a PDF, JPG or PNG file; you can also choose to set the Render controls to output vector images, although it should be noted that shadows will still be rasterized rather than output as true vectors. Importing an exported PDF into Photoshop shows that the shadows do have proper transparency.
You can also export 3D models created in Illustrator as .OBJ files using the Export panel. These can then be imported into other applications for modification or 3D printing.
7. Substance Materials
As well as using objects’ original colors, you can assign any of Adobe’s new Substance materials to them. 42 textures are included, and you can purchase more from Adobe Stock. Each of these materials has a wide range of controls to set the colors, size, repeat, height, and many more parameters; a single Substance material can produce a huge range of variations in appearance.
One significant drawback is that at present you can only apply a single Substance material to your artwork. If you want to combine different materials, you’d have to create and texture each object independently, matching the angle of view of each one.

8. Revolving Objects
As well as Extruding artwork, you can also Revolve a profile around either the left or right edge. Multiple objects can be revolved together, as long as they have been grouped first: so here, the blue pillar was created with three pink circles to the side, and the whole group revolved around the right edge.

9. Adjusting Revolved Objects
Although objects are revolved around either edge, you can tweak the Offset control to move the revolve axis away from that edge. This produces a fatter version of the finished object, as seen here.
You can also apply any of the Substance Materials to revolved objects, although once again only one material is permitted per group. In cases like this, it would be almost impossible to create this effect with separate objects, as they go behind each other.

10. Inflating Objects
The third 3D mode is Inflate, which – as its name suggests – makes objects look as if they have been pumped full of air. An interesting wrinkle here, which may not have been intentional, is that if you add a stroke to an object first, the fill and the stroke (seen here in red and blue) will be inflated independently of each other.

11. Plane Objects
The final 3D mode is Plane, which literally puts the artwork onto a 3D plane, allowing you to rotate it to the angle of your choice. This is the least impressive of all the 3D modes, mainly because of the lack of perspective in the end result. The ability to add a drop shadow is the only marginally useful tool here.

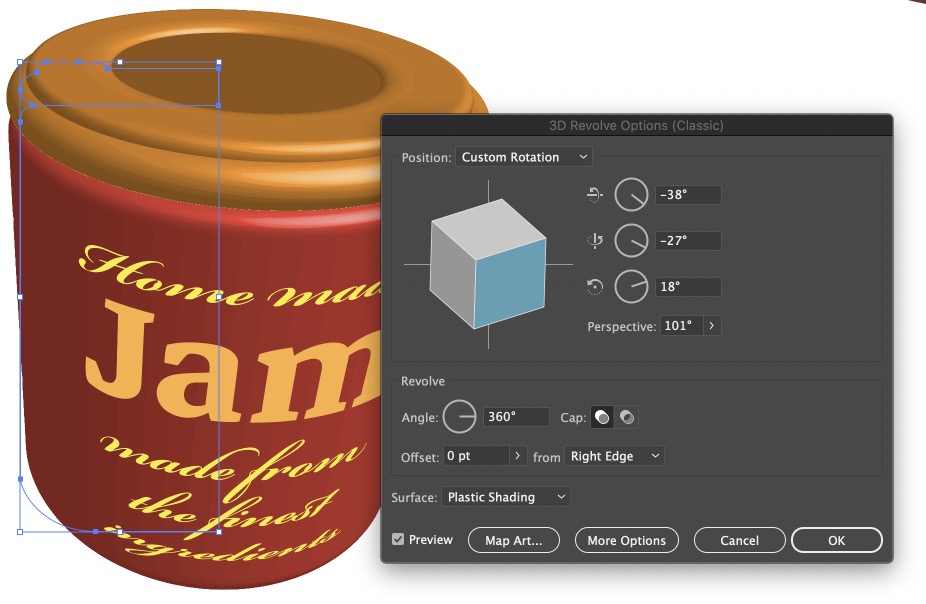
12. No Perspective
Perhaps the single biggest drawback of Illustrator’s 3D tools so far is the lack of a perspective view. All objects are displayed and rendered in orthographic projection, which is fine when you’re viewing them head on, but looks wrong when viewed at an angle – as this example demonstrates. The sides of the jar look as if they’re getting wider as they recede from the camera; in fact, they’re perfectly parallel.

Compare this with the same profile revolved using the old Illustrator tools (which are still available, under the Effect > 3D and Materials > 3D (Classic) menu). Here, the jar is shown in perspective. Note also that it is possible to map artwork onto the surface, which is not yet enabled in the new toolset.
13 Conclusion
The new 3D features in Illustrator are still in the early stages of development, and most of the shortcomings detailed here are planned to be fixed in subsequent releases. The January 2022 update, for instance, is scheduled to include both perspective views and the ability to apply mapped artwork onto objects. Other functionality, such as the ability to apply different materials to objects within the same group, will follow.
This version of the 3D tools is a new departure for Illustrator, and even in this first public release the technology shows a lot of promise. With the decline of 3D tools in Photoshop, and with a true 3D modeler yet to be incorporated as part of the Substance suite of apps, it could be that Adobe Illustrator – unlikely as it may sound – could prove to be your best bet for turning flat artwork into workable 3D.
Commenting is easier and faster when you're logged in!

Recommended for you

Building a 3D Scene
When you want to recreate an iconic image with photorealism it’s time to round u...

CreativePro Video: Recolor Artwork with Pantone Swatches
In this week’s CreativePro video, Theresa Jackson shows you how to easily find a...
The Secrets to Smoother Paths in Illustrator
Don’t let poorly placed points ruin your designs.