
How to Use InDesign’s Data Merge Feature
Colin Flashman shows you five essential techniques for variable data projects.

This article appears in Issue 52 of InDesign Magazine.
InDesign provides incredible power for laying out a document precisely and creatively, but what if you need hundreds or thousands of documents, each based on the same design but with custom data? That’s where InDesign’s Data Merge feature comes in handy. The Data Merge panel allows you to populate your InDesign layout with fields of a database or spreadsheet. It is best suited to campaigns that apply:
- One database record (or row in a spreadsheet) per one or two InDesign pages, such as business cards or direct mail campaigns
- One record to many pages, such as a personalized newsletter, raffle book, or numbered stationery
- Many records to one or more pages laid out as a grid, such as school yearbook photos or photography contact sheets
If you have ever used a word processing mail merge feature, you’ll feel comfortable with the four easy steps to using Data Merge:
- Create a base layout (a template).
- Choose a data source.
- Populate the base layout with the fields from the database.
- Output the merged documents to a finished file.
But that is where the similarity between InDesign and Word ends (see sidebar, “What Mail Merge Does that Data Merge Doesn’t”). This article won’t really teach you how to use Data Merge. The Data Merge panel itself (Window > Utilities > Data Merge) steps you through it in a pretty self-explanatory way, and you can find many tutorials on Adobe’s site and at creativepro.com. Instead, I’ll focus on how to use Data Merge effectively, explain some things you should know about it, and give you some tricks you can use to make awesome merged publications.
Caveat Designer
That said, as much as I like Data Merge, it does have a few quirks that you should know about before you begin.
These aren’t showstoppers, but they can cause headaches if they catch you unaware. For example, Data Merge behaves differently when you place the placeholders on a parent page rather than on a regular document page. Placeholders can be placed on a document page of your template, but new files generated through Data Merge are no longer linked to the original data in the resulting InDesign file. But when you put the placeholders on a parent page of your template, you retain a link to the original data in the new files you generate—and, if that data changes, you will see an Update Content in Data Fields option in the Data Merge panel menu. Note: You can apply placeholders on only one parent page spread. I have also seen some oddities, such as issues with previewing the data (prior to the merge) when you have single-record layouts with varying paragraph styles and when you have the Remove Blank Lines for Empty Fields option selected in the Content Placement Options dialog box (Figure 1).
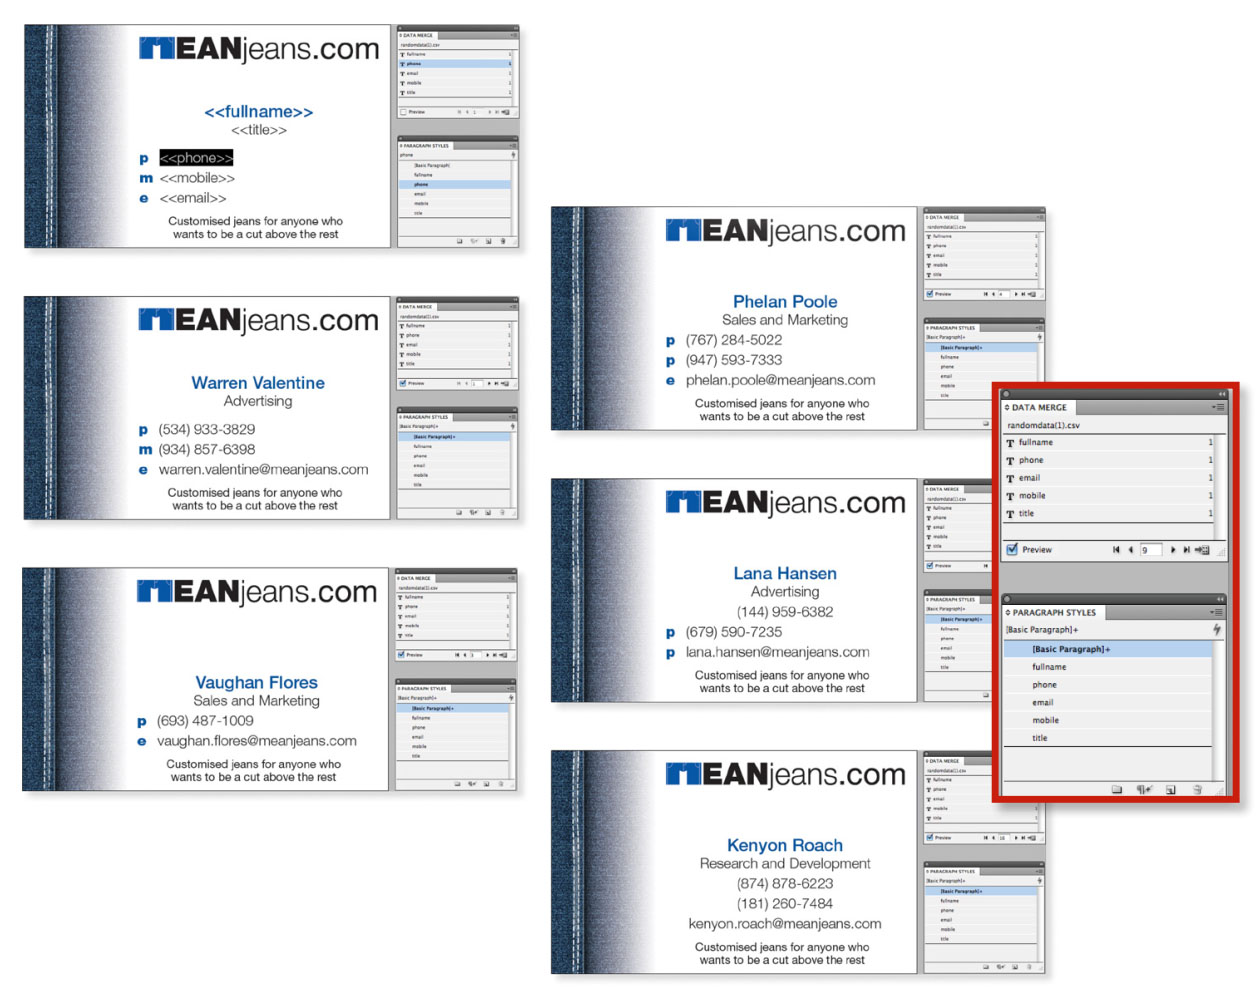
Figure 1. This business card has five placeholders, each with its own paragraph style. Not
all the records have all entries filled in. The first record’s preview appears correct, as all its
placeholders have values. The following records that do not have entries behave correctly,
and the empty line is removed as per earlier instructions. However, when a subsequent entry
appears with all records, the style of the line above is applied, rather than the appropriate
style. Toggling the preview off doesn’t resolve the issue, nor does using Undo. You must either
go back to regular view and reapply the formatting, or revert to an earlier correct version.

Figure 2A. These flashcards appear to be correct in the preview.
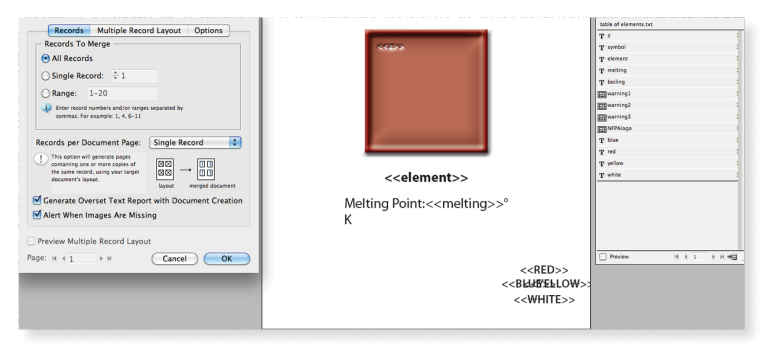
Figure 2B. When previewed during Export to PDF, the “symbol” field disappears completely, and the frame with the melting/boiling points has half disappeared.
Figure 2C. If you continue with this same export, a message warns of overset text.

Figure 2D. If this is disregarded and the exported PDF previewed, the records that had no placeholder preview at all are all replaced by the result of record 1; and the records that had their placeholders partially hidden (the boiling points) display the correct results.
Five Data Merge Tips
Here five of my favorite tips to make Data Merge work for you.
1. Get the merge right the first time
Time is money, and preparing files for a data merge is no exception. The more time you spend on fixing an InDesign or PDF file after a merge—because pictures or data didn’t import correctly—the lower the profit on the project will be. If your client or IT department is supplying your database or spreadsheet data, the onus should be on them to make sure their data is correct and complete. After all, there are few things worse than merging thousands of records and then learning that a new database is coming because they sent the wrong file! For certain projects, post-processing (merging to an InDesign file and then having to make additional changes prior to printing or exporting a PDF) is unavoidable. For example, you might use Data Merge to create the basic structure of a yearbook or catalog, but then need to customize the pages further. However, post-processing will lengthen the time a project takes, so avoid it if possible. As I’ve mentioned, the Data Merge panel lacks the small-but-powerful import options that Word offers, such as filtering, sorting, and if-then-else statements, to name a few. However, most databases and spreadsheets (such as Excel) do offer these kinds of features. So massage the data as much as possible before you export it to a TXT or CSV file for Data Merge. For example, if you’re working with prices, but the data in the spreadsheet has three or more digits after the decimal point (like $4.356), do yourself a favor and format it to round or truncate to just two digits before you export. Otherwise, that will be a hassle to fix in InDesign. Similarly, if you want records sorted by a person’s last name and filtered so you end up with only those from the state of Kansas, you’re going to be much happier if you handle all that formatting and filtering before exporting, too.
2. Understand pictures and fitting
If all your data is text, then count yourself lucky and skip this section. That said, you can achieve some brilliant effects by importing variable graphics and photographs along with your text, so it’s worth paying attention. InDesign makes importing a different image for each data record easy, but only when you follow a few essential rules. Accurate paths and files: The first rule is that InDesign needs an accurate path and file name for the image (remember, the data is text only). But for efficiency and sanity’s sake, it’s really helpful to have all your images in the same folder as your data file. This way, your data file doesn’t have to list the precise full path location—just the file name. InDesign is smart enough to know that if no path is specified, it should look in the same folder as the data file, so images always link properly. This is even more important if you’re importing data over a network. Tagging the header for image fields: This is important—the header of that specific field (the top row in the spreadsheet) must start with an @ symbol, the code that tells InDesign that this field is an image path. Unfortunately, if you’re creating your headings in Excel and you begin a field with @, you’ll get the error “That function isn’t valid.” (This symbol is treated as the start of a formula from the archaic Lotus 1-2-3 software days, but the program remains compatible with its syntax.) The workaround is to add an apostrophe before the @ symbol (e.g., to create the header @images, you would need to type ‘@images in the formula bar) to make Excel understand that this cell is to be treated as text, not a formula. Placing image fields: To control how an image will appear within an image field, choose Content Placement Options from the panel menu. You’ll see the dialog box shown in Figure 3.
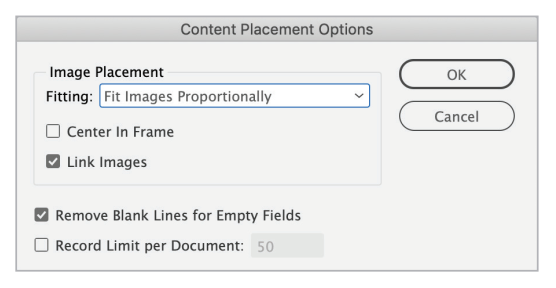
Figure 3. The Content Placement Options dialog box
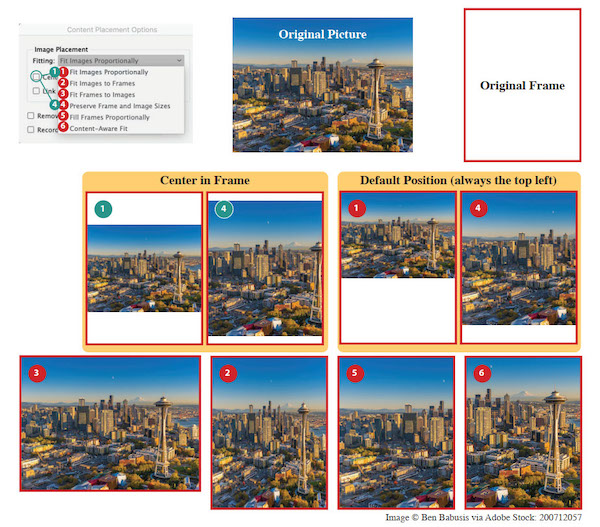
Figure 4. You have eight options for importing an image field with Data Merge.
3. Split up static and dynamic
VDP campaigns that involve images can also generate an enormous amount of data to be processed by the output device. I typically set up my artwork with two layers: Variable and Static. Items that are to be the same on every record appear on the Static layer, and variable data items appear on the Variable layer. Setting up the artwork in this fashion allows me to process the variable data in one of three ways:
- Offset-print the static data and digitally print the variable data. This is generally the case for VDP campaigns that have only black variable text, while all images and color live on the static data layer. The Static layer is printed offset, and then the Variable layer is overprinted onto these “shells.” This method can be more economical than printing the campaign completely digitally in full color.
- Print the project completely digitally, but use a technique on the copier to combine layers. EFI’s Fiery RIP has a VDP feature that allows a base file (the Static layer) and a variable file (the Variable layer) to be combined. It is similar to the offset method mentioned above, but it allows more sophisticated combination of the data, much like placing one PDF on top of another in an InDesign file. For example, this feature would allow your variable data to appear in reverse, as white text knocked out of a dark static background—obviously impossible with offset-printed shells. This method is typically used for VDP campaigns that have shorter runs but have many graphics and effects that would otherwise take a long time to process.
- Print the data digitally direct from InDesign or a PDF created in InDesign. This is the way familiar to most users—merge the file either to a new InDesign file and then print it directly, or export it to a PDF to print. This method can also create huge files and take a while to process, but it is the most flexible option.
4. Data merge to a story
As I mentioned earlier, Data Merge can’t directly merge into a single text frame—it just duplicates your frames repeatedly—which makes it difficult to create directories or any kind of data that you want to flow from one page to the next. Fortunately, there are a couple of workarounds. First, you could merge your data as usual, and then use a plug-in or script to thread all your frames together into one story. Two tools you can use:
- TextStitch, a free plug-in from Rorohiko Workflow Resources
- Merge Text Frames, a free script from Ajar Productions.
Then, once all the frames are threaded, delete any excess pages and frames and autoflow the text however you want. An even-more-intriguing method is to use one of two free scripts by Loïc Aigon that let you data-merge into a table (CSVtoTables.jsx) or a series of anchored objects (InlineMerge.jsxbin). David Blatner wrote about these scripts years ago in his CreativePro post “Using Data Merge to Create a Table for a Directory,” but he left one important thing out: After you run the CSVtoTables script, you can convert the table to text (Table > Convert to Text)! When you do so, you effectively create a story that can flow from page to page even more flexibly than a table can. I should mention, however, that all these methods break the link to the original data file, whether or not the data was merged on a parent frame. Whenever you break the link, you cannot update the data later on.
5. Bring the merge to life using InDesign’s effects
I hate to say it, but most personalized mail that I’ve received has been… boring. For example, apart from my address, the only real personalization is the “Dear Your Name” component. I mean, come on! If you’re going to go through the trouble of a VDP campaign, apply some imagination! If someone would send me a personalized card with my name written in the clouds or looking like it was actually etched into wood, then it would feel like someone made this piece especially for me—and I’d be far more likely to pay attention to it. When making designs with artistic effects applied to the text, think about which font would be most appropriate for the effect you choose. It is unlikely that typical body text fonts would be used; instead, consider wacky and blocky fonts. For example, use a “dotty” font for stitching, a blobby font for water effects, and so on. See Figures 5 and 6 for some creative visual ideas for merging text.
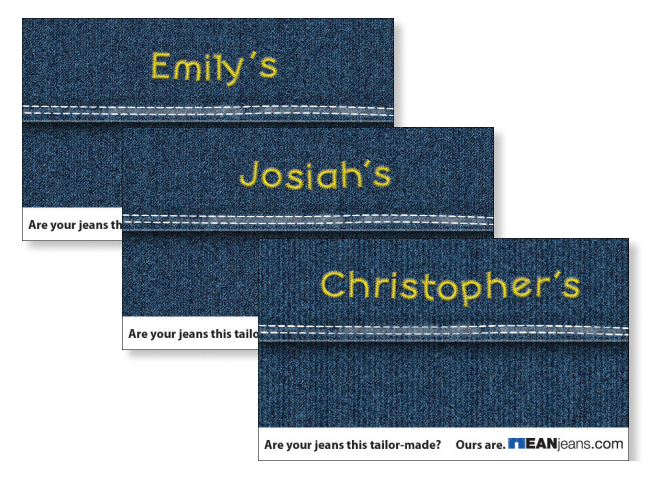
Figure 5. A blue-jeans campaign made by creating a jeans background in Photoshop and adding the client name but applying a font and effects to make the type appear to be incorporated into the jeans.

Figure 6. A word search campaign meant for classrooms. The word search is a real puzzle and really does contain all the names on the right-hand side, including the variable name of the student. The merge works because of the monospaced font and because the variable data has been placed into a frame which stops where the word search stops, so excess letters are hidden.
Warning: When creating fancy, variable data effects, be careful that the effect is not so convincing that the person for whom the product is customized overlooks the fact that the item is unique for them!
Merge It!
Data Merge certainly won’t solve every data-publishing need, but it’s so versatile that it’s certainly practical for a wide range of projects. With a little work up front to make sure your data and templates are set up correctly—plus a little ingenuity and a couple of free add-ons—you’ll be on your way to a super-efficient workflow!
Commenting is easier and faster when you're logged in!

Recommended for you

Using Paper Color to Help Distinguish Various Files
I’m currently working on a complex manual regarding a marine electrical sy...

Easy as Pi
Back in the days of hand-set type, all the little character blocks for a given p...
Proper Typography for Websites
In a previous post on my website, I wrote about the differences between typewrit...