

Many years ago, I read The Divine Proportion: A Study in Mathematical Beauty, and ever since then, I’ve been intrigued by the Fibonacci sequence, the divine proportion, and the golden spiral. The golden spiral, also known as the golden ratio, a mathematical equation (and inspiration behind the Spiral tool in Adobe Illustrator), can be seen when looking at naturally occurring examples within nature. Hurricanes, when viewed above from space, galaxies, nautilus shells, and even pinecones, to name a few, all follow the golden ratio.
Spirals can be used in your designs to create design assets and patterns or as a golden ratio in your logo designs!
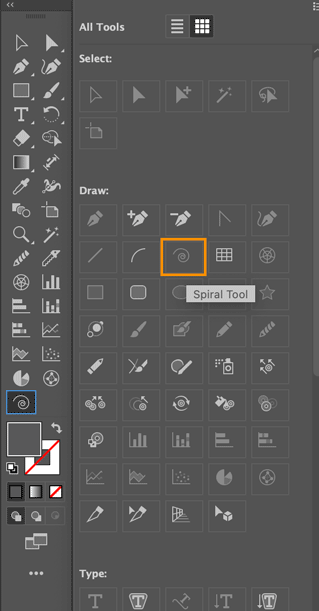
To start, click on the three dots at the bottom of your toolbar to open the Edit Toolbar options. Once the All Tools drawer has opened, you can select the Spiral tool and get started, or you can select your tool and drag the Spiral tool to your toolbar to save it for convenient use.
Tip: Hover over the tools to see the name of each tool.
Select the Spiral tool and either click and drag your mouse to the preferred size on your artboard. Or click anywhere on your artboard to open the Spiral tool dialog box. When opening the Spiral dialog box, you will have the option to customize the tool’s Radius, Decay, Segments and Style settings.
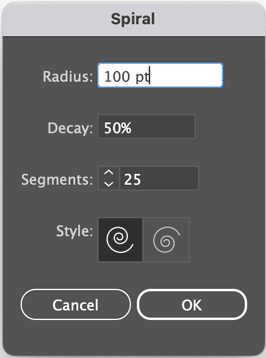
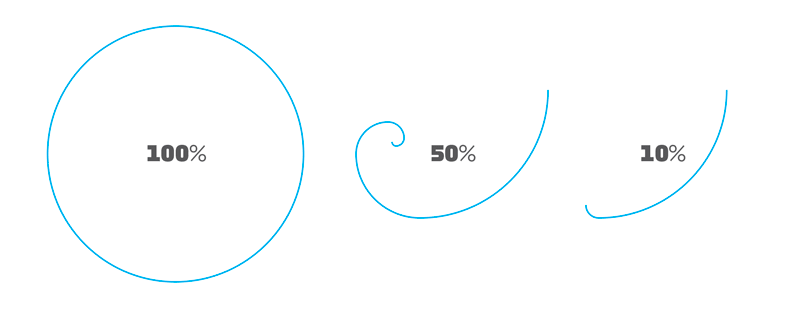
The Radius setting adjusts the width or height of your segment, while the Decay setting is the radius of each following segment multiplied by the percentage you enter in the dialog box. A setting of 100% will result in a circle, while 10% creates a curved path.
Your Segment setting can be adjusted to your preferences. For example, adjusting this setting to 25 will result in a continued inward spiral, while decreasing the setting to 5 will result in more of a curling path.

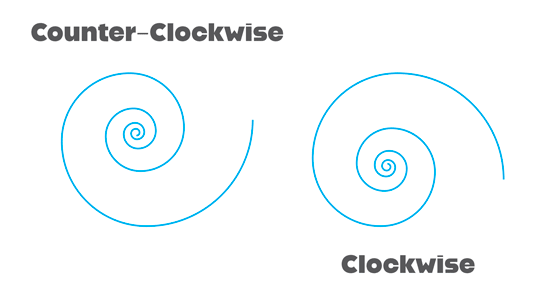
Finally, the Style setting allows you to choose the direction of your spiral between counter-clockwise and clockwise.
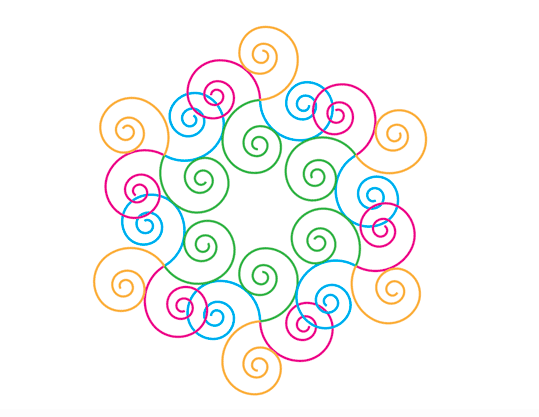
Creative Bonus tip: With your newly created spiral selected, change the stroke color and then head on over to Object > Repeat > Radial and kick your spirals up a notch!
Happy Creating!
This article was last modified on November 5, 2024
This article was first published on November 5, 2024
Commenting is easier and faster when you're logged in!

Recommended for you

Interview with Amy Balliett, Visual Strategist
Q&A with Amy Balliett, who is presenting at The Design + AI Summit 2025

Tip of the Week: Right-click to Reveal
This tip was sent to Tip of the Week email subscribers on June 26, 2015. Sign up...
How to Choose and Use Script Typefaces
Nigel French offers a guide to some of the most beautiful and expressive typefac...