

Adjust the color palette
Unfortunately Dina still looks a little odd and out of place, and it’s because we have a white balance problem. Her picture was taken indoors with flash, which is color balanced to 5500°K, like daylight. But the background photo was taken during sunset which has a much warmer look than daylight. We need to bathe Dina in orange sunset light to make her appear natural in this setting. There’s a command that can do just that.
Click Dina’s thumbnail and choose Image>Adjustments>Match Color from the Main menu. Before entering this command, you always have to select the layer that you want to change. This is referred to as the Target layer. If the Match Color command is grayed out, perhaps you selected the layer mask thumbnail by mistake.
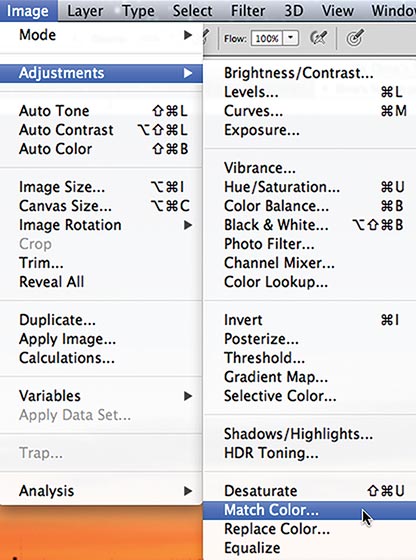
Choose Match Color to apply the colors of one layer to a different layer.
The top section of the Match Color dialog box lets you adjust the Destination Image. Make sure that Dina’s layer is listed as the Target, but leave the Image Options settings alone.
The bottom Image Statistics section lets you specify a Source for the color. Click the Source pop?up menu and choose Dina Final.psd (our current file). In the Layer pop?up menu below that, choose Background for the layer. That’s where our sunset colors are.

In the Image Statistics section, choose Dina Final.psd for the Source and Background for the Layer.
Look at poor Dina now. She’s even more orange than the sunset. That won’t do. In the Image Options section, move the Fade slider to the right to reduce the effect. I decided on a Fade value of 80. Click OK to accept the Match Color adjustments.

A Fade of 80 undoes 80% of the effect.


Match Color was applied at full strength in the image on the left and faded to 80% for the image on the right.
Adjust the overall luminosity
One final tweak. Dina looks a little too bright for sunset conditions, especially the white patterns on her sweater. Add a Curves adjustment layer above the Fringe Pixels layer and Option+Click/ Alt+Click between the layers to clip it to the Dina layer. We want to darken her, not the background photo.
Click the White Point on the Brightness curve and drag it downwards to darken the image overall. I moved it down until my Output value reached 230. Choose a setting that looks right to you. This adjustment toned everything down, but mostly the whites.

Drag the White Point down for an overall darkening effect, concentrating more heavily on the highlights.

The final composition has a natural look to it, blending into the background and fitting into the lighting conditions.
Final Thoughts
Extracting an image and placing it into a new background is far more involved than a simple cut and paste, especially if hair is involved. But with good masking techniques, a few compositing tricks, and a good measure of patience, your images will feel at home in their new locations.
Don’t forget to help yourself with a little good planning, too. If you know in advance that you will be placing your subject into a new background, seek out a location with a similarly colored background if possible. Failing that, choose a non?textured backdrop that contrasts nicely with the subject’s hair. Then let your Photoshop skills take care of the rest.
Speaking Photoshop
This article is an excerpt from Speaking Photoshop CS6 by Dave Bate.
You can also download this excerpt as a PDF.
Reprinted, with permission of the publisher, from Speaking Photoshop CS6 © 2012 David Bate. All rights reserved.
For further information, visit speakingphotoshop.com.
This article was last modified on July 20, 2021
This article was first published on April 5, 2013
Commenting is easier and faster when you're logged in!

Recommended for you

50% Off All Photoshop Software from Alien Skin
Alien Skin software, makers of Photoshop plug-ins and iPhone apps for photograph...
Importing Photos in Adobe Photoshop Lightroom 4: Part 1
Renaming catalog images later Although it is always best to rename files at the...

Work That Text: The Power Behind Typographic Collages
Direct Impact The principal reason for the presence of copy in a piece of design...