

Adjust Edge section
The Adjust Edge section lets you fine tune your mask in a number of ways. Smooth removes jagged edges in the mask, not needed in this case. Feather applies an overall softening to the entire mask edge, also not needed here. Contrast is sometimes useful in bringing back ghosted edges of well defined areas caused by high radius values. Unfortunately, increasing the contrast can also cause hair to look too wet, so use it carefully. Shift Edge is probably the most used option. Slide it to the left to contract your selection, and slide it to the right to expand it. Shift Edge is often used to reduce color fringe by contracting the selection. In this case, it helps remove the fine white line along her left arm but at the expense of the hair. Leave all of the Adjust Edge values at zero.
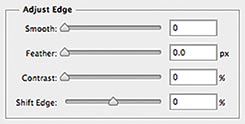
Adjust Edge lets you make global changes to your mask.
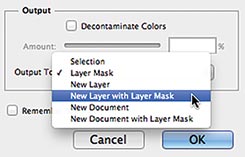
New Layer with Layer Mask gives you the flexibility to edit the refined mask manually or go back to the original.

Decontaminate Colors works similarly to the “Fringe Pixels Layer”trick, but applies the changes destructively to the image, limiting the possibility for future edits.
Output section
What do you want to do with your Refine Mask edits? The Output To pop-up menu lets you alter your existing Selection or Layer Mask, or you could create a New Layer, New Layer with Layer Mask, New Document, or New Document with Layer Mask. Select New Layer with Layer Mask.
The Decontaminate Colors check box eliminates fringe pixels similarly to the manual method discussed with the bear, except that it applies its color directly to the image, not on a clipped layer above it. I prefer the nondestructive method we talked about earlier. It’s almost as easy and it’s more flexible. Leave Decontaminate Colors unchecked.
Check the final result
Back in the View Mode section, click the check box for Show Original to compare before and after results. We’ve come a long way. Just out of curiosity, cycle through the various View options and take note of how nice Dina looks against a white background.
We’ve accomplished what we can in the Refine Mask panel. Click OK to accept the results.

The improvements are obvious, but Dina’s hair looks a little flat in some areas, and there’s a thin white line along her left sleeve.
Remove the thin white line
Refine Mask did a great job, but chances are you’ll find a few spots in need of attention. That’s why it’s so important to become well versed in the manual masking techniques we discussed earlier. Let’s start by fixing the thin white line along Dina’s left arm.
Make sure the mask thumbnail is selected and has a border around it. Select the Brush tool, choose a small brush size with 0% hardness, and make your foreground color black. Not only does the sleeve have that thin white line, it also appears to be more in focus than the right arm. How large should the fuzzy brush be in order to achieve the proper focus? That’s strictly a trial and error proposition. I ended up using a 25 pixel diameter brush and eliminated the white line by clicking on the bottom of the sleeve, then moving upwards and clicking again while holding Shift to “connect the dots.” Carefully work your way up the sleeve. If you make a mistake, correct it by painting with white.

Magnify the image and carefully remove the white line by Clicking and Shift+Clicking your way up the sleeve.
Examine the mask for imperfections
Option+Click/Alt+Click on the mask thumbnail to view it by itself. Here you’re apt to find some problem areas that might otherwise go undetected. Most likely, you’ll find some gray areas well within Dina’s hair. Those are areas that Refine Mask attempted to blend but shouldn’t have. Option+Click/Alt+Click the mask thumbnail to return to normal view, and you’ll see that those areas are void of contrast and look too flat. Return to mask view and carefully clean those areas up by painting with white. Check for missing pieces of sweater, too. I had a few of those spots that needed attention. Work carefully and stay away from the outer most edges of frizzy hair. Those areas should look grayish. Work in proper context by toggling constantly between mask view and normal view.

Mask View lets you discover and correct imperfections that would otherwise be hard to catch.
Remove the fringe pixels
Our mask should be pretty good by now, but take a look at Dina. She’s still exuding a little bit of that holy spirit aura. That’s caused by those pesky fringe pixels, and it’s similar to the greenish color cast problem we had with the bear. Removing the green fringe pixels ended up being a fairly simple process. Let’s try the same procedure here.
- Add a new layer above Dina and name it Fringe Pixels.
- Change the layer’s blending mode to Color.
- Option+Click/Alt+Click on the line separating the Fringe Pixels layer and Dina’s layer to form a clipping mask.
- Select the Brush and Option+Click/Alt+Click on Dina’s hair to make brown th
e foreground color. - Paint over the white fringes with the fuzzy edge of your brush to remove them.

Painting with a dark color in Multiply mode works well if fringe pixels need to be darkened. Reduce the layer opacity if the effect is overdone.
Great! That didn’t do a darn thing. She still looks like a holy spirit. What went wrong?
Remember, Color mode converts a pixel’s hue and saturation to match that of the foreground color, but it leaves the luminosity untouched. That was just the ticket for the bear, but we don’t have a hue or saturation problem with Dina’s photo. Instead we have a luminosity problem. Color mode can’t help with that, but fortunately there’s a blending mode that can. Change the layer blending mode from Color to Multiply and watch her hair darken. It worked! A little too well, in fact. Reduce the opacity of the Fringe Pixels layer until it looks natural. Now Dina looks like a mere mortal again.

By painting on a clipped layer in Multiply mode, we were able to eliminate the white glow around Dina’s head.
This article was last modified on July 20, 2021
This article was first published on April 5, 2013
Commenting is easier and faster when you're logged in!

Recommended for you

How to Digitize a Film Archive with Adobe Lightroom or Adobe Camera Raw
Digitizing an archive of film images can be a time-consuming process. Instead of...
Pantone 2.0: After 45 Years, the Sequel to PMS
On September 5, 2007, Pantone announced an entirely new spot-color-matching syst...

Scanning Around With Gene: One Ringy-Dingy, Two Ringy-Dingies
In the annals of great American institutions, American Telephone and Telegraph,...