


Edge Detection section
The Edge Detection section is where most of your work will be done. In a nutshell, Refine Mask divides your image into three regions:
- An area that is completely revealed by the mask.
- An area that is completely hidden by the mask.
- A transition area, where Photoshop decides what is revealed or hidden. This area can include transparency.
We made our preliminary decision regarding the areas to be revealed and hidden when we created our initial, rough selection. Now we have to define that transition area, and we do that by creating a Radius.
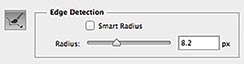
This setting creates an 8.2 pixel radius around the edge of the mask, where Photoshop decides what is revealed and what is hidden.
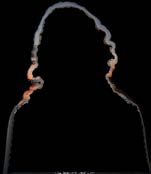
Drag the Radius slider to the right and watch how Dina’s hair begins to blend into the surroundings. But as the hair loses that dreaded cut?with?scissors look, other problems begin to creep in. If you go too far, the edges of her sweater begin to look ghostly and that shadow along her right arm reappears. What’s going on?
Click the Show Radius check box back in the View Mode section. The highlighted region represents the radius we just defined, and that’s the area where we are asking Photoshop to make the masking decisions for us. Drag the Radius slider back and forth and watch that region shrink and grow. Uncheck it when you want to see the full image.
The problem with using the Radius slider for this particular image is that it creates a uniform radius throughout the entire image. But what we really need is a large radius around Dina’s hair, but little to no radius along the well defined lines of her sweater.

A large radius makes the hair blend better, but it adds transparency to the sweater.

Click Show Radius to view the area where Photoshop makes the masking decisions.
Smart Radius narrows the radius in areas that have well defined edges.
The Smart Radius check box tries to address this proble
m. Adjust the Radius slider so it surrounds the edges of Dina’s hair (approximately 70 pixels works), then click the Smart Radius check box. Did you see how portions of the radius became narrower? Photoshop looked for well defined edges and reduced the radius accordingly. But notice how that shadow along her right arm is still showing. As far as Photoshop is concerned, the color of the shadow is a closer match to Dina’s sweater than it is to the white wall behind her. So it’s logical that Photoshop would include that in the visible portion of the mask. We need to tell Photoshop that the shadow doesn’t belong there. Here’s how we do that:
- Deselect the Smart Radius option and reduce the Radius slider until the shadow along her right arm disappears.
- Select the Refine Radius tool to the left of the Edge Detection section. This tool allows us to define our radius region manually. It’s much more flexible than the Radius slider or the Smart Radius option, because we can make the radius as wide or narrow as we want, where we want. Paint over Dina’s hair until it blends nicely. Change the brush size using the square bracket keyboard shortcuts ([ or ]) and make sure you include part of her hair and part of the background as you paint. Photoshop analyzes the colors of Dina’s hair and the wall behind it, then makes a pixel?by?pixel decision as to what is revealed and what is hidden. If you mistakenly create a radius that is too large, Option+Drag/Alt+Drag with the Refine Radius tool to erase it. You could also use the Erase Refinements tool to do the same thing. It’s located under the Refine Radius tool.

The Refine Radius tool lets you create a radius of varying widths.

Use a large radius in areas that need it, such as the hair, but leave it narrow for well defined lines.
This article was last modified on July 20, 2021
This article was first published on April 5, 2013
Commenting is easier and faster when you're logged in!

Recommended for you

Adobe Launches Creative Cloud Market
Adobe Creative Cloud subscribers now have access to the Creative Cloud Market—a...

The Power of the Gradient Tools in Lightroom
Learn how to use gradients in Lightroom to add drama to a flat sky or brighten s...

How to Shoot Raw Photos on Your iPhone (and Why You’d Want To)
You don’t need a DLSR camera to reap the benefits of the raw image format.