How to Draw a 3D Ribbon in Adobe Illustrator, part 2

Anchoring the Lanyard in the Real World
By now, half your lanyard should have a high degree of realism. There’s just one more mesh to create before rep
eating the light and shadow work on the other half of the lanyard. That new mesh is what anchors the lanyard to the real world, providing context for the 3-dimensional twisting and turning of the fabric.
1. Lock your light and shadow mesh layer but keep it visible.
2. Turn on the duplicate you made earlier, the one we named “Cast Shadow,” and move that layer beneath the actual lanyard in the Layers panel. The order of your layers should match mine (see Figure 17), with “L&S” being my light and shadow mesh and “Ribbon” the actual colored rectangle and text.

Figure 17: The order of the lanyards components in the Layers panel.
3. Select the “Cast Shadow” mesh and, on the Transparency panel, set the blending mode to Multiply. The Multiply blending mode will apply darker colors in the mesh to whatever colors or imagery you later put behind the mesh, while omitting any shades that are lighter than the background. The net effect will be realistically blended shadows. Keep the opacity at 100% to enable deep shadow; less to soften the shadows.
4. The shape of the Cast Shadow mesh should loosely follow but not mirror the shape of the lanyard—that would be unrealistic. So distort and color it to create credible shadows cast by turns, twists, and puckers of the lanyard relative to the light source direction you chose (see Figure 18). When you color it, remember to use only shades of grey because of the Multiply blending mode.

Figure 18: Note that the Cash Shadow intentionally deviates from the shape of the lanyard in several places.
5. Either after distortion and color or during, soften the edges of your cast shadow with Gaussian Blur (Effect > Blur > Gaussian Blur). I used 7.4 px as my Gaussian blur setting, but select what looks best to you, with your object. The lower the Gaussian Blur setting, the sharper your shadows, which implies that the object is closer to its shadow as well as fewer and closer light sources.
6. When this half of the lanyard is exactly the way you want it, give the other half highlights and shading and a cast shadow as well (see Figure 19).

Figure 19: Now both halves are done, including their individual mesh distorted rectangle and text groups and the two separate gradient mesh objects for lighting on the lanyard and cast by it.
Final Thoughts
From a distance (or zoomed out), the lanyard should look very close to photo-realistic. Enlarged, however, the illusion of a photograph might not hold up. We built a quick sketch to present an idea; if your illustration is destined for high-resolution work or print, spend a little more time on the shading. I would also strongly recommend working more with the scribbled pattern, varying its colors and texture to look more realistic—perhaps through multiple meshes with their own blending modes. Giving your lanyard volume by thickening the edges shown to the viewer by folds or rotations would also go a long way toward creating realism. That too can be accomplished easily by layering multiple mesh objects with slight fluctuations in their shapes.
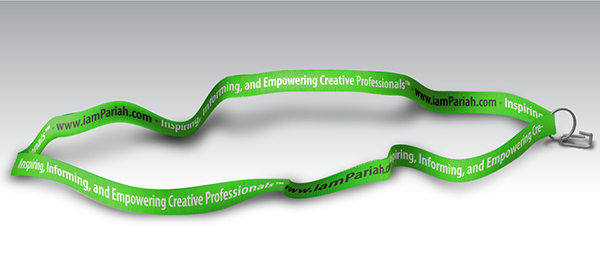
Finally, add a clip and maybe a ring to complete the lanyard. These objects aren’t mesh warp objects, though you might want to employ gradient meshes for their coloring or at least their cast shadows (see Figure 20).

Figure 20: Adding a little hardware—and corresponding gradient mesh shadows—completes the project.
This article was last modified on January 18, 2023
This article was first published on June 17, 2013
Commenting is easier and faster when you're logged in!
Recommended for you

CreativePro Video: How to Use Camera Raw in Photoshop
In the following CreativePro video, Michael Ninness shows us how to use Camera R...

Photoshop Tip: Auto-Select a Layer
When you’re working in a Photoshop document containing multiple layers, it...

How to Turn a Photograph Into a Cartoon in Photoshop
Learn the simple steps for creating a seemingly hand-drawn cartoon from a photo,...


