

Are you beach body ready? Or is your doubtless athletic physique marred by unsightly tan lines? How do the perfect models in image libraries manage to avoid the tell-tale signs? Here’s a way of using Photoshop to bring those paragons of beauty down to our human level, by adding sunburn to this lightly tanned figure.
Step 1: Choose your body
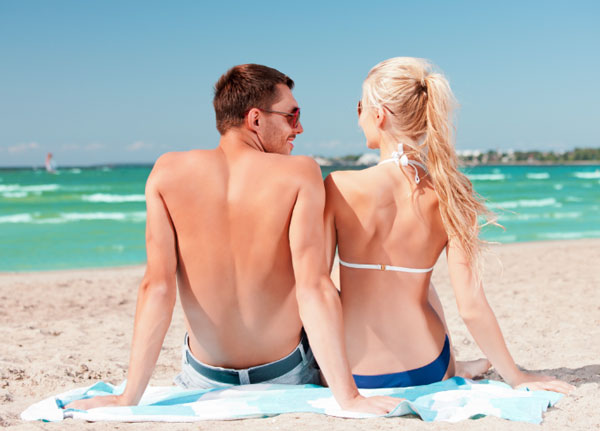
This handsome beach couple will suit our purposes well. Let’s bring that smug hunk down a notch or two by showing where he wore his T-shirt.
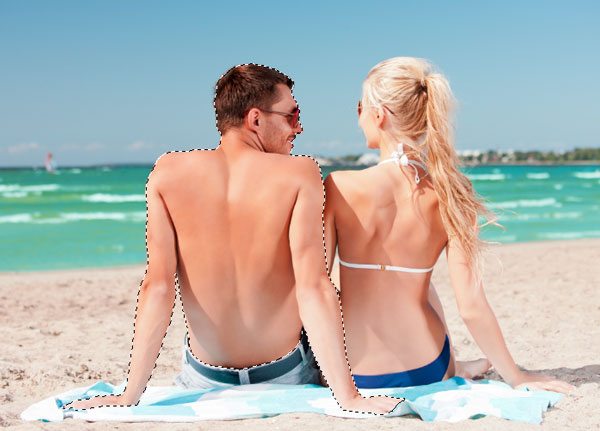
Step 2: Select the body
The easiest way to select the body is to use Select > Subject. This will select both the male and female models, so you’ll need to modify the result so only the man is selected. You can do this using the Select and Mask dialog, or – if you’re in a hurry – just use the Lasso tool to deselect the areas you don’t want (shortcut: hold Option/Alt before you start to draw to remove the new selection from the old one). Then copy the body to a new layer.
Step 3: Add the sunburn
From the bottom of the Layers panel, add a Hue/Saturation Adjustment Layer, and click the bottom left button on the Properties panel to make a clipping mask with the layer beneath, so it doesn’t affect the whole image. Drag the Hue slider to the left to add a red tint, and lower the Lightness slider until you achieve your required amount of burn.

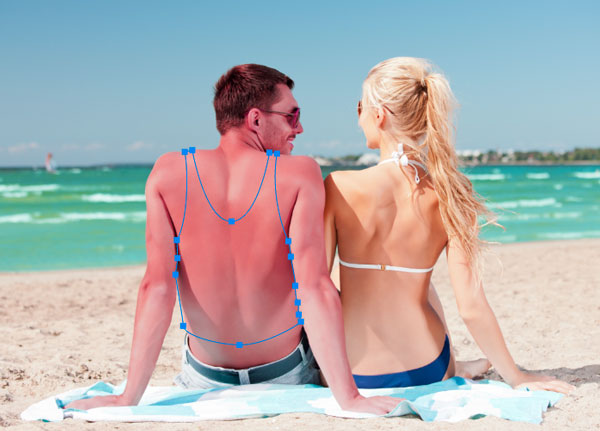
Step 4: Draw the T-shirt
Use the Pen Tool to trace the area where the T-shirt used to be, then turn that path into a selection with the Enter key (laptop users, use Command/Ctrl and the Return key). Or, if you don’t like the Pen Tool, you can skip to the next step and paint on the mask instead.
Step 5: Mask the T-shirt area
On the Adjustment Layer, fill the selected area with black to mask it (shortcut: press the D key to set the foreground and background colors to white and black, then use Command/Ctrl Backspace to fill the area with black). If you’ve skipped the Pen Tool in step 4, you can just paint in black on the mask instead.

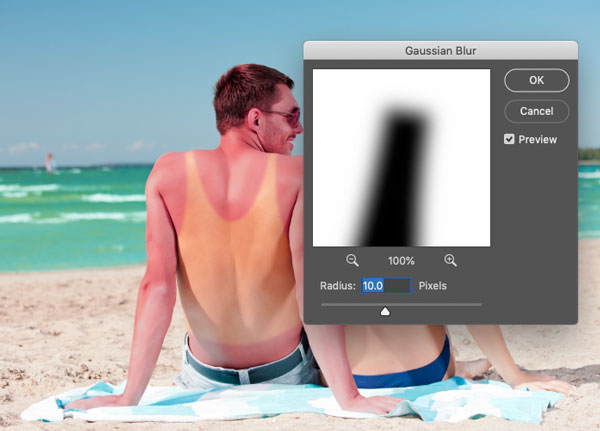
Step 6: Soften the edges
The hard edge produced by the Pen Tool is too crisp to be believable. Use Filter > Blur > Gaussian Blur to soften the edges on the mask.
Step 7: Lower the opacity
All looking a little too strong? Take the opacity of the Adjustment Layer down to, say, 60% to produce a more subtle effect.

Step 8: Limit the sunburn
For a better result, paint in black with a soft-edged brush on the Adjustment Layer mask to remove the sunburn effect from the man’s face and hands. Take that, Mr Perfect.

This article was last modified on July 19, 2021
This article was first published on March 9, 2020
Commenting is easier and faster when you're logged in!

Recommended for you

CreativePro Video: Swap Faces in Photoshop
In this week’s CreativePro video, Jesús Ramirez shows a fun Photoshop trick for...

Photoshop, Illustrator, and InDesign New Features Guides Updated for 2023
These free reference guides are a unique resource for understanding the evolutio...
Mastering Photoshop Smart Objects: Layer Comps
If you need to develop several versions of a composition in Photoshop, Layer Com...