


Here are step-by-step instructions so you can make a single-image graphic that can be sent via email from a publisher like Publisher’s Weekly.

Anatomy of an effective book promotion
A book promotion eBlast graphic is all about making people want to buy the book. It should grab the reader’s attention, sell them on the book, and link to the action you want them to take (buy or pre-order the book).
A book eBlast includes:
- Cover image, sometimes a 3D mockup that looks like a printed book
- Author’s name plus other contributors, like the illustrator or photographer
- Publisher’s name
- Brief description of the book
- One or more book reviews
- Call to action like “buy it on Amazon,” or “request an ARC” (Advanced Reader Copy)
- Age range if promoting a children’s book
- Publication date if the book isn’t out yet
- Other titles and covers if you’re promoting a series
- Graphic elements from the books’ branding
- May include other details such as size of the book, book’s ISBN (International Standard Book Number), or price
Typical technical requirements
The following requirements are from Publisher’s Weekly’s current specifications. It’s important to check the newsletter publisher’s exact specifications before you start. Sometimes this information is on their website, sometimes you can email the production manager. Production managers have always been helpful when I’ve contacted them.
- Size: 600 px × 800 px 72 dpi RGB
- File weight (its size in megabytes): no more than 5mb
- Final output: PNG, JPG or GIF
- Additional details: a subject line and a link destination
Gather your design elements
Here’s what you’ll need to get started:
- A mockup photoshop workspace
- A hi-res layered Photoshop cover document, or the best available art of the cover
- To know the cover display font
- An illustration from the book if using
- Text for the ad: reviews and book details
Make a sketch first, so you have an idea what elements you want in your design.

The Night Men is a mystery whose plot revolves around an old pulp novel. The cover design features a picture of that book. To clearly separate the “book within a book” image from the actual cover, I decided that a 3D mockup would be best. I wanted a mockup of a book standing vertically, angled to see the pages and not the spine. After searching the web, I found the perfect free mockup template from Covervault.
Mock-up the book cover
First download the cover mockup. It is a layered Photoshop file (PSD), compressed to a ZIP file for speedier downloading. Macintosh computers will open a ZIP file when it is double-clicked. The ZIP file is expanded into a folder with the same name. To open a ZIP file on a Windows computer, press and hold (or right-click) the file, select Extract All, and then follow the instructions.
Covervault has a terrific video tutorial on using the book templates.
Open the Mockup PSD document in Photoshop. I like the “Graphic and Web” workspace for this project. Choose Workspace from the drop-down menu, and then choose “Graphic and Web” from the fly-out menu. I closed the middle tab group, “Properties, Libraries, Layer Comps” since I won’t be using those. This makes lots of room for the Layers Panel.

Select Save As from the File drop-down menu to save the template file in the Photoshop format with a new name.
Double-click on the layer named “Cover,” a new Photoshop document will open named “layer1.psb”
Now open the Cover document in Photoshop. With the Rectangular Marquis tool selected, choose All Layers from the Select drop-down. Do not merge the cover art in the Cover document, you’ll want to pick up some of the layers for your eBlast graphic.
Paste your cover art into layer1.psb document.
If the cover art doesn’t fit into the mockup, be sure the template is the right size for the book. I’ve had good results slightly adjusting the proportions of a mockup. I’ve also successfully resized book cover art to fit the mockup. I get good results resizing the cover document by choosing Image Size from the Image drop down, and then pasting the resized art into the mockup. I test the choices in the resampling method pop-up menu in the Image size dialog box.
When your cover art is fitting correctly, save and close “layer1.psb.” Notice that the book cover now appears angled on the front of the 3-D book.
If you want to make any adjustments to the cover art, simply double-click on the Cover layer to open layer1.psb again.
Layout your eBlast in photoshop
Note: I started with a layered Photoshop file for the book cover. If you don’t have the layered file, the book title treatment and graphic elements may need to be opened as separate files. They may need to be recreated from scratch. This is obviously a pain in the neck, and will make your eBlast project take much longer. It’s worth every bit of effort to help your client understand what you need to make their book promotion look its best. You can ask for the “Layered Photoshop file” or “The final cover art” or “What you gave the printer for the cover.”
Open a new photoshop document for the eBlast. Choose New… from the File drop-down menu, make a new document 600 px × 800 px, 72 dpi, RGB 8 bit Color Mode. You can use any color you’d like for the background, I started with White. Save it as a photoshop document.
Copy the graphic elements
In Photoshop, work with these three documents open, the Cover document, the Book Mockup document, and the eBlast document (the 600 px × 800 px file you just created.) I like them arranged as tabs at the top of the document workspace, just under the Conditional menu. You can switch between documents by clicking through the tabs. You set this up by choosing Arrange from the View drop-down, and then choosing Consolidate All to Tabs in the fly-out menu.
In the Cover document, select the book title layer. Choose Duplicate layer from the Layer menu. In the Duplicate Layer dialog box, choose your eBlast document from the Document pop-up menu. Be careful here. If the title is made of multiple layers, be sure to copy all of them, including adjustment layers, to the eBlast document. You can group all the title layers in your eBlast doc by shift-clicking on each layer (Mac and PC) and choosing Group Layers from the Layers drop-down. You can easily move the title in one piece by selecting the group. I prefer this to flattening the layers, you have more flexibility.
Use the same “duplicate layer” technique to copy elements you plan to use from the Cover document to the eBlast document. Textures can make good backgrounds, and graphics can make good borders.
In the Book Mockup document use “duplicate layer” to copy over the Cover layer and the Book Layers group to the eBlast document. The mockup will sit on your eBlast background, so you don’t want to copy over the background layers of the Book Mockup document.
Tip: Copying all the layers of the mock up to my eBlast file gave me flexibility to make subtle adjustments without switching between Photoshop documents and replacing layers. For instance, after seeing all the design elements together, I wanted to soften the highlight on the top right of the mockup. I could select the Highlight layer and adjust its opacity in the field at the top of the layers panel without leaving the eBlast document. If those layers had been flattened, I couldn’t make that last minute adjustment.
Add the Text
Use the same fonts as the book cover to reinforce the book’s brand.
Typeset the review or reviews to stand out. The reviewer or reviewing publication is usually named. Use an em dash (Mac: press Option+Shift+- (minus-sign); Windows: Control+Alt+- (minus-sign) before the name of the reviewer. Often, the reviewer’s name is typeset flush right under the review. If you are including a review from an author, a book title is included, and the title is set in italic. If you have any questions about italics, ask the project’s editor or consult the Chicago Manual of Style.
Add in the book description, any other required text, and a call-to-action. For this book, the author wants people to buy the book on Amazon. So I mocked up a button to encourage viewers to click on the ad that will bring them to the Amazon page for Night Men.
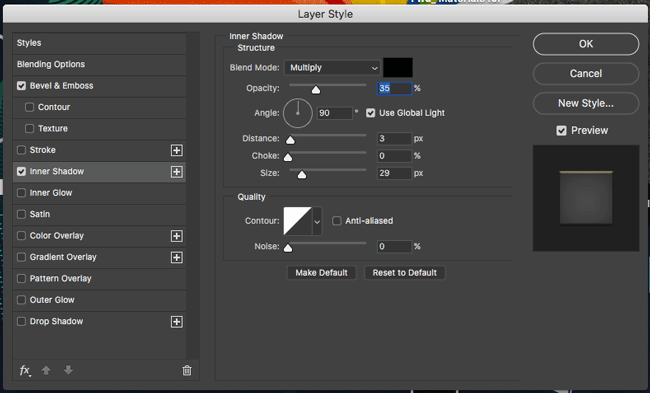
I made the button using the rounded rectangle tool. I added these effects to the layer:

The button design is simply to encourage the click, clicking anywhere on the ad will open the book’s Amazon page.
Output the file
After you have finished your eBlast image, you’ll need to export it for the Newsletter Publisher.
Select file > Export As…

You can usually send a PNG, JPG or GIF. Test file formats in the Format pop-up menu to see which one makes your output look best.
In this dialog box you should double-check that the file will work for the newsletter:
In the image size fields on the right side, the width should be 600 px and the height should be 800 px, the colorspace should be RGB
On the left of the dialog box, you can see what the file will be named by default, a thumbnail of the file, its file format, pixel dimensions and its weight in kilobytes. Confirm here that the file weight is below the maximum the Newsletter Publisher will allow.
Click Export All….
Additional Details
If you are submitting the artwork to the newsletter publisher yourself, you’ll need to tell them what subject line you want for your eBlast. This is the same as a subject line for any email you send, the people receiving it will see that as the subject of the in their list of emails. The subject should entice them to open the email and see your ad, so consult the editor or author for ideas.
You must tell the newsletter publisher where you want a reader to go when they click on your ad. Give them the full URL, like this: “https://www.amazon.com/Night-Men-Jason-Keltner-Book-ebook/dp/B0044UHUNW/”
Some newsletter publishers will send a test email. You can give them the email address for anyone who should review the eBlast.
Hope you sell a lot of books!
Many thanks to David Jones for suggesting this tutorial, Mark from Covervault for letting us feature his template, and Keith Snyder for the book we used in the example.
This article was last modified on August 9, 2019
This article was first published on October 22, 2018
Commenting is easier and faster when you're logged in!

Recommended for you

InDesign Magazine Issue 113: Calendars
Issue 113 of InDesign Magazine include articles on calendar design, high-contras...
How to Choose Colors for Design and Marketing Success
Learn how to choose color thoughtfully for your designs and marketing campaigns,...

Treasures From the Vaults
We dug deep into the depths of InDesignSecrets to reveal some great "lost" tips.