
Hot Tips
Your favorite InDesign experts bring the heat with this collection of fresh tips.

This article appears in Issue 125 of InDesign Magazine.
Your favorite InDesign experts bring the heat with this collection of fresh tips.
Image Shortcuts
Khara Plicanic
There are several easy ways to save time when browsing, placing, and editing large amounts of images. For browsing, try using the Light Table workspace in Bridge by choosing Window > Workspace > Light Table (Figure 1).

Figure 1
Once you’ve selected your images, instead of dragging and dropping, use the Place In InDesign command by choosing File > Place > In InDesign. Even better, if you’re using a Mac, you can set up a custom keyboard shortcut for this command, like I did (Figure 2). Check out this article by Keith Gilbert for instructions on how to do that.
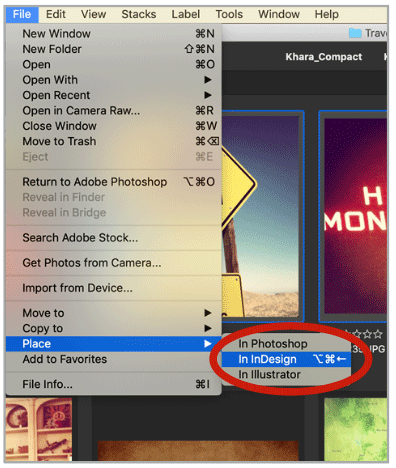
Figure 2
When it comes time to edit images for production, you could Option/Alt-click on each image to pop it over to Photoshop, but this option allows you to open only one image at a time. Better alternatives include selecting multiple images within the Links panel, and choosing Edit Original from the panel menu (Figure 3). Or, if you need to do this a lot, you could create a custom keyboard shortcut for the Links panel’s Edit Original command. (Note that this shortcut only works when the Links panel is visible onscreen.) That way, you could even marquee-select an entire spread’s worth of images at a time and use the shortcut to edit them all at once!
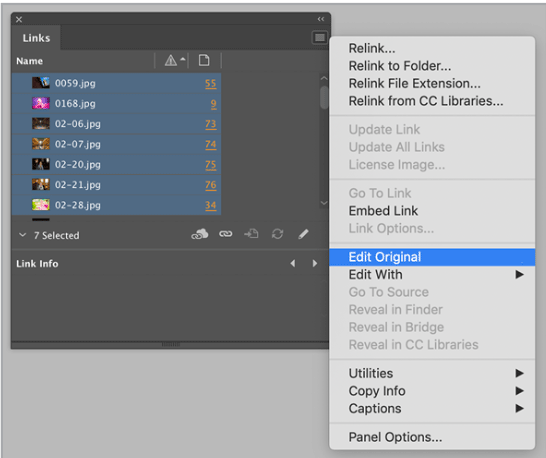
Figure 3
The MacBook Pro Touch Bar and InDesign
Keith Gilbert
If you have
a newer MacBook Pro laptop with the fancy new “Touch Bar,” you’ve probably noticed that the Touch Bar doesn’t help much in InDesign, and even worse, the function keys (F1–F12) don’t appear, which eliminates a lot of keyboard shortcuts (such as F5 to show and hide the Swatches panel and F6 to show and hide the Color panel). Holding down the fn key will temporarily display the function keys. But here’s a way that you can permanently display the function keys when you run InDesign, without changing the Touch Bar behavior in other programs.
Go to System Preferences, and choose Keyboard.
Select Shortcuts at the top, and then Function Keys on the left (Figure 4).
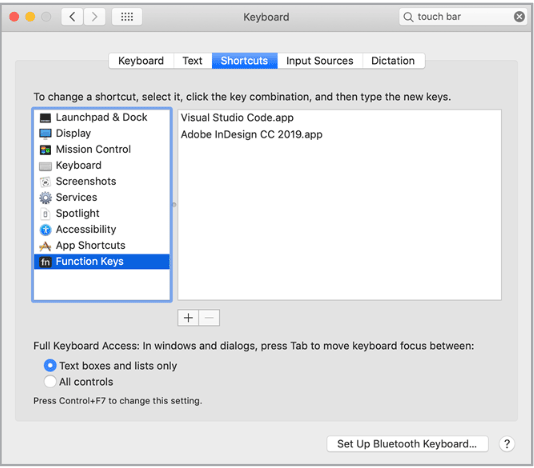
Figure 4
Click the plus sign, find your InDesign application icon, and click Add.
You can use this technique to display the function keys in any individual apps that you wish. Here’s hoping that Adobe will offer Touch Bar support in a future version of InDesign!
Replacing an Image Everywhere in a Document
Eugene Tyson
You may find yourself working on a project where an image needs to be replaced throughout the entire document, which can be problematic in a very long document. Here’s a shortcut that can help.
Start by locating the images you need to replace in the Links panel. By default, they’ll be nested into one entry. In this example, you can see this image was used 6 times (Figure 5).

Figure 5
From the Links panel menu, choose Relink All Instances of <filename> (Figure 6).
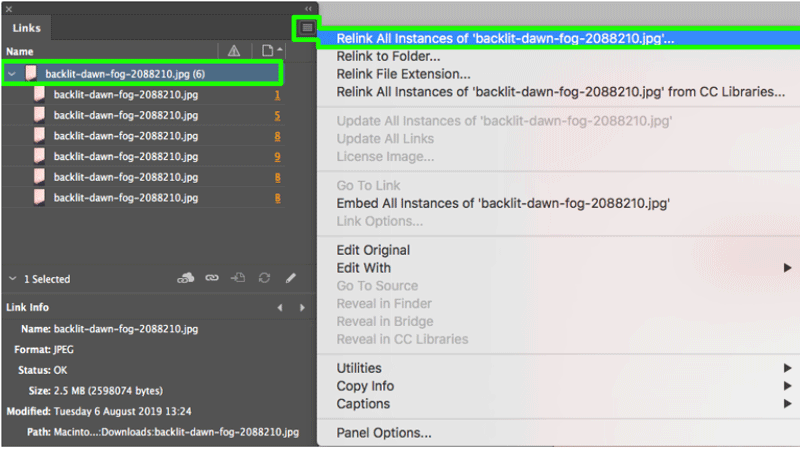
Figure 6
InDesign will prompt you to select a new image. Once you select your image, it will update on each page, and probably not do too good a job with placement (Figure 7).

Figure 7
You will need to check each image to make sure it is positioned correctly. To do this quickly, you can click the page number on the right in the Links panel to navigate to each instance of the image and select it (Figure 8).

Figure 8
You can continue selecting images through the Links panel until they are all repositioned correctly (or to your liking).
No More Overset Text When Working with Tables
Bart Van de Wiele
When working with tables in InDesign, it’s a common practice to have your table sit in a separate text frame. But the bottom of your table might often go missing due to the text frame becoming overset (Figure 9).

Figure 9
This might happen when you add rows or expand existing rows, resulting in the table becoming larger than the text frame in which it resides. To make the text frame grow and shrink with the table, follow these steps.
Select the table using the Selection tool.
Choose Object > Text Frame Options, and click the Auto-Size tab (Figure 10).

Figure 10
From the Auto-Sizing menu, choose Height Only. Then click the middle top icon from the alignment grid (Figure 11).

Figure 11
Click OK to close the Text Frame Options dialog box and apply the settings (Figure 12).
Figure 12
Controlling Chapter Numbering in TOCs
Sandee Cohen
When working with long documents, I often have two types of entries for my tables of contents. One contains just the entry with a page number. The second contains the word “Chapter,” the chapter number, the entry, and then the page number (Figure 13).
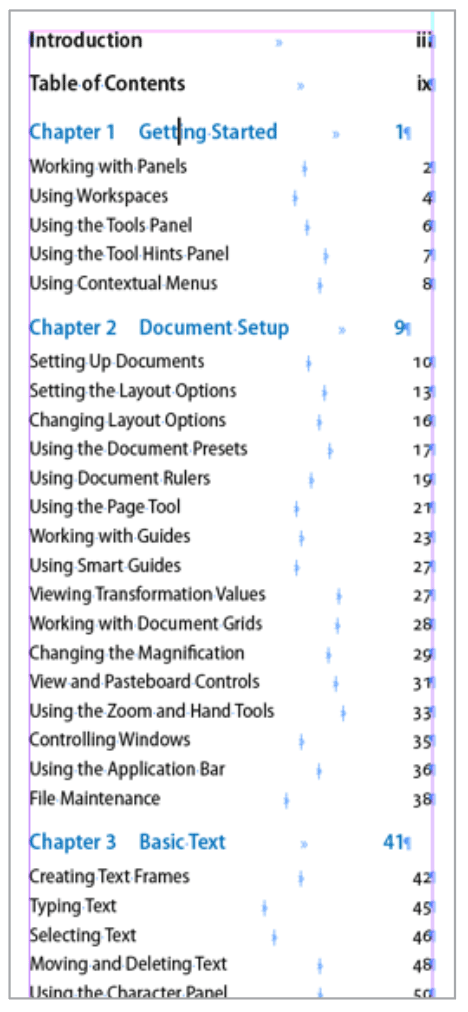
Figure 13
It used to be tricky to get the chapter and chapter number as part of the entry, until I came up with this simple trick:
Create a paragraph style that uses a numbered list with the word “Chapter” in front of the numbering. This paragraph style can then be used as the style for the chapter entries in the TOC (Figure 14).

Figure 14
Then, when you build your TOC, the chapter number comes from the numbered list, while the page number comes from the TOC.
Create a 3-sided Text Frame
Keith Gilbert
Suppose you want to create a text frame that has borders on three sides. “Impossible,” you say. As you know, a stroke must be applied to all sides of a text frame. But here’s a sneaky, flexible-but-simple way to accomplish this.
Create a text frame.
With the frame selected, choose Object > Text Frame Options, and give the frame an inset.
Apply a stroke to the frame. In my example, I’ve added an arrowhead and tail. If you do this, it won’t be visible yet, since the stroke doesn’t have a beginning or end. If you wish, this is a good time to create an object style to record all your frame attributes (Figure 15).

Figure 15
Switch to the Direct Selection (white arrow) tool.
Drag a selection marquee across any one edge of the frame to select just that edge (Figure 16).

Figure 16
Press the Delete key to delete that single line segment. Any arrowhead or tail that you had previously applied will now appear (Figure 17).

Figure 17
Even though the text frame has only three visible sides, it still behaves as a text frame. You can resize the frame to make it wider or longer, change the contents, thread it to other frames, and so on.
Highlighting All Instances of a Paragraph Style
Maya P. Lim
There are several ways you can quickly find all instances of a paragraph style. One way is by applying a paragraph rule to the paragraph style in a color that pops off the page; this is handy when you want the highlighting to appear in Normal mode as well as Preview mode. Just be aware that this technique requires the additional step of disabling the paragraph rules after you’ve finished editing so they won’t appear in the finished product. In Figure 18, I’ve highlighted all headers in magenta.

Figure 18
Another option is to use StyLighter, a script that allows you to assign colors to specific styles and see them in Preview mode only. StyLighter also highlights overrides, which can be handy when checking over work. In Figure 19, I’ve set the header style to orange, and the overrides are highlighted in cyan.

Figure 19
Working with a Diagonal Grid
Nigel French
InDesign’s baseline grid is great for allowing you to cross-align columns of text, but you can’t rotate it. Nor can you rotate the view of your page in anything other than 90° increments. So what if you want to design something like Figure 20 with objects at 45° angles?

Figure 20
While InDesign lacks the ability to convert objects to guides or to set an angle of constraint, the way you can in Illustrator, this can be achieved using custom or frame-based grids. If you rotate a frame containing a baseline grid, the grid rotates along with it.
For the example shown, create a large frame—large enough to cover the page when it is rotated—and then turn on the baseline grid from the Baseline Options tab of the Text Frame Options dialog box (Figure 21).

Figure 21
Rotate this frame 45°, and then copy and paste in place and rotate the copy –45° to create an overlapping diagonal grid. For maximum flexibility, group these two frames and put them on a layer, which you can lock and hide as necessary (Figure 22).

Figure 22
Although Snap to Grid won’t work, you can now position your text and other elements visually according to the grid lines (Figure 23).

Figure 23
Changing Run-in Heads to Subheads
David Blatner
Clients change their minds—that’s their nature. And it’s up to us to figure out the best way to make the changes they ask for. Let’s say you’re working on a long document where you’re using a nested style to bold the first sentence of certain paragraphs. Then the client calls and tells you that they want those sentences to be subheads instead.
Fortunately, this is something you can take care of quickly with the help of a GREP Find/Change (well, two actually). First, in the GREP tab of Find/Change, search for ^.+?[?!.]s and replace it with $0%r.
The first GREP code means “find the first sentence ^.+?, up to a question mark, an exclamation point, or a period [?!.], followed by a space s”. The other code means replace with “the found text $0 followed by a percent sign % and a paragraph return r”.
Then switch to the Text tab of Find/Change. Search for % and replace it with a space character; also apply the desired paragraph style.
(You don’t have to use %… you can use any character that you don’t use anywhere else.)
Removing Overrides Only from One Style, Document-wide
Anne-Marie Concepcion
You’ve inherited a 132-page layout where the previous designer did all sorts of unspeakable things (that is, applied crazy manual formatting) to text formatted with a particular style—let’s say numbered lists—all of which have the same Numbered List paragraph style applied (Figure 24).

Figure 24
They’re in different stories and different spreads, so you can’t quickly select them manually to get rid of the overrides in the usual way of Option/Alt-clicking the style name, nor use the Clear Overrides button in the Styles panel. Besides, maybe you want to retain any local overrides in other paragraphs for now.
Can you target a particular style and tell InDesign to clear the overrides only in text formatted with that style, throughout the document? Yes!
The key is to use an InDesign “bug” to your advantage. In the Find/Change dialog box, when you specify the same paragraph style for both Find Format and Change Format, which should really change nothing in the document, something does get changed! InDesign will remove all local formatting from text with that style applied. That’s usually a bug, but in this scenario it’s a feature!
So back to our example: Go to Edit > Find/Change. In the Text panel, make sure there is nothing inside the Find What and Change To fields. Choose Document as the Search scope if you want. In Find Format, choose the name of your Numbered Lists paragraph style, and click OK. Do the same for Change Format, making sure you choose the exact same style name, and click OK (Figure 25).

Figure 25
Now choose Change All, and there you go (Figure 26)!
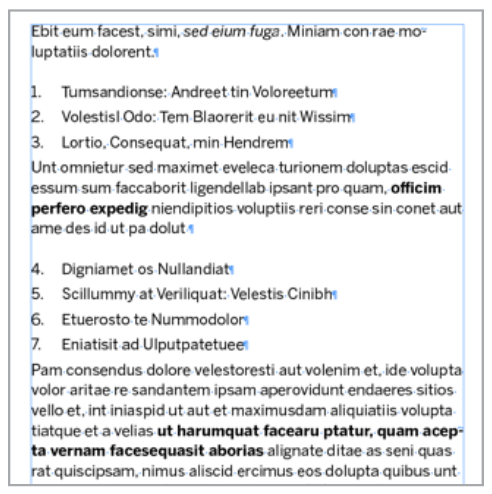
Figure 26
An Object Style to the Rescue!
Alan Gilbertson
Once in a while, you’ll get a project that repeats the same sequence of paragraph styles many times in individual text frames. Of course (because you read InDesign Magazine!) you would use Next Style in your Paragraph Styles to automate the sequence, but you can take it to a new level with an object style.
Let’s use a “book from blog” example, where you want to retain the online look. The paragraph style sequence is:
Post Date
Post Title
Log Line
Post Text
Figure 27 shows the object style setup with paragraph style set to Post Date and Apply Next Style (the key to making this work) selected. This style has its own keyboard shortcut.

Figure 27
How it works
Place the text or paste into a new text frame. Do not hold down Shift or Alt/Option! The next step won’t work if you have threaded frames. Overflowed text is fine (Figure 28).
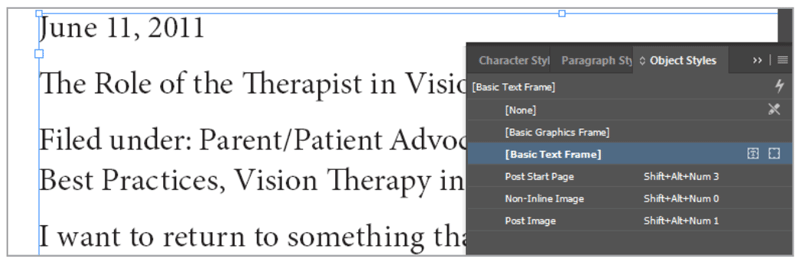
Figure 28
Apply the object style to the text frame—preferably using the keyboard shortcut—and voilá (Figure 29)!

Figure 29
At this point, all you have left is to fix any overset text, but the repetitive work is done. The same technique works for recurring sidebars, those exercise pages at the end of every textbook chapter, an anthology of essays or short stories, or even the opening page of any book chapter.
Exporting a PDF to Separate Pages
Eugene Tyson
Exporting an InDesign file to a PDF for print is a pretty straightforward process—you just choose File > Export and select Adobe PDF (Print) as the format. Alternatively, you can choose File > Adobe PDF Presets, and select a pre-made preset.
But what most folks don’t know is that you can also export a multi-page file to separate PDFs, one for each page, which is really useful if your print workflow requires that kind of output.
In this example, I have created a very simple document with only page numbers on it (Figure 30). But you can imagine that it contains four posters: two sized as A4 and two sized as A3.

Figure 30
Once you’ve opened the Export PDF dialog box, you’ll find the options for exporting to separate pages in the General tab. When you select Create Separate PDF Files, a few other options become available. There’s a tiny triangle beside the Suffix area that you can click to add Incremental Numbers, Page Number, and Page Size to the end of the document filename (Figure 31).
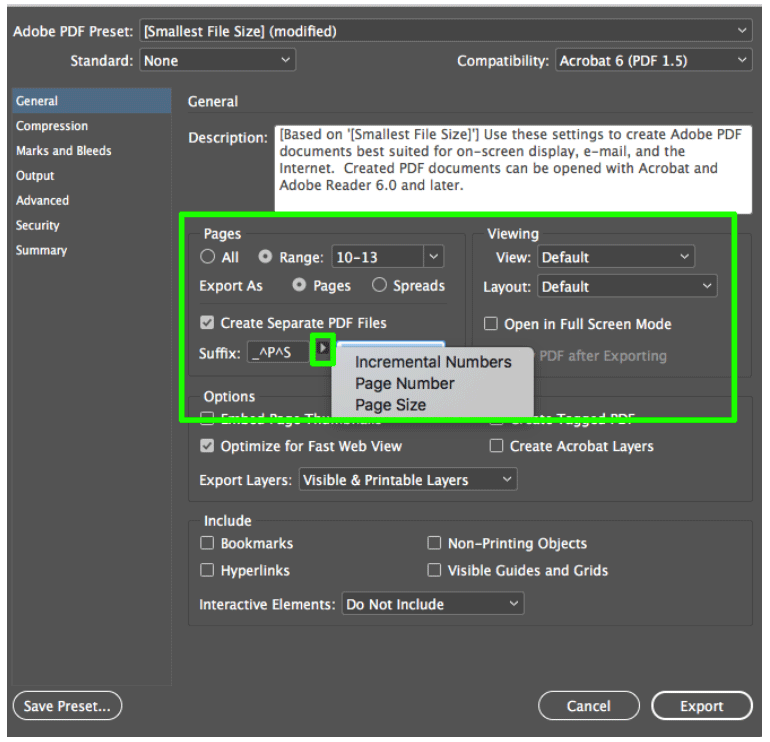
Figure 31
The adjacent field, which is unfortunately quite tiny, shows you a preview of the filename (or more likely, just a fragment of the name). Hover your cursor over the field to reveal a tooltip showing the whole filename.
In my example, I have _^P_^S, which gives me the ^P (page number) and ^S (size); the underscores give me a break between the numbers (Figure 32).
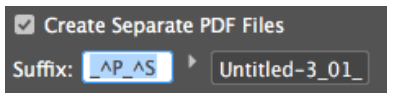
Figure 32
Figure 33 shows the result of the export, with the page numbers and the page sizes in the filenames.

Figure 33
The option to include incremental numbers comes in handy for things like raffle tickets. You might have 200 tickets in one InDesign file and output to separate PDFs as sequentially numbered files. In my example, I added three 0’s before the ^# (sequential numbering code) (Figure 34).
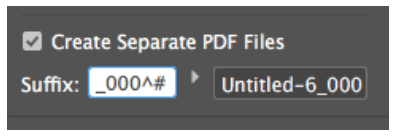
Figure 34
Figure 35 shows some of the exported ticket files.
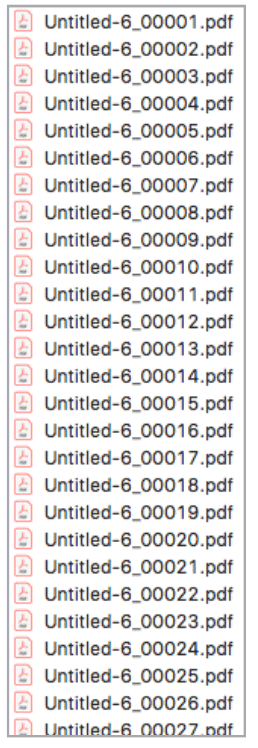
Figure 35
Super-powered Swatches
Laurie Ruhlin
When I create a color scheme for a document, based on a color like blue, I will usually want a tint of that blue and maybe a gradient from 100% of the blue color to a lighter tint. I also know that I have to be ready to make alterations. For example, after the main color is created, the client may request a change from blue to red, or maybe a different division of the company needs a similar design, with a different color scheme. Here’s how to create color, tints, and gradients that automatically change when the main color is modified.
Create a new color
From the Swatches panel menu, choose New Color Swatch (Figure 36).

Figure 36
Create a new color. For my example, I’ll use values of C=90 M=80 Y=0 K=0, and name it “Blue.” Then click OK (Figure 37).
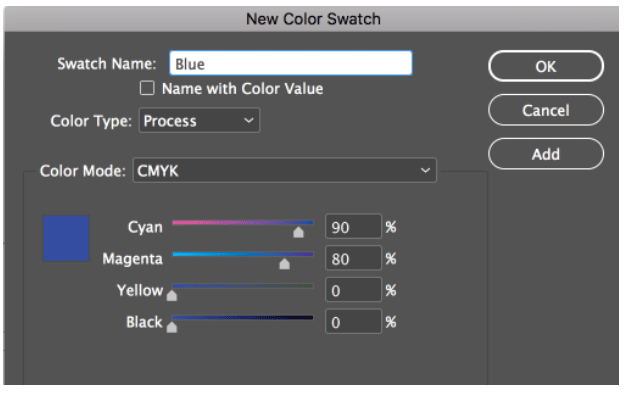
Figure 37
Create a tint
With the Blue color selected in the Swatches panel, choose New Tint Swatch from the Swatches panel menu (Figure 38).
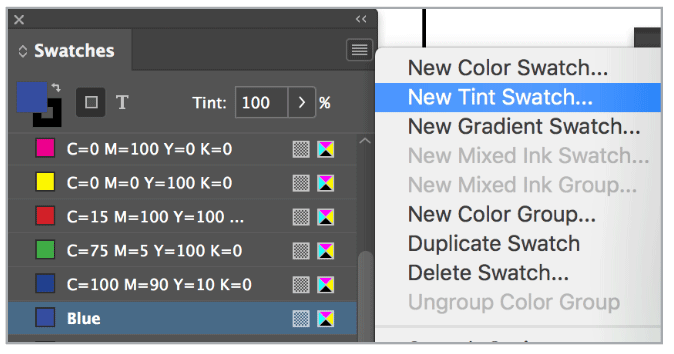
Figure 38
Lower the tint value at the bottom of the dialog box by moving the slider, and click Add. Repeat for more tints. Click OK when finished. (If Add isn’t active after typing in a value, press the Tab key.) (Figure 39)
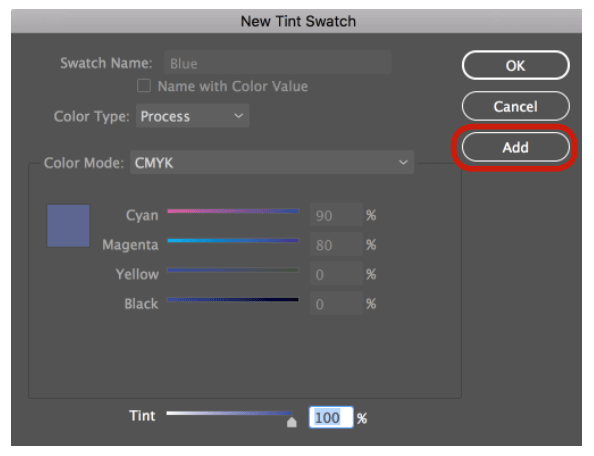
Figure 39
At this point, in your Swatches panel, you have the main color “Blue,” and tints named “Blue 20%” and so on.
Make a gradient
From the Swatches panel menu, choose New Gradient Swatch. Name the gradient swatch “Blue Gradient,” and then click the left gradient slider icon to activate the color choices. From the “Stop Color” drop-down menu, choose Swatches. This will display the swatches and tints available in this InDesign document. Click on the main Blue color. Now click the other gradient slider icon on the right side, and choose the Blue 20% (or the lowest tint you created). Click OK to add the gradient to your Swatches panel (Figure 40).
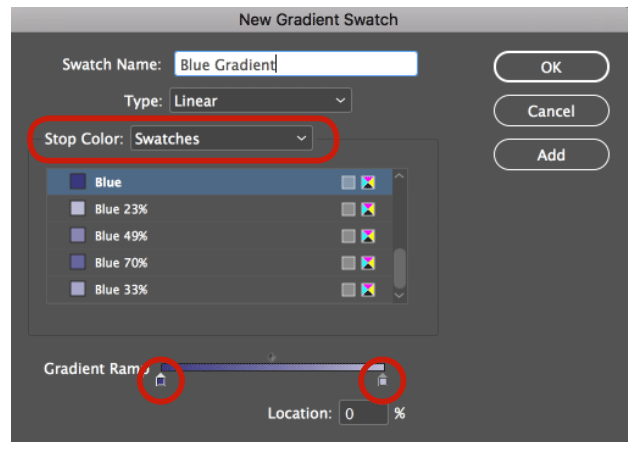
Figure 40
Create a rectangle frame and apply the gradient to the fill. Optional: Create more objects and fill with the main color and the tints.
Now for the color-changing magic. Deselect all objects. Right-click the main Blue swatch, and choose Swatch Options. Change the blue color to red (or any other color) by using the sliders or typing in new color values. When you click OK, the main Blue, the blue tints, and the gradient made from the tints will all change to the red color!
Fine-tuning Adjust Layout Results with the Gap Tool
Maya P. Lim
Adjust Layout (File > Adjust Layout) can be helpful when resizing a document or changing its margins, but sometimes it moves objects to places you’d rather it didn’t or resizes them in ways that you don’t like. The Gap tool (Figure 41) can help fix these awkward results by quickly adjusting the spacing between items, snapping them into alignment with nearby frames, and showing mathematical relationships to other spaces on the layout.

Figure 41
In Figure 42 you can see my original page, before applying Adjust Layout.

Figure 42
Figure 43 shows how things look after Adjust Layout was applied to widen the page size.

Figure 43
To improve things, click on the Gap tool, and hover your cursor between two frames. Click and drag to adjust, hold down Option/Alt to move two items simultaneously, or hold down Command/Ctrl to narrow or widen the frames simultaneously. This works on object frames as well as text frames.
In Figure 44, I’m using the Gap tool between two photos to crop them similarly to the original layout. Blue arrows appear to show equivalent measurements.
Figure 44
In Figure 45, the Gap tool helps me to create the same line breaks in my text frames as I had in the original layout.
Alt Text via Object Style
Nolan Haims
Alt text descriptions for images are a key part of making documents 508-compliant and accessible to those with vision impairment. Here’s a quick tip to have InDesign pull alt text already embedded in the image rather than having to manually enter it each time in InDesign or in Acrobat.
Create a new object style, and select Alt Text under Export Options. From the pull-down menu next to Alt Text Source, choose From XMP:Description. Click OK (Figure 46).

Figure 46
Now, whenever you apply this object style to an image, if there is alt text in the Description field, it will automatically be tagged to the image upon PDF export. You can check this by going to Object > Object Export Options > Alt Text (Figure 47).
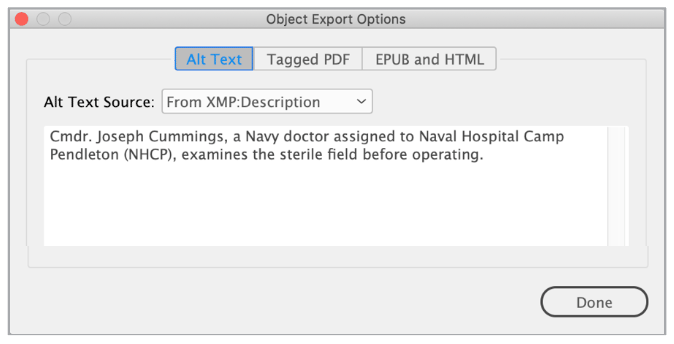
Figure 47
Note that InDesign can pull alt text from a variety of metadata fields, but the three default options are Title, Description, and Headline, which are where you most often find useful image information. The easiest way to view and edit this data is through Adobe Bridge, where you can even batch-apply descriptions. And the best part about applying this information at the source is that you’ll never have to reapply this information in InDesign if you reuse an image on your next project!
Apply a Master to Every nth Page
Shy Sivapatham
If you work with long documents, you might come across a situation where you need to apply a master page at certain intervals throughout a document. There’s no way to tell InDesign to automatically apply a master to every nth page, but you can make this job easy with the help of a website that generates comma-separated number lists. Just head to rechercheonline.de, and use the controls to generate a list of the page numbers where you need to apply a certain master.
For example, say you had a 50-page document where you needed to apply a master to every 5th page (page 1, page 6, page 11, and so on). Set the controls to count from 1 to 50 with a step of 5 and to separate the numbers with just a comma (Figure 48).
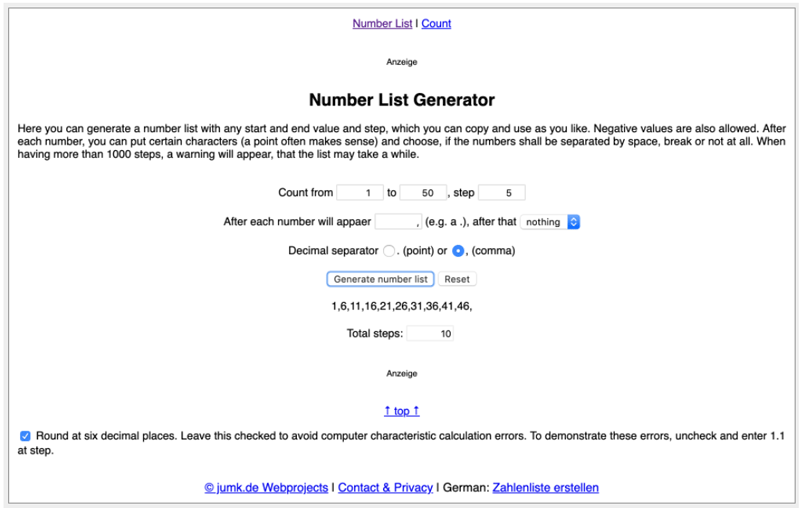
Figure 48
Click Generate Number List, and then copy that list to your clipboard. Back in InDesign, go to the Pages panel menu, and choose Apply Master to Pages. In the dialog box, choose your desired master, paste in the number list, and click OK (Figure 49).

Figure 49
Voilá! Every 5th page is now formatted with that master (Figure 50).
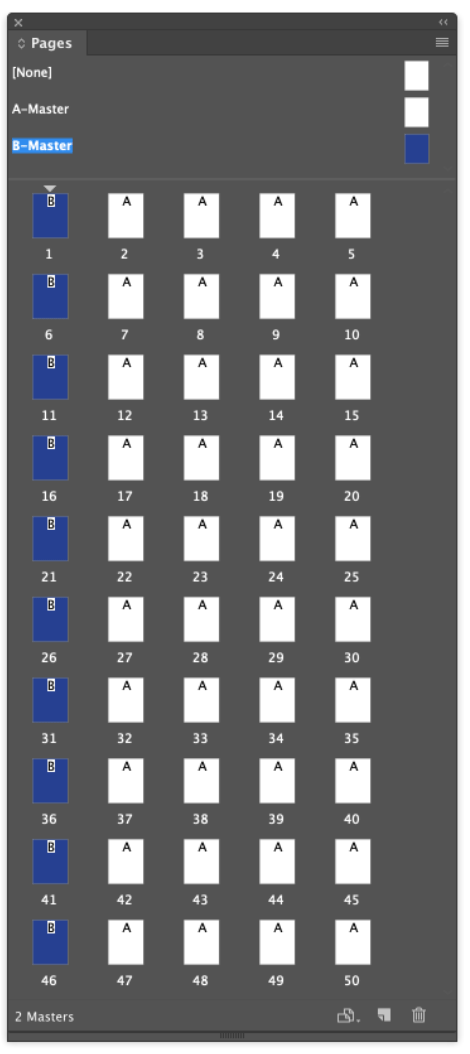
Figure 50
Monthly Colors
David Blatner
In some documents that are published regularly (for example, monthly newsletters), the colors need to change with each issue. You could edit your color swatches each month, but that won’t change instances where the colors are inside placed vector graphics. Instead, consider applying “generic” spot colors to the elements you want to change.
For example, Figure 51 shows two placed graphics on an InDesign page—one from Illustrator and one from Photoshop. Both graphics use a spot color named “GenericColor,” and we’re using the same name for a spot color in InDesign. The color definitions don’t have to match.

Figure 51
Then, to change the color across the whole document, create a new CMYK color (let’s call it “January”), and make sure the Color Mode is set to Spot (Figure 52).
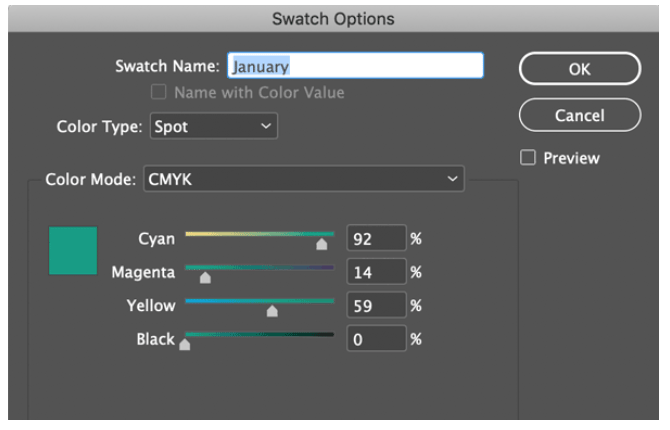
Figure 52
Then:
Choose Ink Manager from the Swatches panel menu.
Choose GenericColor from the list of inks.
Choose January in the Ink Alias menu (Figure 53).

Figure 53
Click in the column to the left of January (which sets it to separate to CMYK upon output).
When you click OK to close the Ink Manager dialog box, nothing changes; but when you choose View > Overprint Preview, all the “ThisMonth” colors will automatically change to the January color (Figure 54)!

Figure 54
Then you can create a different February color, and when you alias GenericColor to February, all the colors will change automatically.
Working with Crop Overlays in InDesign
Nigel French
Photoshop offers several crop overlays that can suggest possible cropping for an image. I mostly use the Rule of Thirds, but also on occasion find the Golden Spiral to be useful. However, if we commit to the crop in Photoshop, we reduce our flexibility in InDesign. Because we won’t necessarily know how we want to crop the image until we see it in the context of the layout, it can be useful to have crop guides in InDesign.
Start by making a crop overlay template in Photoshop (Figure 55).
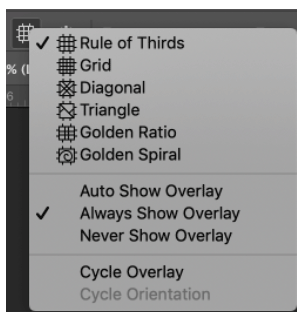
Figure 55
Take a screenshot of the overlay applied to a blank canvas in Photoshop—the aspect ratio of the canvas doesn’t matter (Figure 56).
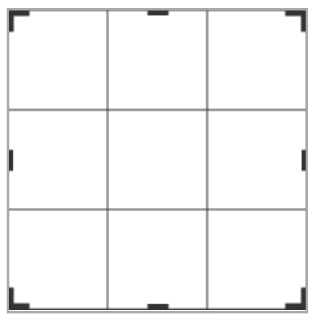
Figure 56
Place the screenshot in InDesign, set its frame fitting options to Fit Content to Frame and Auto Fit (Figure 57), and change its blending mode to Multiply to neutralize the whites (Figure 58).
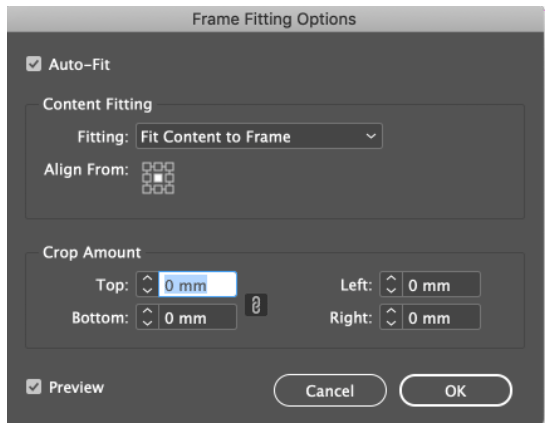
Figure 57
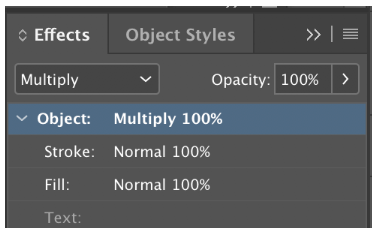
Figure 58
Put the crop guide on a non-printing layer, and then save it as a library item.
When you need to crop an image, drag the crop guide library item onto the page and position over the image. Size it as necessary to fit the image (Figure 59).

Figure 59
Lock the Crop Guide layer, and then position and scale the image on the layer beneath according to the intersections of the crop guide to make the crop (Figure 60).

Figure 60
When you’re done, hide the crop guide layer until you need it again.
Two Tables of Contents in One InDesign File
Eugene Tyson
InDesign can create a Table of Contents for your document. As you’re probably aware, the table of contents is based on the proper application of paragraph styles. Any headings should have a paragraph style, including subheadings. For example, you may have 4 levels of headings:
Heading Level 1
Heading Level 2
Heading Level 3
Heading Level 4
However, you may have another section within your book that requires another table of contents. Perhaps you’re laying out an annual report with a company profile at the beginning and a financial statement toward the end.
Or another common example: you may have split your document into parts—Part 1, Part 2, etc.—and would like a Table of Contents for each part.
To create multiple tables of contents, I always find it best to set up my table of contents styles first by choosing Layout > Table of Contents Styles.
For this example, I created two Table of Content styles—Part 1 and Part 2 (Figure 61).

Figure 61
Then, when it comes time to insert a table of contents, I just use the TOC Style drop-down list to select which style I want to use (Figure 62).
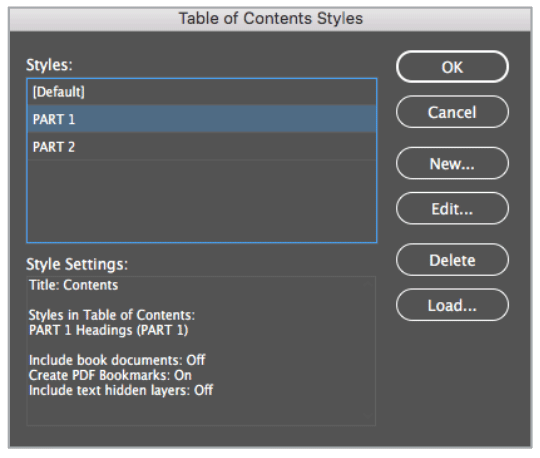
Figure 62
Important: The two different Tables of Contents will update independently of each other. If your page count changes, be sure to update both tables of contents!
Create Searchable, Retrievable Text Snippets
Keith Gilbert
I love the ability to store text in CC Libraries. To do this, just select some text with the Type tool in InDesign, click the plus icon at the bottom of the CC Library, and choose Text from the pop-up menu (Figure 63).
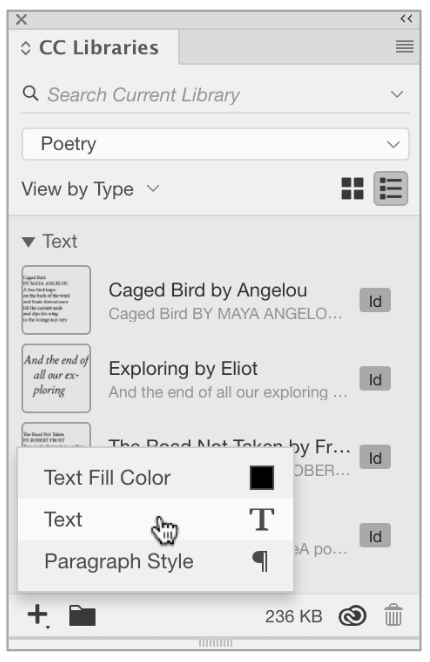
Figure 63
The text will be added to the library as a text object. You can quickly retrieve the text at any time by dragging the text onto a page and clicking, which will create a new text frame, or, with an insertion point selected, right-click on the object in the CC Libraries panel and choose Place Inline (Figure 64).
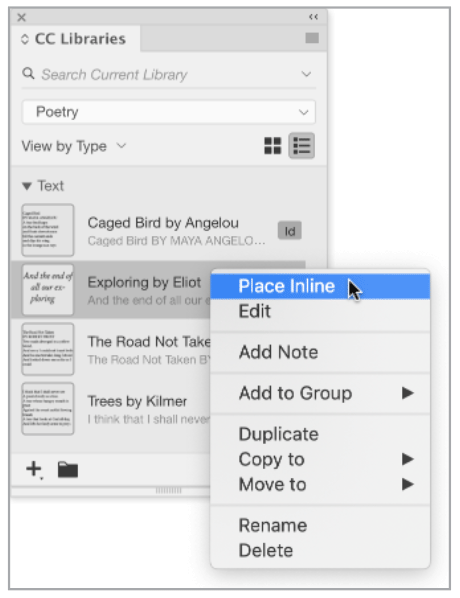
Figure 64
These text snippets are searchable. The search field at the top of the CC Libraries panel lets you search either All Libraries or just the Current Library. Type a word or phrase in this field, and the full text of your library items will be searched. Note: If you type multiple words, any item that contains all of those words somewhere in the text will be selected. In other words, if you type “the sighing trees,” any item that contains the words “the” and “sighing” and “trees” somewhere in the text will be selected (Figure 65). To match an exact phrase, search for “the sighing trees” all enclosed in a single set of quote marks.

Figure 65
Recovering Documents That Have Been Saved Over
Maya P. Lim
If you are a Creative Cloud subscriber or if you use Dropbox, recovering a previous version of a file is easy.
Creative Cloud keeps a history of every change made to a file for ten days. Simply click on your file in the Your Work section of the Creative Cloud website, identify the version you wish to restore under the Timeline, and click Revert (Figure 66).
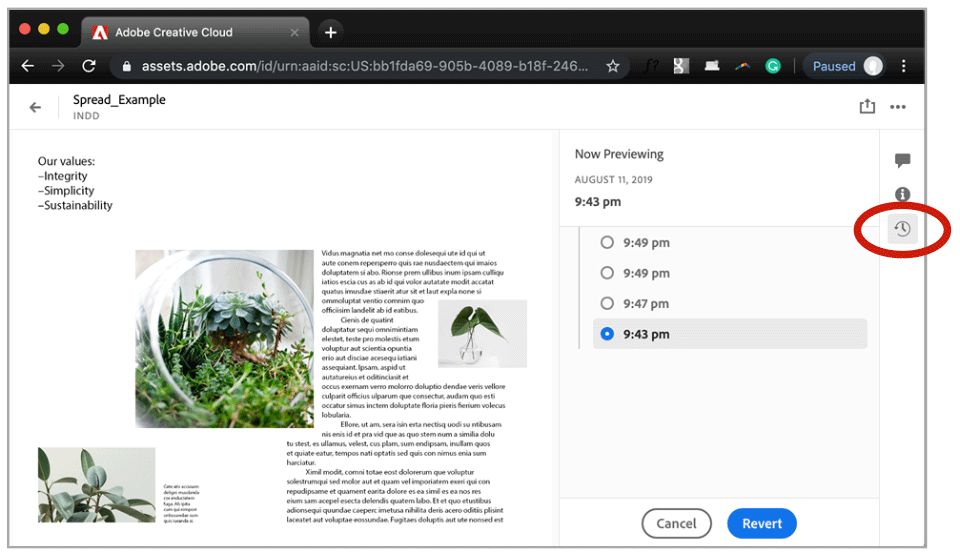
Figure 66
Note that the preview does not support all fonts, so changes in typography may not reliably appear in the preview.
Dropbox allows you to revert to versions up to 180 days old, depending on your subscription plan. Navigate to the file in Dropbox (either in the website or in your locally synced files), and click on Version History (Figure 67).
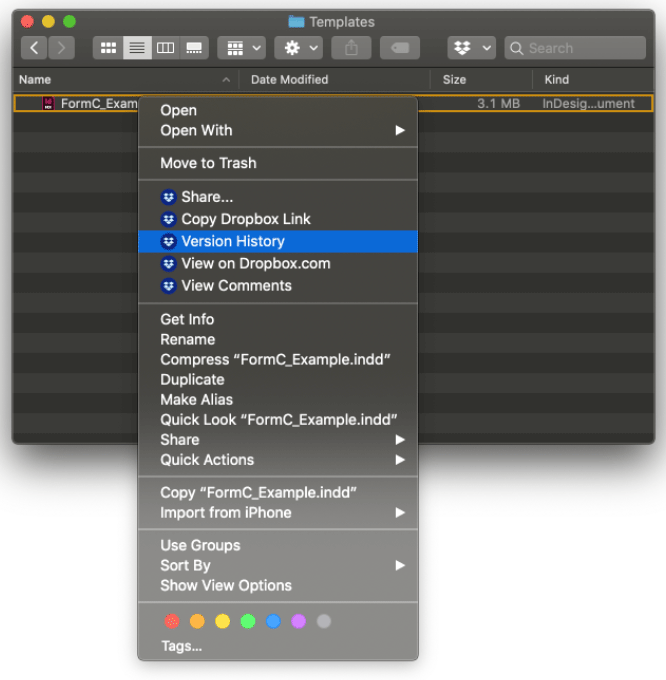
Figure 67
Select (or, more realistically, guess) the version you wish to restore; currently Dropbox can’t show previews of InDesign files (Figure 68).

Figure 68
Before restoring, click Save As on the edited document if you wish to save the work under a different filename.
Decide Once, Use Forever
Alan Gilbertson
How to save time without even trying
It’s an old axiom that the quickest way to cut your work in half is not to do it twice. Prevent the style decisions you make today from being a mystery a year from now by standardizing everything you can. Decide once, make it your standard practice, and you’ll never have to make that choice again.
Text and table styles
One of the most powerful ways to put this idea into practice is to create your own naming convention for paragraph, character, table, and cell styles and stick to it. Whenever you open an old project, you won’t waste time trying to remember how you named the styles. For new projects, the decisions are already made. Keep a template or three handy from which to load the style names you use.
Fonts, weights, colors, and other specifics will be different from one project (Figure 69) to the next (Figure 70), but if the style names never change, you won’t ever be lost. Note that the text frame object style definition also changed between the two examples.

Figure 69

Figure 70
Keyboard shortcuts
When you use keyboard shortcuts for styles, you make your work go faster if you can remember what shortcut goes with which style. It’s easy if you decide on a standard set of shortcuts that you use for every project. Pretty soon, muscle memory takes over, and you don’t have to think about it.
Using the Eyedropper Tool to Resize Images
Bart Van de Wiele
One of the biggest secrets of the Eyedropper tool is the ability to use it as a tool to resize objects or even set page X/Y coordinates. And it’s just as easy as picking up and applying formatting.
Double-click the Eyedropper tool in the Tools panel.
If you wish to apply only object dimensions, deselect all other settings, and select Object Size within the Transform Options category (Figure 71).

Figure 71
Click the edge (not the center) of the image whose settings you want to sample (Figure 72).
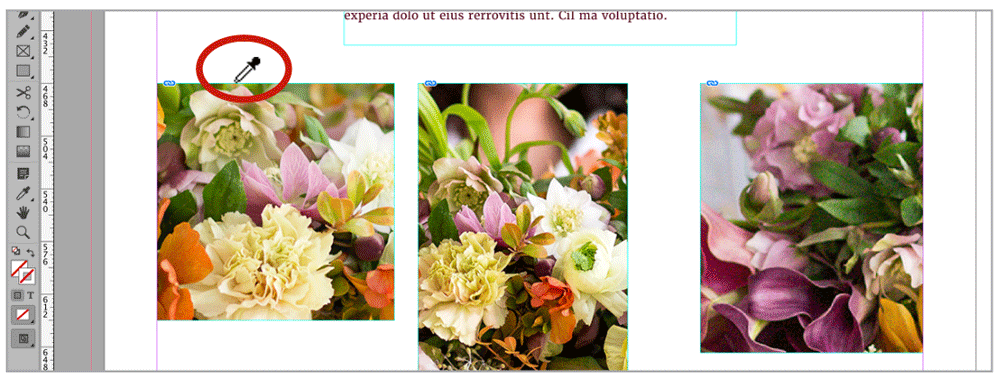
Figure 72
Click the edge (again, not the center) of the image to which you’d like to apply the settings (Figure 73). Of course, you can also use object styles to control object size and position.

Figure 73
Commenting is easier and faster when you're logged in!

Recommended for you

Tip of the Week: Live Distribute
This tip was sent to Tip of the Week email subscribers on November 27, 2015. Sig...
Tip of the Week: Creating Custom Motion Paths for Animation
This tip was sent to Tip of the Week email subscribers on December 10, 2015. Sig...
Tip of the Week: How to Find Tables With Find/Change
How to use Unicode to find tables in InDesign with Find/Change.