


It’s beginning to look a lot like Christmas…or not, depending on where you live. Personally, I haven’t seen a single flake yet, but that doesn’t mean I can’t whip up a blizzard anytime I want in InDesign. Here’s a quick roundup of ways to add snow effects in your designs.
Start with whatever elements you want to winterize.

Using the Pen tool, sketch out the outline of the snow you want to add. Follow the object’s outline closely for a light dusting, or lay it on thick for big storm.

Not all that confident in your Pen tool skills? Don’t worry, this is one time where sloppy curves are no problem. Or, if you want some great Pen tool help, check out Deke McClelland’s Lynda.com course on Pen tool Fundamentals.
Don’t forget the small details like the counters in letters like o.

Give the snow a very light gray fill so it looks a little more realistic, and so you can use it on a pure white background.

If you want a flat look, you’re done. Or use the Direct Selection tool to tweak the shape of the snow, if desired.
You can also experiment with different ways of adding a little dimension and “pop” to the snow.
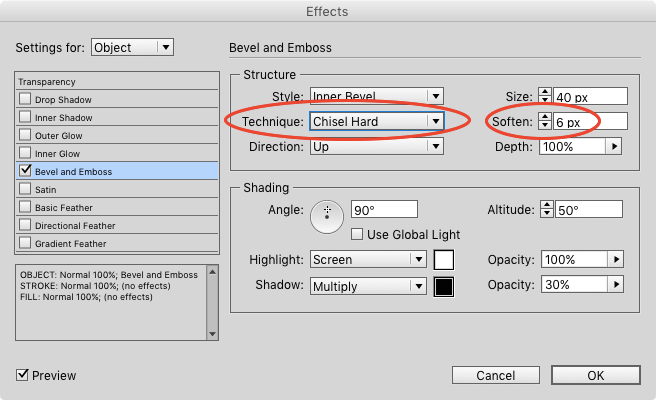
You could go with a classic Bevel and Emboss effect to add some highlights and shadows (another reason to not make your snow pure white—it’s pretty hard to add a highlight to white).


If a Smooth bevel doesn’t give you the look you want, try using Hard Chisel or Soft Chisel, and then dialing in the exact amount of softness.

Or if you want something a little more hip than an old school bevel, try layering a few copies of the snow object, with slightly different fill colors.


Use a light blue instead of a neutral gray to cool things down even more. Brrr!

Or mix and match any of the techniques. Use a bevel and multiple copies of the snow object and a chilly blue fill, etc, etc.

Be creative, have fun, and don’t forget your galoshes! By the way, what the heck are galoshes?
This article was last modified on July 25, 2019
This article was first published on December 9, 2015
Commenting is easier and faster when you're logged in!

Recommended for you

Parentheses around page numbers in the Index panel
Ever wonder why some of your page numbers in the index panel are surrounded by p...
HELP! New Ways to Find It in CS3
Everyone needs help sometimes. InDesign CS3 and the CS3 applications now give yo...
How to add automatic “jump” lines
Want to create automatic "continued on page xx" or "continued from page xx" text...