
Why Does My High Res Image Look Low Res?
Learn how to choose the Display Performance settings you need in InDesign.

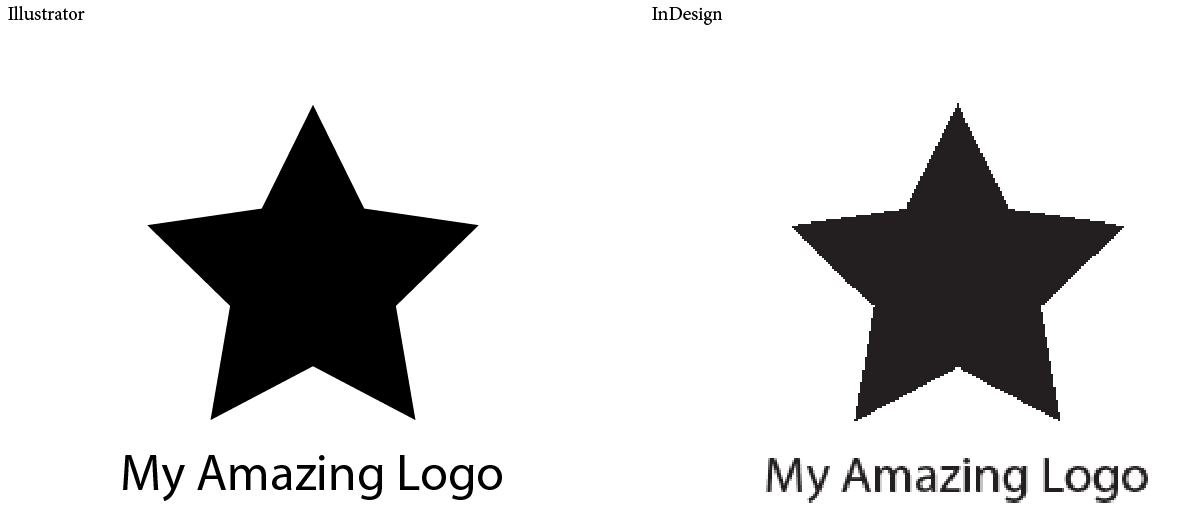
Here’s a very common question that I see on InDesign user forums: why does an image that you know is high resolution look awful when it’s placed in InDesign? This can be especially confusing if you’re coming from Illustrator or Photoshop, which always display images at full quality.
Here’s a side-by-side, Illustrator vs. InDesign scenario. As you can see, InDesign’s preview of the logo looks very jagged and low resolution.
See also: What’s My Resolution?
Why Does This Happen?
Why does the InDesign logo look so jagged? InDesign sometimes uses a low-resolution thumbnail, also known as a proxy, to display the image in the layout. However, you’re not stuck with this low-resolution preview.
InDesign has three options for how images/graphics are displayed, which you can access via View > Display Performance.
- Fast: Displays a gray box and you won’t see the image at all
- Typical: Shows a low-resolution proxy
- High Quality: Shows a high-resolution proxy
How Do I Control What I See?
By default, InDesign is set to display images using the High Quality view, with high-resolution images for Raster and Vector. This means that you will see high-resolution images by default. But you can change this behavior.
Go to InDesign > Preferences (Mac) or File > Preference (Windows) and click on Display Performance.

In Options (section 1 in the screenshot), there are two controls:
A: Default View, which determines which Display Performance is to be used (Fast, Typical, or High Quality).
B: Preserve the Object Display Settings, which we’ll touch on later.
In Adjust View Settings (section 2 in the screenshot), there are the following controls:
C: A drop-down list where you can choose between Fast, Typical, or High Quality views. After you select one of these views, you can customize its settings in D, E, and F.
D: Raster Images: Adjust the slider to control the onscreen appearance of pixel-based images (like those from Photoshop) in your layout.
E: Vector Images: Adjust the slider to control the onscreen appearance of vector-based images (like those from Illustrator) in your layout.
F: Transparency: Adjust the slider to control the onscreen appearance of transparency effects.
Once you’ve set your preferences as you want them, click OK. Then you can go to View > Display Performance, and use those settings. Note that you can lose these settings if your preferences are reset, which can happen with a crash, update, or when installing plug-ins.
Outside the Preferences
Understand that when you select View > Display Performance > High Quality, this does not mean you actually have high quality Photoshop or Illustrator images, it just means that you’re telling InDesign to use the settings you defined for the high quality onscreen view. So, how do you check the resolution of a placed image to tell if it really is high res or low res?
Open the Info Panel, by going to Window > Info. Then select the image. The Info panel will show you the Actual ppi and Effective ppi.

Actual ppi refers to the image at 100% scaling. For example, in the figure above, that’s 72 ppi, which would output as low res if you made no modification in InDesign.
Effective ppi refers to the image at your chosen scale. For example, in the figure above, the image is scaled down to 29%. Therefore, effectively it is 248 ppi (72/29 × 100), and will output as high res.
See how the effective resolution is what really matters? How an image looks on screen in InDesign is not always reflective of what you’ll get in final output. What you really care about is how it looks when printed or exported to PDF for digital documents. Just because it looks good on screen does not mean it will print that way—always get an accurate proof!
When the Info Panel Will Not Show Any PPI Information
If your image is a vector image, it has no set resolution, and is therefore scalable to any size! Placed PDFs will also not show any PPI information as these are containers for raster images, vector images, text, and other objects.
The only file types that do show this information are raster images like JPG, PNG, GIF, PSD, TIF, and BMP.
Do I Have to Check Every Image I Place?
If you don’t want to check every individual image you place, you can use InDesign’s Preflight panel to automatically check for low resolution images.
Go to Window > Output and choose Preflight.
At the top right of the panel is an option to Define Profiles.

Start by selecting the + symbol to create your own custom preflight profile.

Navigate to Images and Objects and select what resolution you want to check for.
Now when you have preflighting turned on and your custom preflight profile selected, images that fall below your minimum desired resolution will be detected and flagged as errors. Then, it’s up to you get a higher resolution image, scale the image down until its effective resolution is above your minimum, or decide if it’s okay to ignore the warning. If you don’t know, then your print vendor can help you out (or at least they should)!
See also: Customizing a Preflight Profile
What Should the Image Resolution Be?
As for the all-important question of what is the right resolution for your images, the answer is that it depends—talk to your print vendor for the best option. However, you will notice that the example above is set to 265 ppi, which is high enough for most printers. Requirements vary for newspaper, magazine, and high-end jobs, but typically most people request 300 ppi. It also depends on the content of the image. A 150 ppi foggy scene will print fine, but a 150 ppi close-up of a person’s face may not fare as well.
The output method is important too. Digital printing is a bit more forgiving than lithographic printing, so you could risk going below 265 for a digital print.
Again, for large format printing, signs, billboards, and so on, it’s completely different—speak to your print vendor.
Side Effects of Display Performance Mode Set to High Quality
When you have your display performance set to High Quality for all images, you can experience lag in InDesign, sometimes a serious lag. For a complex vector-heavy image (like a CAD drawing) set to High Quality all the time, you will almost certainly experience InDesign lagging, which can be frustrating! If this is the case, consider only using High Quality for rough layout purposes, then set it back to Typical when you are happy with the image positioning.
What Does Object Level Display Performance Do?
Another option for changing image display settings is Object Level Display Performance, which allows you to control the onscreen appearance of images on an individual basis. You can select an image and go to Object > Display Performance and choose Fast, Typical, or High Quality. For example, you may need a certain logo to always display at High Quality, but you might not care about the other images in the layout. So, you could go to Preferences, edit the Fast setting, and drag the Vector slider all the way to the right. Then in the layout, select the image, go to Object > Display Performance and choose Fast. Now just that logo will display in High Quality.
Summary
So, let’s review.
- InDesign will show images as high resolution by default. This is set in Preferences, using the following options (which you can edit to suit your needs):
- A) High Quality display performance mode
- C) Display Raster as high resolution images
- D) Display Vector as high resolution images
- E) Transparency at high quality.
- Displaying images in high quality does not mean they are actually high res! Check the image’s effective resolution to see for sure. And check with your printers/print vendor for recommended guidelines.
- If the Info panel does not show you the ppi, then check the image using preflight, or manually check images by opening them in Photoshop or Illustrator.
- Be aware of lag when using High Quality mode.
- You can set up and use Object Level Display Performance to control the onscreen appearance of individual graphics, separate from the rest of your other images.
This article was last modified on October 20, 2021
This article was first published on October 15, 2015
Commenting is easier and faster when you're logged in!

Recommended for you

CreativePro Video: How to Use Camera Raw in Photoshop
In the following CreativePro video, Michael Ninness shows us how to use Camera R...

Using the Links Panel to Locate the Original Raw Image
Have you ever worked on an InDesign document and needed to locate one of the ori...

InDesigning Your Desktop
Just for fun, try using InDesign to improve something that's been right in front...