
Exporting Graphics From InDesign
How to export graphics for websites, PowerPoint, or Word documents efficiently from InDesign.

This article appears in Issue 140 of InDesign Magazine.
I know what you’re wondering: Why in heaven’s name would you want to use InDesign to create graphics for websites, PowerPoint presentations, or Word documents? Isn’t that what Photoshop and Illustrator are for? Well, here are four common scenarios where InDesign might be the best tool for the job:
- You are more comfortable working in InDesign than Photoshop, or you wish to leverage InDesign’s Alternate Layout and Liquid Layout features to quickly create design variations.
- You’ve created a lengthy print document that contains many images that you’ve cropped in InDesign, and now your client needs each image exported as a JPG with the cropping retained.
- You’ve created custom icons, charts, or diagrams with InDesign’s Rectangle, Ellipse, Polygon, Line, Pen, and Type tools. Now you need to export each icon, chart, and diagram as a separate graphic for use in a PowerPoint presentation or on a web page.
- You’ve created a layout in InDesign, and you want to bring the layout into a program, such as Adobe After Effects, to add animation, or into Adobe Aero to create an augmented reality experience.
I’ll show you how to get the best PNG, JPG, SVG, animated GIF, and HTML output from InDesign. Some of the methods will work best for exporting individual InDesign-created graphics or placed images, while others are better suited for exporting an entire InDesign page, such as a banner ad.
Exporting PNG and JPG files
Here’s how to efficiently export to the most popular image formats on the web.
Use File > Export
When you choose File > Export and select PNG or JPG for the file format, InDesign presents you with a dialog box that contains various options (Figure 1). Most importantly, you can choose
to export the selection (whatever you currently have selected on the page), a single page, a range of pages, or the entire document. There are also controls for image quality, color space, transparency (PNG only), resolution, and other options.
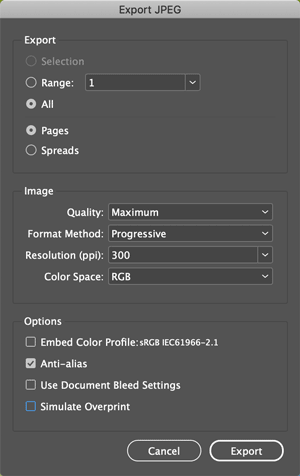
Figure 1. The Export JPEG dialog box allows you to choose what to export, image quality, resolution, and more.
How do you know what resolution you should use to export your graphics? For print output, you’re probably used to thinking in terms of dots per inch, like “I want a 5 × 7 inch image at 300 dpi.” But if you are going to use the graphic on the web, or in an app, or for some other onscreen use, you probably need to match a specific pixel dimension, not a pixel resolution. For example, you may need to generate a graphic to fit a 200 × 320 pixel slot in a WordPress site. In this case, all you care about is that the graphic is 200 px wide by 320 px high. The number of pixels in one inch doesn’t matter.
The trouble is that the Export PNG and Export JPG dialog boxes don’t allow you to specify a pixel dimension, only a pixel resolution. So what can you do? The best solution is to create your InDesign file at the correct pixel dimensions from the start. If you create a 200 × 320 px InDesign file and then export it at 72 ppi, the resulting file will be exactly 200 × 320 px (Figure 2).
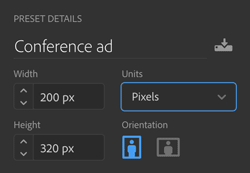
Figure 2. If you create a file with the exact dimensions that you need in either pixels or points, when you later export the file at 72 ppi, the resulting PNG or JPG file will match the dimensions exactly.
PNG vs. JPG
Most web graphics are saved as either PNG or JPG files. These file formats are very similar. They are both bitmap formats, meaning that they are made up of rows of colored pixels. The main differences are that JPG files always use “lossy” file compression, throwing some image data away, resulting in smaller file sizes at the cost of visual quality. PNG files, when saved in the PNG-24 format, use only “lossless” compression so visual quality is always maintained. PNG-8 can achieve smaller file sizes, but with a loss of quality as the format supports only 256 colors. The other main difference is that PNG files can contain transparent regions, while JPG cannot. Another common web format is GIF, which is similar to PNG-8, but also supports frame-based animation.
Tweak the File > Export command with a script
What if you’ve already created an InDesign file, perhaps for print use, and now you need to output the same file as a web graphic at a specific pixel dimension? Well, you could do the math to figure out the output resolution that results in the correct pixel dimension. (I wrote an article on CreativePro that explains how to do the math.)
Or, better yet, download the Export JPG or Export PNG with dimensions scripts available free on my web site here. These scripts use InDesign’s File > Export command, but they automatically calculate the correct resolution needed to output your file to the specified pixel dimensions (Figure 3).
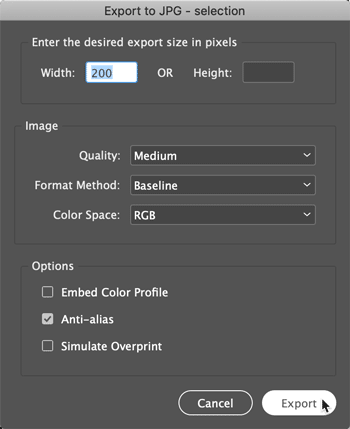
Figure 3. I’ve written two free scripts that allow you to output PNG or JPG files at the exact pixel dimensions you specify.
Batch export PNG or JPG files by exporting to HTML
When you have an InDesign file that contains many images that need to be output to PNG or JPG, sized and cropped just like they are in InDesign, use the following method, which allows you to output many images with a single command:
- Choose Window > Articles to display the Articles panel.
- Drag one of the images you wish to export to the Articles panel. Click OK when the New Article dialog box appears.
- Drag the rest of the images into the Articles panel to add them to Article 1 (Figure 4). You can drag one image at a time, or you can select multiple images and drag them together into the panel.
- Choose File > Export, and choose HTML for the Format setting.
- In the General area of the HTML Export Options dialog box, make sure that Same as Articles Panel is specified for Content Order (Figure 5).
- For the image options, fill in the Image area of the HTML Export Options dialog box as shown in Figure 6.
- None of the rest of the options are important, because you are only concerned about exporting the images, so click OK.
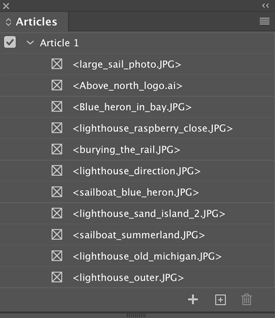
Figure 4. Drag the images you wish to export into the Articles panel, which then lists them organized by article.
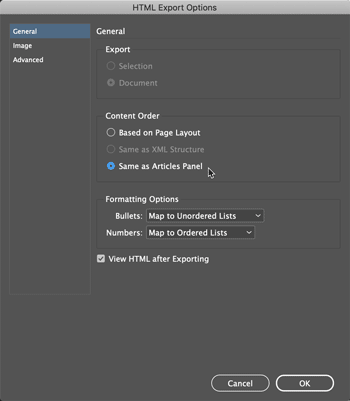
Figure 5. Choose Same as Articles Panel for the Content Order setting so that only the images you added to the Articles panel are exported.

Figure 6. Fill in the Image area of the HTML Export Options dialog box as shown at left to output to JPG or as shown at right to output to PNG. Specify the Resolution and Image Quality to suit your needs.
This will generate a folder structure similar to Figure 7. You can throw everything away except for the JPG or PNG images in the folder named image.
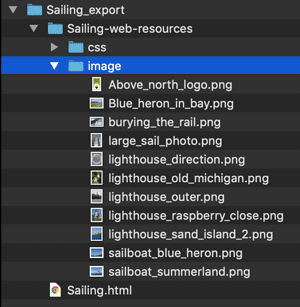
Figure 7. After the HTML export, you’ll find your JPG or PNG images in the image folder.
Convert layouts to PSD format for advanced exporting
If you want to prepare layouts in InDesign, but want to take full advantage of all the bitmap-exporting options that Photoshop offers, there’s a great script that combines these two powerful programs. The InDesign to Photoshop layers PRO script by Luis Corullón quickly exports your InDesign pages to a PSD file, preserving layers and layer names. You can specify the export resolution, color space, and crop and can even specify a page range to batch export multiple pages (Figure 8). The script isn’t free, but the cost is trivial if you need this functionality on anything approaching a regular basis.

Figure 8. With the InDesign to Photoshop layers PRO script, you can easily create layered PSD files from InDesign layouts.
There is also a free script which you can find here, but it is Mac-only and doesn’t offer the same options or speed.
Image Quality
What about image quality? Some people insist that you will get the best quality bitmap output by exporting your InDesign file to PDF, opening the PDF in Photoshop, and then using Photoshop to export to PNG or JPG. In my tests, and in my experience, there isn’t any data to support this theory. If your artwork contains small type or thin lines, you will notice a difference in output generated these two ways. But this isn’t due to Photoshop being inherently superior. Instead, it is a result of differences in antialiasing. Antialiasing refers to the computer fooling our eyes into seeing bitmap images as “smooth” by inserting tinted pixels around the edges of solid areas (Figure 9). When you export a PNG or JPG image from InDesign, you can turn antialiasing off if you wish (though the need for this would be rare), but there is no adjustment for how much antialiasing to use.
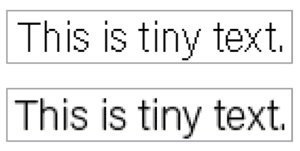
Figure 9. The term antialiasing refers to the algorithms used by InDesign and Photoshop to “smooth” bitmap images by inserting tinted pixels around the edges of objects. The top image was exported without antialiasing, while the bottom image was exported with antialiasing.
When you open a PDF in Photoshop, Photoshop is responsible for the antialiasing of vector objects as they are turned into bitmaps. Photoshop’s antialiasing algorithms aren’t necessarily “better” than InDesign’s, just different. Depending on your content, pixel dimensions, and colors used, you may prefer one over the other.
Antialiasing Controls in Photoshop
When you create text from scratch in Photoshop, you get to choose from several antialiasing formulas (Figure 10). This lets you tweak the antialiasing to your heart’s content. Unfortunately, we don’t have this kind of control in InDesign.
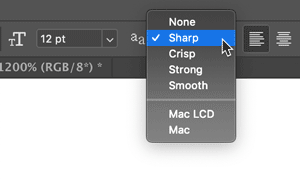
Figure 10. Photoshop offers several antialiasing options.
Keeping File Size Low
If you’re making images for PowerPoint or Word, the size of your files on disk probably doesn’t matter very much. But when making images for the web, it can matter a lot! When you export an image directly from InDesign, you can choose a quality setting of Low, Medium, High, or Maximum; Low results in the smallest file size, while Maximum quality produces the largest.
But what if you want finer control than just four settings? You can achieve the best balance of file size versus image quality by post-processing with an image compression tool. One easy option is to open the PNG or JPG image in Photoshop and then use File > Export > Export As (or Save for Web).
It’s also easy to find utilities that do this task (sometimes faster or better), such ImageOptim for macOS or Pingo for Windows. If you don’t want to install any software on your computer, try the TinyPNG or Compressor sites.
If you know you are going to run your exported images through one of these utilities, I recommend exporting from InDesign with Quality set to Maximum to preserve as much detail as possible, and then let the utility do all the file compression work. Particularly if you are preparing images for a high-traffic website, you’ll want to become familiar with one of these utilities so that you can quickly create the best-looking images at the smallest file size.
Exporting Vector Artwork to SVG Format
Unlike the bitmap file formats JPG and PNG, SVG is a vector file format that is supported by modern web browsers. If you have vector art in InDesign that you want to export for use on the web, SVG can be a good choice.
Support for SVG in InDesign is complicated. Versions through CS3 were able to export SVG, and then that capability disappeared in later versions. Now, starting with InDesign 2020 (a.k.a. version 15), you can import SVG files into InDesign and these imported files will be passed through as SVG during certain types of export. But, there isn’t a feature in InDesign to export a selection or page as an SVG file. So what can you do instead?
If you are using Windows, you could try SVG Kit, a plug-in from Scand Ltd. As of this writing, it supports only through InDesign 2019 (version 14), but a free trial version is available.
A more universal solution is to export your InDesign file as a PDF, then open the PDF in Illustrator and export it to SVG. Here are the steps for that:
- In InDesign, choose File > Export, select Adobe PDF (Print) for the format, and then [PDF/X-4:2008] for the Adobe PDF Preset.
- Open the PDF in Illustrator. Check for any changes or areas you may need to clean up.
- Choose File > Export > Export As, and select SVG for the format.
- Choose your SVG options (Figure 11).
- Open the resulting SVG file in your browser to view the results.
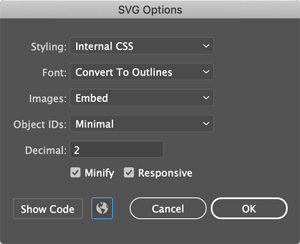
Figure 11. When you export an SVG file from Illustrator, the SVG Options dialog box offers a number of choices. The settings shown here are a good place to start. See this Adobe Help page for more information about these options.
If the ability to export directly to the SVG format is important for your workflow, make your voice heard at the InDesign UserVoice site.
What About Alt Text?
Alt text is a short explanation of an image that assistive technologies, such as screen readers, use to describe the image to users with visual impairments. You can assign alt text to images in InDesign by right-clicking an image and choosing Object Export Options. Unfortunately, this alt text doesn’t get embedded in the image when you export an image to PNG or JPG from InDesign (nor does any XMP metadata that may be included in the original JPG or PNG image). If you want to add alt text to images after you’ve exported them from InDesign, you can use Adobe Bridge. In Bridge, select an image and enter the desired alt text in the Metadata panel’s Description field. For a deep dive into Bridge, check out Alan Gilbertson’s article in Issue #139.
Creating HTML Banner Ads
Once you’ve mastered outputting static images from InDesign, the natural next step is to think about exporting animation. InDesign’s awesome Animation and Timing panels make creating a simple animation easy—meaning InDesign is perfect for creating banner ads (see Diane Burns’ article in Issue #98 for more on creating animated content with InDesign).
Unfortunately, there are only a few options for getting HTML out of InDesign that supports this animation. For example, Publish Online works, but it only outputs to Adobe’s servers. You can also export a Fixed Layout EPUB (FXL), but the animations are embedded in the document. I developed a script that can export HTML (along with animations and interactivity) from InDesign, but it’s very limited (you can check it out here).
The best way that I’ve found to turn InDesign-created animations into HTML banner ads is in5, a commercial InDesign plug-in from the third-party developer Ajar Productions. Here’s how it works.
First, download and install the in5 plug-in (a free trial version is available).
- Create a file in InDesign using the exact pixel dimensions you want for your final banner ad.
- Create your artwork, and use the Animation and Timing panels to make the artwork move.
- Choose in5 > Easy Export Wizard to export your in5 file to HTML. Choose Banner Ad for the output, and then Pixel Perfect for the rendition style (Figure 12).
- View the result in your browser.
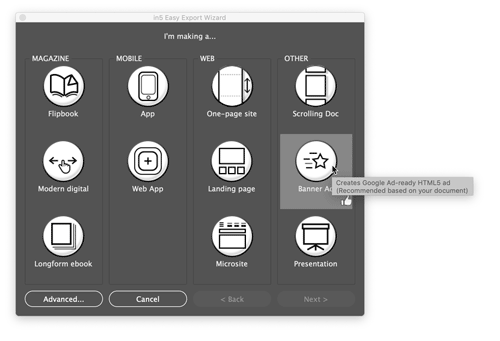
Figure 12. The in5 plug-in makes exporting an HTML banner ad from InDesign easy.
I wrote a more detailed review of in5 and its capabilities in Issue #106.
Creating Animated GIFs
In some situations HTML isn’t a good option for animation. If you are trying to include animation in a marketing email or social media campaign, for example, the venerable animated GIF file format is still the best option. Here are three methods for creating an animated GIF from InDesign artwork:
Method 1: Create static artwork in InDesign, and then bring that artwork into Photoshop (using the script mentioned earlier in this article). Then, use Photoshop’s Timeline panel to make the artwork move or change (often by hiding or showing individual layers on each frame). You can export as an animated GIF using Photoshop’s Save for Web feature.
Method 2: Create animated artwork in InDesign, and preview the output in the Interactivity Preview panel (Window > Interactive > EPUB Interactivity Preview). To make an animation, record the animation with a screen recording application such as Snagit, which can save directly to GIF format. Or, use your operating system’s ability to capture the screen to video, and then use Giphy.com or any number of conversion sites to convert the video to animated GIF.
Method 3: Use the in5 plug-in. Here are the basic steps:
- Download and install the in5 plug-in (see above). Then install the in5 Animated GIF Maker extension for Chrome.
- Create a file in InDesign with the exact pixel dimensions you want for your final animated GIF.
- Create your artwork, and use the Animation and Timing panels to make the artwork move.
- Choose in5 > Easy Export Wizard to export your in5 file to HTML.
- Open the resulting HTML file in Chrome, and use the in5 Animated GIF Maker extension to record the browser animation and save it as an animated GIF (Figure 13).

Figure 13. With the in5 Animated GIF Maker extension for Chrome, you can easily record HTML output and save it as an animated GIF.
See this YouTube video for complete step-by-step instructions.
Viewing Your Results
Of course, you can open an HTML file in your browser. But don’t forget that browsers also provide a handy way to view PNG, JPG, SVG, and animated GIFs. Just drag one of these files onto your browser icon in the macOS Dock or on your Windows desktop to open a new window displaying the image at its actual size.
Better yet, some browsers contain tools to help simulate what the image will look like on various device screens. In Chrome, for example, choose View > Developer > Developer Tools, and then click the button for Toggle Device Toolbar. Or, you can press Command+Shift+M (macOS) or Ctrl+Shift+M (Windows), and then choose the device you wish to simulate (Figure 14).
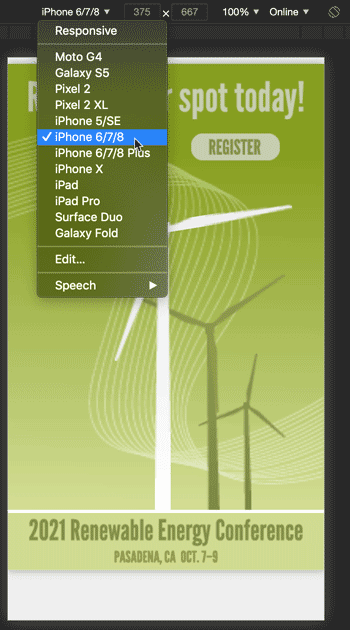
Figure 14. The Developer Tools in Chrome enable you to easily see how your exported JPG, PNG, SVG, GIF, or HTML file “fits” on various size screens.
Up and Coming Bitmap Image File Formats
For now, InDesign can export only JPG and PNG bitmap file formats. But these two venerable formats likely aren’t the last word. There are a handful of promising new file formats on the horizon, including WebP (developed by Google) and AV1/AVIF. You can read all the gory technical details about these formats at developers.google.com, at netflixtechblog, and in Steve Caplin’s article at CreativePro.
Picture This
The next time you need to crank out a series of animated GIF banner ads, convert the photos from a print project to JPG, or convert InDesign artwork to transparent PNGs, don’t just reach for Photoshop. Instead, give the methods in this article a try and see how powerful InDesign is for creating web graphics.
Commenting is easier and faster when you're logged in!

Recommended for you

HTML: The Secret Sauce for Layout, Animation, and Interactivity
As we publish more content across more screens and devices, HTML remains the mos...

InDesign Mag Issue 34: Color, Utko, Postcards, ACE, and more!
Here’s the thing: InDesign Magazine comes out once every two months. It...

Easy SOQ Compliance
Learn the process for crafting winning proposals that conform to strict requirem...