
Generative AI for Designers
An introduction to using currently available artificial intelligence options in your workflow

This article appears in Issue 21 of CreativePro Magazine.
We are just starting to discover the capabilities and impact of artificial intelligence (AI) technology on the world. Generative AI (GenAI) technology offers a vast array of possibilities for graphic designers, by allowing them to generate new images and extend or fill areas in existing images by using words and phrases to describe the content they want. Seamless textures, 3D models, and even versions of videos with new actors are also products of GenAI.
As time passes, AI’s image quality and potential continue to improve. In recent months, we have seen significant changes in the AI landscape due to updates and modifications to the various AI image-creation systems.
Two AI software projects—Stable Diffusion and DALL-E 2—got upgrades in the reliability of their image models, while Midjourney released version 5 of its image-creation model, which provides amazing, high-resolution photorealistic images from text. Adobe’s recently launched Firefly promises even more changes and even the potential of integration of AI into Photoshop.
In this article, we’ll explore this new frontier by touring through Stable Diffusion and DALL-E 2, with a couple of stops to check out some amazing aspects of Midjourney.
GenAI Vocabulary
Before getting to the specific sites, let’s run through some terms you’ll see as you begin using artificial intelligence to generate graphics.
- Text to image is a method of using AI to create images from text descriptions. Those descriptions are called prompts and are written not in code but in the language of daily life (natural language). The software interprets the meaning of these prompts and draws on its algorithms to create corresponding images. The flexibility and ease of this process makes it ideal for quick content creation.
- Image-to-image translation can use attributes from one image to modify or create
new images. The image-to-image technique is used for a variety of purposes, including colorizing black-and-white photos, applying the style of one image to the content of another (style transfer), and adding data to enhance resolution of raster images (super-resolution imaging). - Inpainting: Like Content-Aware Fill in Photoshop, inpainting fixes missing or damaged parts of an image with content based on the surrounding image and text input. It analyzes the surrounding pixels and generates new pixels to fill in the gaps. This technique can remove unwanted objects from images, restore damaged photographs, or even fill in so many missing parts that the result is an entirely new image.
- Outpainting: An extension of the inpainting technique, outpainting creates new content outside of the existing image boundaries. It can seamlessly create larger images based on limited input, as well as new content that matches the style of the original image.
The Major Players
Now that you know some of the basics, you’re probably wondering where you can start using GenAI image-creation systems.
One obvious place to start is Adobe’s recently introduced Firefly, which you can use to create great images with text prompts. (See Steve Caplin’s article in this issue for all the details on what you can do with Firefly, as well as its limitations.)
Other tools at your disposal include:
- Stable Diffusion is open-source software developed by Stability AI. With a subscription, you can access it through the company’s DreamStudio website. You can also install it locally through various sources for free or run it on a remote server that provides more GPU capability.
- DALL-E 2 is made by OpenAI, the same company that makes the AI-based ChatGPT, and its previous incarnation was one of the first well-known AI image generators. You can use DALL-E 2 directly through the OpenAI website or with Photoshop plug-ins. DALL-E’s system uses credits to generate images. You get 15 free credits per month, and you can purchase additional credits at the company’s website.
- Midjourney is an AI image-creation tool that is accessible through the Discord chat application. There you interact with the bot to make images via text or image prompts. Midjourney’s impressive v5 model excels in photorealistic and highly stylized images.
Some of these AI platforms offer limited free image generation for users to test them out. Developers can access the systems of Stable Diffusion and DALL-E 2 and incorporate their capabilities into other software and plug-ins, including Photoshop. However, Midjourney does not currently provide this option. Nevertheless, you can easily download the images created by Midjourney and use them in your creations.
Photoshop Plug-ins
Stability and flying dog software offer two excellent plug-ins that you can use today to generate images with Stable Diffusion and DALL-E 2 right in Photoshop. You will need to purchase credits with Stable Diffusion (Stability AI) and DALL-E 2 (OpenAI) to use either of these plug-ins, unless you already have a local installation of Stable Diffusion.
Concept.art
Concept.art is a plug-in by Christian Cantrell, former vice president of Stability AI, the company that makes Stable Diffusion. The plug-in is available at Adobe Exchange for free (Figure 1).
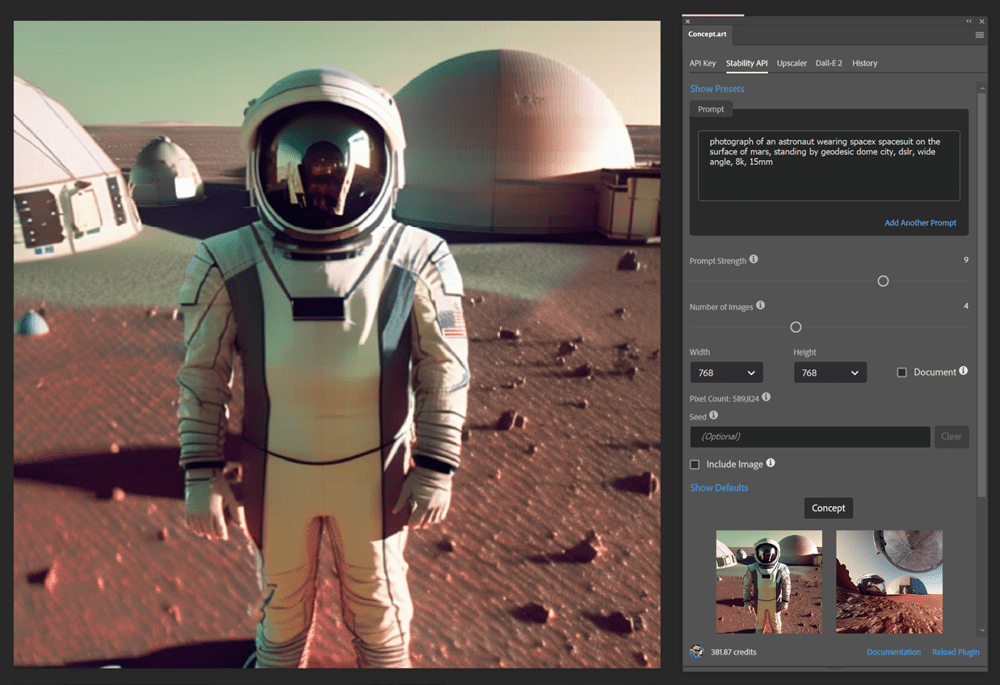
Figure 1. The Concept.art plug-in for Photoshop
flying dog Photoshop Plug-in
flying dog software is a German company that has created a plug-in with a unique AI Studio interface for generating and editing images. You can find the plug-in for $55 at Adobe Exchange (Figure 2). Although I will be focusing on the Concept.art plug-in in this article, I highly recommend you check out flying dog’s plug-in because of its uniquely useful interface.

Figure 2. The flying dog plug-in AI Studio interface
Getting Started
Follow this step-by-step guide for using the web versions of Stable Diffusion and DALL-E 2. After that, we’ll go over the process of installing the Photoshop plug-in and discover other options.
Basic image generation with Stable Diffusion from the website
Start by creating a Stable Diffusion account and testing out the web interface for generating images.
- Visit the Stability AI website, click the Sign Up button, and complete the process to create an account.
- Once you’re logged in, you’ll see the DreamStudio dashboard. In the Prompt field, type your prompt. For my example (Figure 3), I entered underwater scene of turtle swimming through coral surrounded by fish, high resolution, 8k, dslr.
- Once your images appear, choose one. You can generate additional variations of it, if you like (Figure 4).

Figure 3. The DreamStudio web interface with the Prompt field highlighted
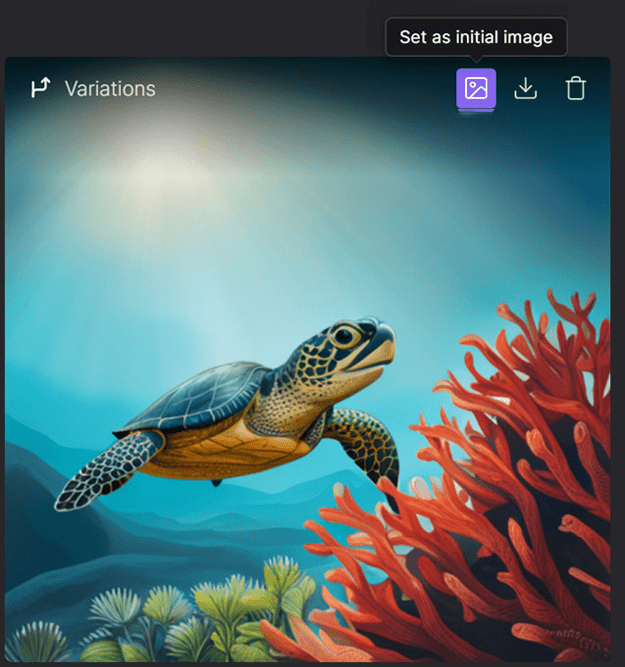
Figure 4. Selecting an image to use for image-to-image translation and editing
Basic image generation with DALL-E 2 from the website
Follow these steps to get started using DALL-E 2.
- Head to the DALL-E 2 website, click the Sign Up button, and complete the process of setting up an account.
- Once logged in, you will be taken to the DALL-E 2 dashboard. In the text input field, type a description of the image you want to generate—for example, a red chair with white cushions. Click Generate.
- Click the image you like, and then you can download it with the Download button, save it to your gallery, modify it with outpainting and inpainting, or create variations of the image.
Installing the Concept.art Photoshop Plug-in
Now let’s look at the process for installing and using the Concept.art plug-in for Stable Diffusion and DALL-E 2 within Photoshop.
Install the plug-in
- Make sure you’re logged into Creative Cloud, then go to Adobe Exchange and click the Free button (Figure 5) to install the plug-in.
- Open Photoshop, and then create a new document of 512 × 512 pixels (this is currently the default size for AI creations).
- Open the Concept.art plug-in from the Plugins menu.
- You will need API keys, which are codes that allow the plug-in to interface with the image-generation systems. You will see four tabs on the right. Click the API Key tab, and enter your API keys for DALL-E 2 and Stable Diffusion (instructions follow).
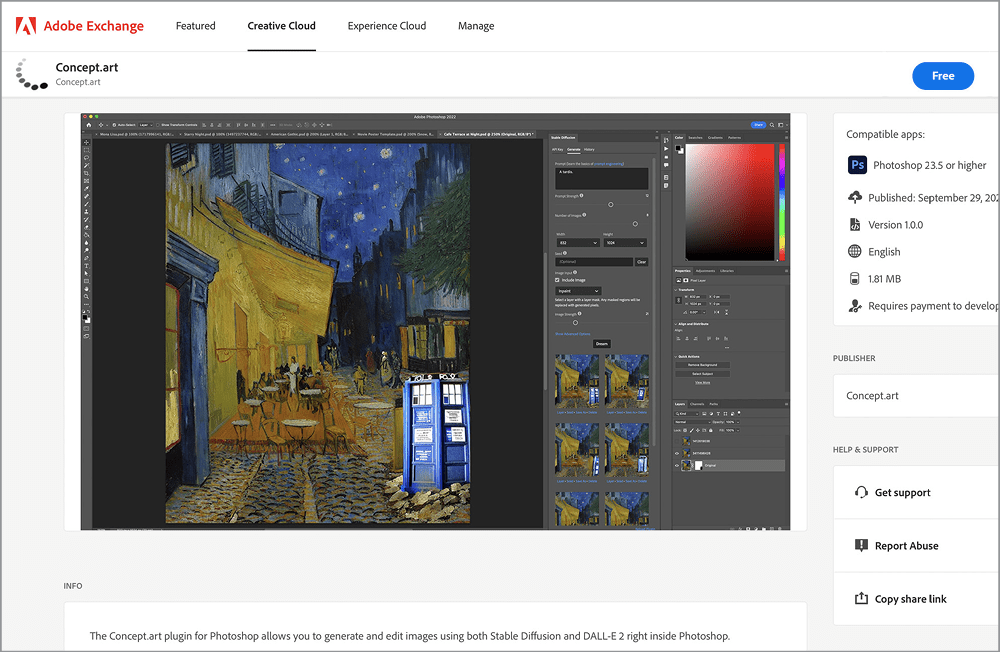
Figure 5. Install the Concept.art plug-in by clicking the Free button.
Once you have the plug-in installed and API keys entered, you can start to use the plug-in to generate images.
Get the Stability and DALL-E 2 API keys
To use the Stable Diffusion and DALL-E 2 with the Concept.art plug-in, you need to get API keys.
To get the Stability API key, go to beta.dreamstudio.ai/account, create an account, and follow the steps. Copy your new API key (Figure 6), and paste it into the DreamStudio settings of the plug-in (Figure 9) found on the API Key tab.
To get your DALL-E 2 API key, go to platform.openai.com/account/api-keys after you have an account with OpenAI. Click the Create New Secret Key button to generate a key (Figure 7), then click the green button to copy the key (Figure 8). Paste this key into the DALL-E 2 area of the plug-in’s API Key tab (Figure 9).
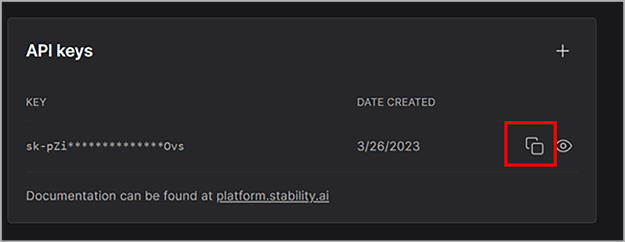
Figure 6. Copy the Stability API key.
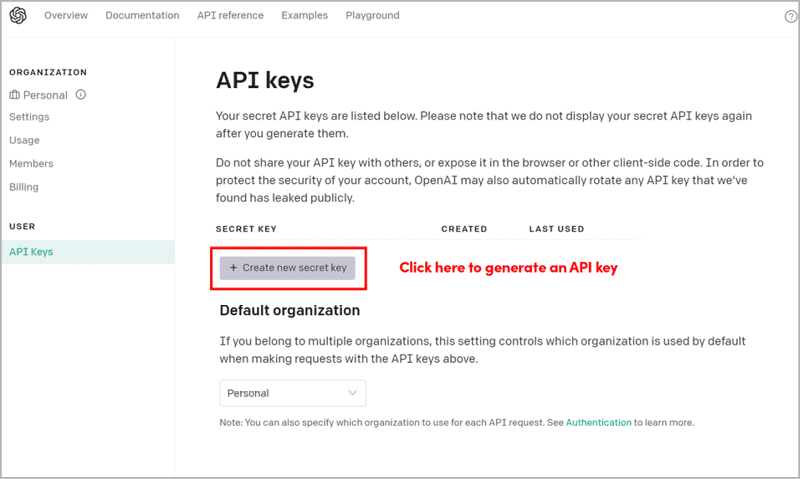
Figure 7. Get the DALL-E 2 API key.
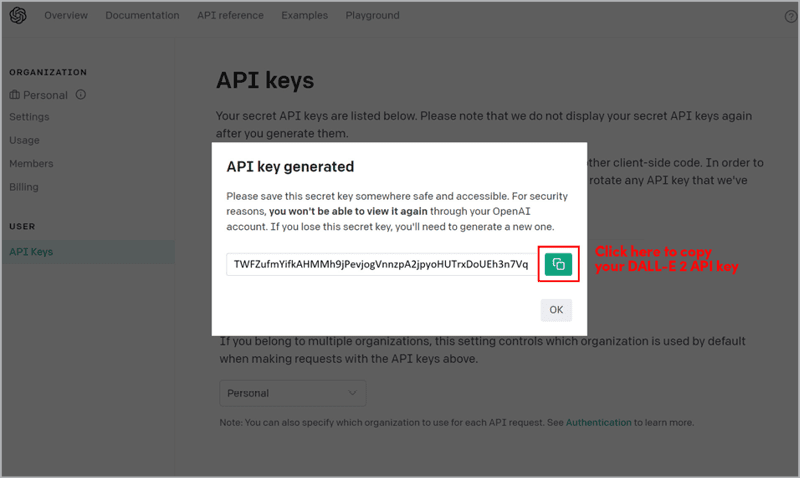
Figure 8. Copy the DALL-E 2 API key.

Figure 9. Paste the API keys into the API Key tab of the Concept.art plug-in.
Local install of Stable Diffusion?
If you have a local installation of Stable Diffusion, you can add the URL of the local instance (usually 127.0.01.7860). The process of managing a local installation of Stable Diffusion is beyond the scope of this article. However, if you want to learn more about it, there are several excellent tutorials available. See “Additional Resources” below.
Using Stable Diffusion
With your API keys entered, you’re ready to generate images. Text-to-image creation is the place to begin. Remember, every image you create uses up some of your credits, so understanding how to make the best text prompts from the start will help you save money. We’ll start small with images of 512 × 512 px to limit your credit usage and provide an overview of the options available.
Click the Stability API tab of the interface, and in the Prompt field, type a description of your desired image (Figure 10).
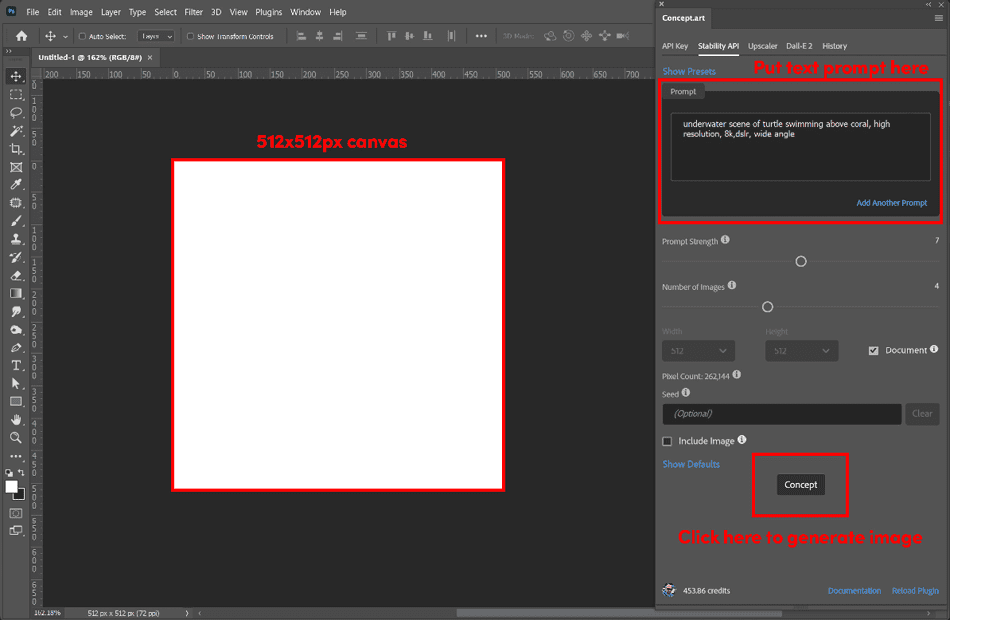
Figure 10. Preparing the canvas
Basic anatomy of a prompt
Each AI system uses slightly different prompt methods. Stable Diffusion prefers precise prompts broken into sections that use punctuation to emphasize aspects of the image. Use commas to separate concepts and parentheses to emphasize elements. If your image doesn’t have the look you’re after, changing your prompt a little can greatly change your results.
DALL-E 2 and Midjourney tend to better understand complete sentences and produce better results with more intricately formatted prompts.
In general, you want your prompts to contain the following:
Subject: Describe your primary subject: turtle, dog, man, woman.
Action: Describe what your subject is doing: swimming, running, kneeling, standing.
Adjective: Give details about the subject. Describe the color, length, and cut of your subject’s hair or clothing. This could be the color of an animal’s coat or flowers in a garden.
Location: Explain where your subject is: underwater, in the sky, in a library.
Lighting: Describe the lighting conditions the subject is experiencing: studio lighting, spot lit, cinematic lighting, backlit.
Mood: Explain the overall mood of the image.
Inspiration: Mention an artist or a camera format you wish to emulate. Your image could be by Picasso, Studio Ghibli, or Van Gogh.
Style: Describe the style of artwork or photography you want to emulate: photograph, HDR photo, anime, renaissance painting, or watercolor.
Quality: Specify the resolution you want to emulate. This does not mean your image will be that resolution, but it may grant the image more, or fewer, details. Examples include: 8 bit, 4k, high resolution, ultra resolution.
DLSR: One of many camera types you can use in a prompt. Other examples include Polaroid, pinhole camera, and disposable camera.
You’re not limited to these examples, and I’ll provide links to helpful prompt guides in the “Prompt Crafting” sidebar. These resources will provide you with best practices for generating prompts.
My prompt, for example, is underwater scene of turtle swimming above coral, high resolution, 8k, dslr. Note that Stable Diffusion would produce a markedly different image if I used painting instead of realism, painting of turtle swimming above coral.
Negative prompts
Most generative AI systems provide for negative prompts whereby you can eliminate concepts from your images. In the Concept.art plug-in, you can click Add Another Prompt and set the new prompt to a negative weighting. The “Prompt Crafting” sidebar has links to resources with more details on using negative weights.
Generate your concept
After you enter your prompt, click the Concept button to generate your first set of images. Click the Layer button to create a layer with one of your generated images (Figure 11). You can even add them all as layers to your image and mix and match as desired.

Figure 11. Initial image generation with Stable Diffusion
Image-to-image translation in Stability API
After you create an image, you can generate variations of the same image or subtly adjust it by changing the prompt.
- In the Prompt field, type the changes you want to see in your image. For example, I changed my prompt to watercolor painting of underwater scene of turtle and fish by coral, high resolution (Figure 12).
- Click the Include Image option to open the Image Options area.
- Choose Document Content (Image-to-Image) from the area’s menu.
- Click Concept, and Stable Diffusion makes new images based on your original. You can select one or more to create layers from it, just as before.
- Click Layer under any of the new images to use that image in place of your current one. You can use this technique to generate images like ones you already have, as well as to turn photos into paintings and vice versa.
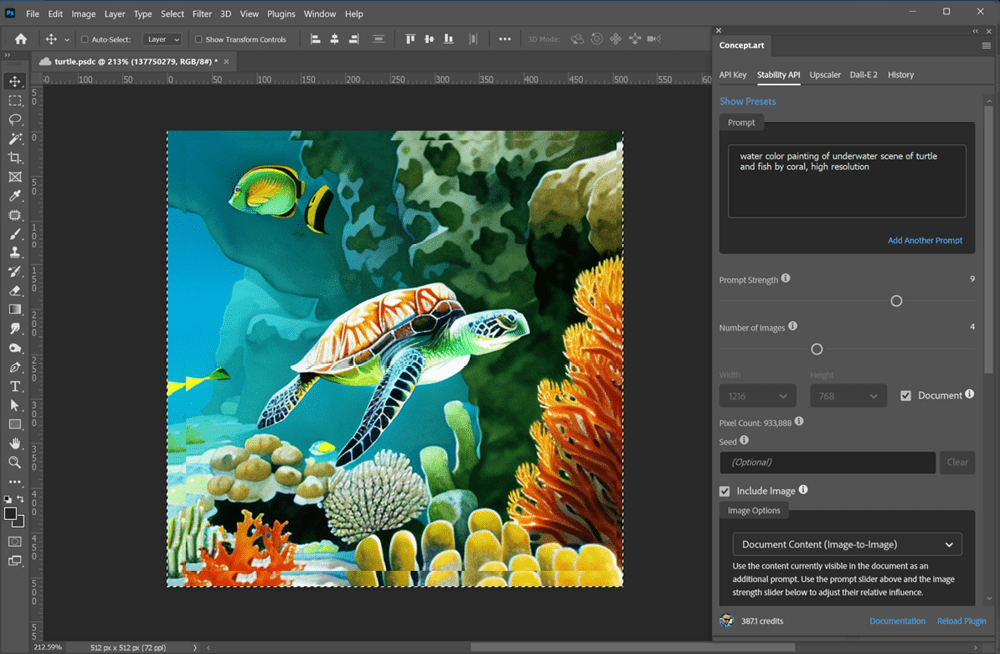
Figure 12. Photo turned into painting using Stable Diffusion’s Include Image option
Inpainting
You can also inpaint on your image to remove distracting elements or add other objects. For instance, let’s add a little fish to befriend our turtle in the photographic image.
- In the Image Options area of the Concept.art plug-in, choose Inpaint Selection from the menu.
- Choose the Rectangle Selection tool from the toolbar.
- Draw a selection around the object you want to remove or the area where you want to add an object.
- In the Prompt field, type what you want the object to be. (For example, I changed the prompt to angel fish swimming underwater, high resolution, 8k, dslr.)
- Click Concept to generate images.
- Click Layer under the image you want to use. I added a fish to the top left of the image (Figure 13).

Figure 13. The results of image-to-image creation plus inpainting with Stable Diffusion
Outpainting
You can also use this plug-in to expand your image with Stability API. Outpainting allows you to expand your canvas and fill it with images that you prompt for.
- Expand your canvas by choosing Image > Canvas Size. Set your canvas size to 768 × 768 px.
- In the Image Options area of the Concept.art plug-in, choose Outpaint Transparency from the menu.
- Set Width and Height to match your image dimensions (768 × 768 px) or click the Document checkbox.
- Make sure to modify your prompt if necessary. Because I didn’t want an additional turtle or fish in the image, I removed these from the prompt and used underwater scene of coral, high resolution, 8k, dslr (Figure 14).
- Click Concept, and wait for the images to appear.
- Select the image you want from the window by clicking Layer.
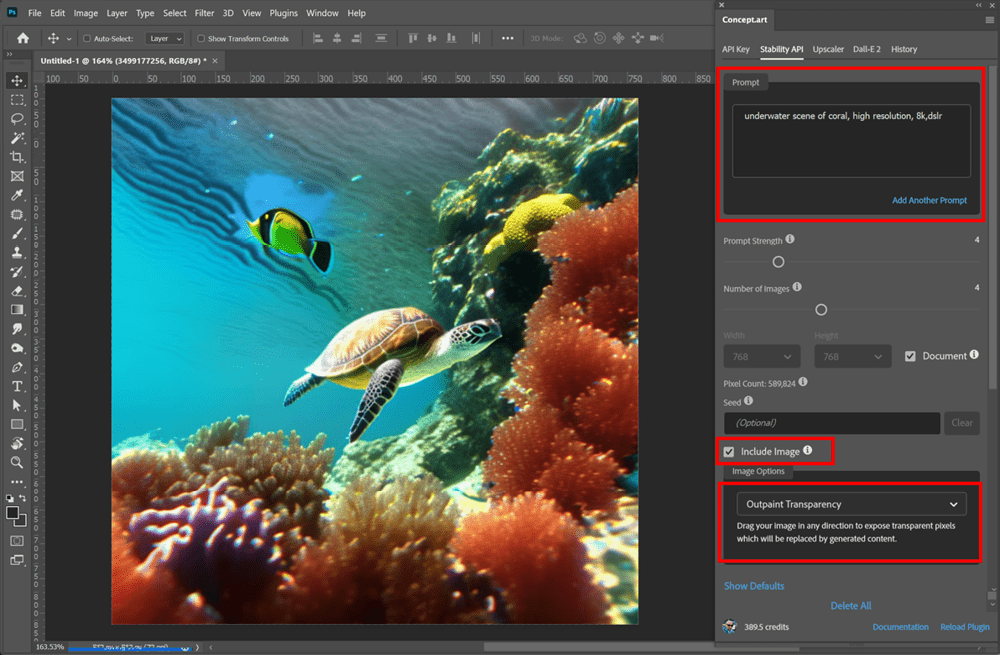
Figure 14. Outpainting requires you to change the prompt and choose Outpaint Transparency from the Image Options menu.
DALL-E 2
The DALL-E 2 tab of the plug-in interface provides most of the same functionality as the Stability API tab.
The Generations section of the DALL-E 2 tab is where you generate your initial images. As with Stability API, enter your text prompt here. Remember to be specific in your prompting, including details about the lighting, artistic method, and equipment.
- Start with a 512 × 512 px image. Type your prompt into the Prompt field.
- Select the number of images you want to make. (Remember, each image costs credits.)
- Set the Image Dimensions to your document size, (There are fewer options in DALL-E 2 generation.)
- Click Generate, and wait for your images to appear.
- Click Layer under the image you want to keep.
In my example I used the prompt night photograph, Asian taxi driver sitting in taxi smoking, neon lights reflected in car window, dslr, 8k. This gave me a range of highly detailed images to choose from (Figure 15).
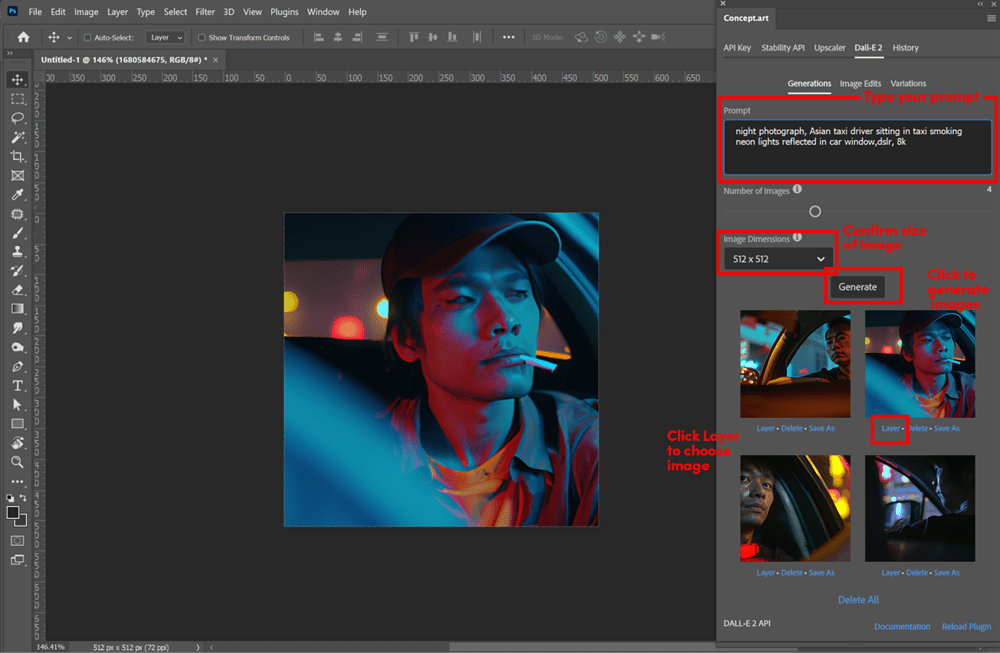
Figure 15. Generating an image with DALL-E 2 using the Concept.art plug-in
Inpainting with DALL-E 2
Click Image Edits to access the inpainting tools, with which you can mask or erase a portion of your image to replace it with something else. Any transparent areas will be replaced with the content generated from the prompt text. DALL-E 2 will attempt to duplicate the style of your image and add your prompt to it.
For example, I erased a section of my taxi driver’s face and replaced it with reflective sunglasses (Figure 16).
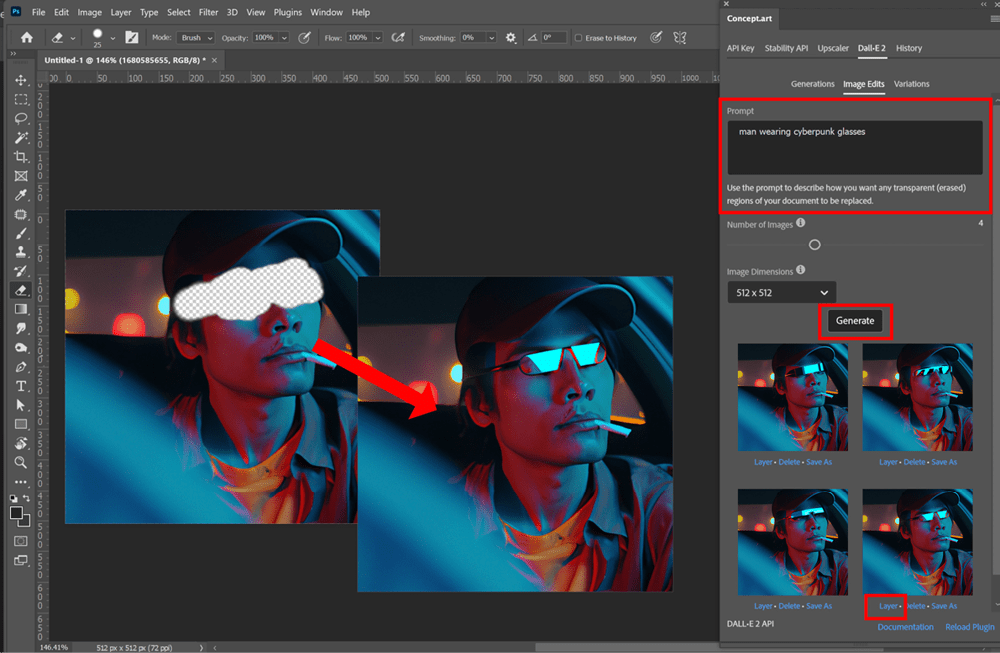
Figure 16. The DALL-E 2 Image Edits tools in the Concept.art plug-in
Give it a try:
- Rasterize the layer you want to edit by right-clicking the layer and selecting Rasterize from the context menu.
- Use the Eraser tool to remove a section of your image.
- Type the prompt into the Prompt field, and click Generate.
- Wait for DALL-E 2 to generate the images.
- Select the image you want by clicking Layer under the image.
Creating variations
The Variations section of the DALL-E 2 interface allows you to create new versions of an existing image (image to image) like Stability API. This is as easy as clicking the Variations tab, then the Generate button. DALL-E 2 will analyze the existing image and generate new versions (Figure 17).

Figure 17. Variations in DALL-E 2
Outpainting with DALL-E 2
You can also do outpainting in the DALL-E 2 tab of the plug-in by using the Image Edits section. DALL-E 2 excels at outpainting.
- Expand your canvas by selecting Image > Canvas Size. Set your canvas size to 1024 × 1024 px.
- In the Image Edits section of the DALL-E 2 tab, type your prompt to include what you want to see in the extended area of the image. For my example, I typed man in car wearing cyberpunk glasses.
- Set Image Dimensions to match your new canvas dimensions.
- Click Generate, and wait for the images to appear.
- Select the image you want from the window by clicking Layer (Figure 18).

Figure 18. Outpainting with DALL-E 2
Upscaling
The Concept.art plug-in also has a built-in AI upscaler that will increase the size of your image up to 8x, making a higher resolution image using artificial intelligence (Figure 19). Click the Upscaler tab, and be prepared to spend Stable Diffusion credits for the process.

Figure 19. Upscaling with Stable Diffusion
Putting It All Together
With these tools you’ll be able to extend your creativity and use these techniques in your own designs. As a creative director for a sleep products retailer, I’ve been generating lifestyle images of happy couples in modern, sun-dappled bedrooms to use in social media and other advertising. My workflow goes something like this (Figure 20):
- Start with a text-to-image prompt.
- Edit the image by erasing and fixing any issues with inpainting.
- Upscale as needed. This may introduce some artifacts, especially in faces; however, I use image-to-image translation to recreate the image at the new resolution. This might change features, but often it produces great results that I can use directly or mask in.
- Use outpainting to expand the image to the necessary dimensions and aspect ratio.

Figure 20. My usual workflow with Stable Diffusion and DALL-E 2
Which plug-in you use might vary with the task at hand, because Stable Diffusion and DALL-E 2 each has its own strengths. DALL-E 2 currently excels at outpainting, for example, while Stable Diffusion seems better at inpainting. As these systems evolve, you will have to experiment further for the best results.
Talking ’bout my Generation
This has been a very basic introduction to AI image generation in Photoshop. I don’t have room to explain the minutiae of details you can manipulate to better control your output. Image Weight, Seed, Sampling Method, and CFG Scale—all these settings are useful to learn how to create better images.
I highly recommend you consider installing Stable Diffusion. Once done, you can download genre-specific models from such sites as Civitai, which specializes in photorealism, Japanese animation, and fantasy art. You can also download extensions like OpenPose and ControlNet (Figure 21) that will give you fine control over the pose of your generated characters. Plus, you can train a model on your own images with DreamBooth to generate content that’s in your own style.
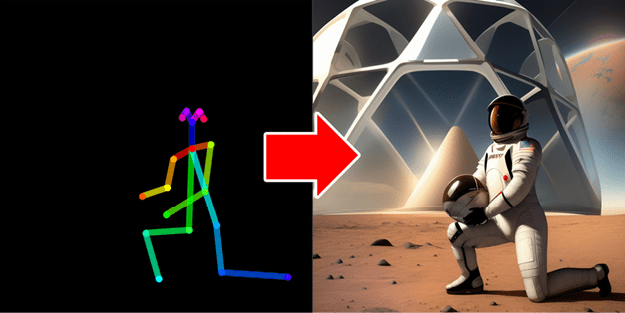
Figure 21. ControlNet and OpenPose extensions for local Stable Diffusion installation create perfect poses.
You can even connect a local Stable Diffusion instance to your Photoshop plug-ins and use those custom models and other options right inside Photoshop.
Currently, installing a local instance of Stable Diffusion can be a daunting process requiring knowledge of arcane command-line interfaces and the like, but it is getting easier every day. Check out the “Additional Resources” below for more information about installing your own copy of Stable Diffusion.
I hope I’ve provided you with a glimpse of the power of artificial intelligence and some idea how you can use it in your daily workflow. I highly recommend you dive in and play with the various image-generation systems and learn what works best for you!
Additional Resources
DALL-E 2 Prompt Book Dallery.gallery’s awesome guide on building the best prompts for DALL-E 2 is a little outdated but still very functional.
“How to Write an Awesome Stable Diffusion Prompt” Nick Lewis’ quick prompt guide is a good place to learn the basics of prompt building. I highly recommend it.
Stable Diffusion Prompt Book Openart.ai’s free book is a great resource for crafting prompts.
Levende Streg The creative agency Levende Streg is helmed by Maria Prohazka whose YouTube tutorials provide a wide range of tips on AI image creation and advanced techniques. YouTube: @LevendeStreg
Kristina Kashtanova Kristina is an artist and AI researcher who makes awesome tutorials on using AI. She recently published a comic book created with AI. YouTube: @KrisKashtanova
Scott Detweiler Scott was one of the first AI enthusiasts I followed. His tutorials and reviews will give you a good grounding in the various systems, as well as provide AI-infused compositing tips. YouTube: @sedetweiler
Civitai The Civitai website hosts Stable Diffusion models of various types. You can find models for nearly any kind of genre here. One note of warning, many are NSFW models, so proceed with caution.
Lexica.Art The Lexica website is a gallery of AI-generated images that include all the necessary prompts and settings to create similar images. Studying these will provide you with insight into better prompt creation and configurations.
Stable Diffusion installation A local installation of Stable Diffusion will provide you with the best results, and it’s free! Scott Detwiler and Matt Wolfe both offer helpful videos on getting a local instance running on your computer.
Commenting is easier and faster when you're logged in!

Recommended for you

How to Add a History Panel to InDesign with Scripts
Wish InDesign had a History panel? Try these scripts that allow you to access al...
Script of the Month: What the GREP?
This month’s script can help you understand and troubleshoot GREP expressions.

Typing Tab in a Table Cell
Need to type a tab inside a table cell? Here's the tip you were looking for!