

Adobe Photoshop has a lot of controls. Open up just a few of its panels and you’ll be confronted with a huge assortment of buttons, sliders, dials, and check boxes. Throw in the Tools panel, Options bar, and menu item after menu item and you’ve got an interface that can take years to unravel.
Most Photoshop instruction is geared toward explaining what each of these controls does, how it works, and, possibly, how and when you should use it. That’s all important, but if you limit your Photoshop training to when to push what button to get which effect, you’ll miss many opportunities to produce better digital photos. I’ll show you how understanding the abilities of your camera and Photoshop can give you images otherwise impossible.
From Start to Finish
Most people say they use Photoshop to correct their images. Photoshop certainly can handle such image problems as sensor dust, lens flares, and bad white balance, but the idea that any color adjustment is a correction betrays a lack of understanding of the role Photoshop should play in your shooting habits.
Master photographers of old, such as Ansel Adams, were masters not just because of their exceptional compositional skills, but also because of their almost inhuman grasp of the characteristics of their papers and chemicals. In addition to keeping maniacal records of everything from development times to the amount of agitation used when processing their film, they often mixed their own chemicals and made their own papers. They knew exactly how all of these variables affected the quality of their final prints, and this understanding often affected the exposure choices they made while shooting. Because they knew how far they could push and pull the tonal information they were capturing, these pros were able to shoot with specific tonal alterations in mind.
These photographers didn’t use their darkrooms to correct images — they used their darkrooms to finish images. They understood that shooting the photo was only the first stage of making a good image. When shooting, their goal was to gather a scene’s light with the goal of exploiting it using the available processing techniques in order to create the image they envisioned in their minds.
While we’re not all Ansel Adams, we digital photographers can benefit from a similar understanding of our processing techniques.
Photoshop lets you make astounding alterations to your images. It would take years to master the wet-darkroom equivalents of Photoshop’s varied special effects, compositing, and adjustment tools (and you won’t find a wet-darkroom equivalent for many of Photoshop’s capabilities). However, how much you can do with Photoshop’s tools depends a lot on the quality of your camera.
Not All Edits Are Created Equal
Though Photoshop lets you adjust the color and tone of your image, it’s possible to push these types of edits too far. Color alteration is a subjective process, of course. A color edit that looks great to you might look lousy to someone else. But there are some relatively objective boundaries you can use to judge when you might be pushing an edit too far.
When you use Photoshop’s color and tone controls — Levels, Curves, Hue/Saturation, and so on — you redistribute the pixel values in your image, squeezing and stretching the data in your picture to force bright tones down to darker values or dark tones into brighter values.
Unfortunately, there’s no way to massage image data in this way without causing it to degrade. Photoshop must discard color information when you make color or tone adjustments, and you can see just how much by looking at your image’s histogram (Figure 1).
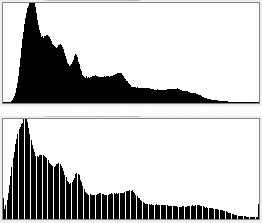
Figure 1: The sad fact of image editing is that it usually results in data loss, as shown by the gaps in the bottom histogram. Knowing how much data loss the images from your camera can withstand will make you a better shooter.
If you push an edit too far, the resulting data loss will manifest in your image as posterizing and banding. Bad posterization can show up in print, even when you’re working with high-resolution images. Therefore, posterization and banding become the best benchmarks for telling when you’ve pushed an edit beyond a reasonable point.
At what point posterization occurs varies depending on how much data there is in your image. This, in turn, is dependent on the quality and characteristics of your camera, as well as your choice of exposure. While you can control exposure to try to capture more data when you need it, there’s not much you can do about the quality of your camera.
However, you can develop an understanding of your camera’s range and how much latitude it provides for color and tone manipulation.
Know Thy Camera
There are many things that go into making a good photograph. Composition and subject matter are the most obvious, and many beginning photographers think that visualizing a photograph simply means imagining what the final composition will look like in print.
But good digital photography depends on much more than good composition. Because of the changes you can make in image editors, good digital photography depends on understanding that shooting the picture is only the first part of the process. Your camera is the instrument you use to gather visual data that you’ll manipulate later to achieve the image in your head. This image can be very different from the reality of your scene.
If you have a solid understanding of how far you can push and pull the image data your particular camera produces, you’ll have a much easier time recognizing potential images.
The picture in Figure 2 began as a simple composition exercise.

Figure 2: Though this was the scene I saw while looking through the viewfinder, I had a very different final image in mind.
As I was looking through the camera, I realized there was a lot of nice contrast in the lighthouse texture and the sky, and I could probably accentuate that contrast to make a substantially more dramatic image (Figure 3).
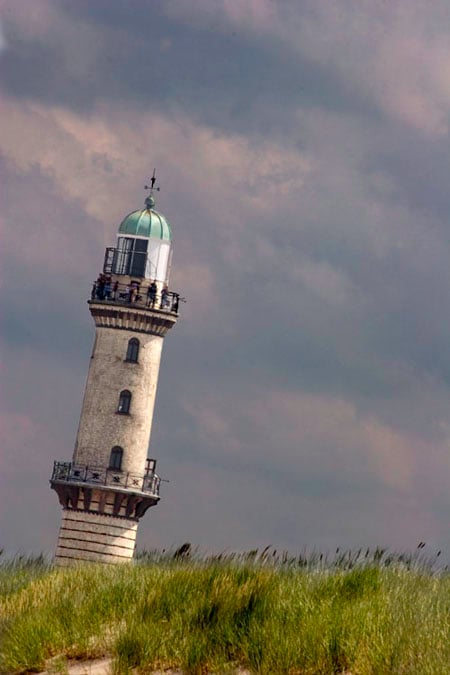
Figure 3: Using Photoshop, I finished my original photo to create the scene I had imagined.
While shooting, I chose an exposure that gave me a lot of range but that erred on the side of brighter highlights. Because I’ve worked a lot with this camera (the Canon EOS 20D), I knew how far I could push and pull color and tone before encountering posterization.
I also bracketed a lot during shooting. Since shooting digital is essentially free (once you’ve paid for the camera and storage… and lenses… and the cool camera bag… and tripod… and accessories… okay, okay, digital photography is expensive if you’re a nerd like me, but my point is still sound), there’s no reason not to bracket like crazy. With a couple of bursts of bracketed shots, you’re likely to have at least one image with a broad tonal range, targeted to the area that best serves your needs.
Figures 4 and 5 are another before and after example. I spotted a rooftop scene that wasn’t much to look at, but I was struck by the light/shadow difference and the texture on the building.

Figure 4: The original scene was no prizewinner, but I knew it had potential. For a full-size view, click on the image.
In person, the scene had more contrast because the human eye has a much broader contrast range than does any digital or film camera. I imagined a final image with stark contrast and high texture that emphasized the difference between the dark shadow areas and the brightly lit areas. The final image would be starkly graphic and very warm.
To achieve these ends, I knew I needed as broad a contrast range as possible, so I shot a series of bracketed photos and consulted their histograms to make sure that I was, in fact, getting a wide tonal range.
The composition needed a little digital help, too. The boundary between the flat wall and the room on the back of the house bisected the center of the frame. I could tell there was a lot more wall, but because another building was in the way, I couldn’t find a vantage point that let me capture the whole thing. I wanted the majority of the shot to be the blank wall, to balance the shadow areas on the left side of the image. Faced with a physical impossibility, I decided I’d simply expand the wall later using Photoshop.

Figure 5: After completing digital manipulation in Photoshop, the final image was close to what I saw in my mind’s eye. For a full-size view, click on the image.
Don’t Just Push Buttons
Creating these interesting photographs was possible only because I know the capabilities of my camera and image editor. That’s why it’s so important that, when you’re learning a program like Photoshop, you go beyond memorizing what buttons to push to achieve a particular type of edit. Pay attention to how far you’re able to manipulate the color from the camera (or cameras) you use.
Learning how to manipulate an image will certainly make you a better Photoshop user. Learning how much your images can be manipulated in Photoshop will make you a better shooter.
This article was last modified on August 14, 2023
This article was first published on August 15, 2005
Commenting is easier and faster when you're logged in!

Recommended for you

Heavy Metal Madness: The Art of Labor Day, or is it Leisure Day?
I enjoy a three-day weekend as much as anybody, but Labor Day has always struck...
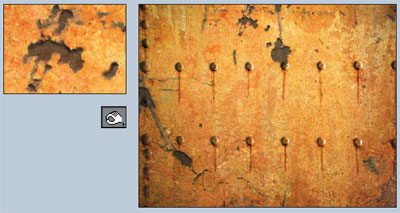
Photoshop How-To: Aging Metal Textures
If, like me, you like the patina of aged, rusty metal, then this Photoshop trick...

Integrating 3D Text into Images with Photoshop
This is a technique you’ll have seen in countless films and TV shows, from...